Pages

Tuesday, February 28, 2017

Live Video Chat With Sara - "Cakes, Rolls and Pops" And How To Make Your Own | Posh Pooch Designs

It's Mardi Gras!
Fat Tuesday!

I have had this Question asked me several times lately, 
so I decided to do a little investigating.
"What is the difference between The Caron Cakes Yarn, 
The Sweet Roll Yarn, and the Bernat Pops Yarn, and
 the New Mandala yarn cakes?"


See The Live Video on my Youtube Channel 
at This LINK


Let's take a Quick Look:

1. Caron Cakes Yarn
Made by: Caron / Yarnspirations
Thickness: Medium 4
Weight: 7.1 oz. / 383 yards
Fiber Content: 80% Acrylic/ 20% Wool
Suggested Crochet Hook: H

2. Sweet Rolls Yarn 
Made By: Premier Yarns
Thickness: Medium 4
Weight: 5 oz. / 245 yards
Fiber Content: 100% Acrylic
Suggested Crochet Hook: I

3. Bernat Pop Yarn
Made By: Yarnspirations
Thickness: Medium 4
Weight: 5 oz /280 yards
Fiber Content: 100% Acrylic
Suggested Crochet Hook: H

4. Mandala Yarn Cake
Made By: Lion Brand Yarns
Thickness: Light 3
Weight: 5.3 oz. / 590 Yards
Fiber Content: 100% Acrylic
Suggested Crochet Hook: H

How to make my own "Yarn Cakes".
I have been making these cakes for many
 years using my left over yarns. 
It's a great way to mix and match your yarns 
and come up with new color combinations.

See a Video Demonstration on my Youtube Channel at This LINK
Choose 3 or four colors of yarn, and 
separate them into .50 oz. balls.
If you have a yarn winder begin winding the first color.
 When you are almost to end of the first color,
join the new color by using the Russian join, 
and continue winding.
Repeat this until you have made your cakes.
My Yarn winder only makes small cakes, 
so mine are more the size of the Sweet rolls.

If you do not own a Yarn Winder, 

you can do the same thing, only wind it into
 toilet Paper Rolls.


What's New This week at 
Last week I wrote a pattern for the Murphy's Dog Rug. I got so many requests for a Video.
So I made one. You can see it at this LINK

Shamrock Dog Collar
Free Crochet Pattern and Video LINK

Scissor Bag/Case
Free Crochet Pattern and Video LINK

Fluer De Lis Pin 
Free Crochet Pattern and Video LINK
Have  Lovely Week!

Tuesday, February 21, 2017

Murphy's Pizza Dog Rug Crochet Pattern | Posh Pooch Designs

Murphy's Pizza Dog Rug
Crochet Pattern By
 Sara Sach of
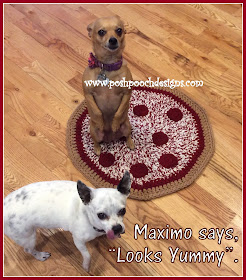
A Friend of mine found a small dog, who was hanging out
 in front of the Murphy's Pizza here in town. They took him to the Veterinary, After no chip or owner was found, they decided to keep him and call him Murphy. He is a Jack Russel/ Chihuahua Mix and Adorable.
Because he was found in front of Murphy's Pizza, 

she asked me to make him a Pizza rug or mat to lay on.
And This is what I came up with.
The Rug is Stitched using 3 strands of yarn held together.

This makes a sturdy but soft rug.
 I used Red Heart Super Saver Worsted weight (4) yarn,
 so it would hold up in the wash. 

See The Video on my Youtube Channel
 at This LINK 


Murphy's Pizza Dog Rug Mat - Pizza Blanket
 Crochet Pattern
 By Sara Sach
Please add this pattern to Your Ravelry Favorites

Skill: Easy

Materials:
Crochet Hook – N/ 9.00MM – For Rug
                           H/ 5.00MM – For Pepperoni
Yarn: Worsted Weight (4) I used Red heart Super Saver
                                         Red – 14 oz.C1,
                                         Cream 14 oz.–C2, 
                                         Beige – 14 oz. -C3
Yarn Needle - Large Eyed

Stitches:
Chain (ch)
Slip Stitch (slst)
Double Crochet (dc)
Change (chg)

Size: 24 X 24 inches
If you want the Pizza bigger, you can continue to increase
 till the Pizza is a s big as you would like.

Pattern Notes:
Rug Pattern is Stitched holding 3 strands of yarn together.
Pepperoni is stitched with 1 Strand of yarn
Ch3 counts as a Double Crochet
Rounds are joined with a Slip Stitch

Pizza Rug:
R: 1 – With 1 Strand of C1, and 2 strands of C2, holding all 3 strands of yarn together,
Using Crochet Hook N -

Ch 4, 9 dc in the 2nd ch from the hook, join with a sl st to the 1st dc to form a circle.
Ch 3. (10dc)

R: 2 - 1 dc in same st as ch3, 2 dc in each dc around. join, ch3(20 dc)

R: 3 - 1 dc in same st as ch3, 1 dc in the next st, *2 dc in the next st, 1 dc in the next st*,
Repeat from *to* around, join, ch3 (30 dc)

R: 4 - 1 dc in same st as ch3, 1 dc in the next 2 sts, *2 dc in the next st, 1 dc in the next 2sts*,
 Repeat from *to* around, join, ch3 (40 dc)

R: 5 - 1 dc in same st as ch3, 1 dc in the next 3 sts, *2 dc in the next st, 1 dc in the next 3 sts*, 
Repeat from *to* around, join, ch3 (50 dc)

R: 6 - 1 dc in same st as ch3, 1 dc in the next 4 sts, *2 dc in the next st, 1 dc in the next 4 sts*,
 Repeat from *to* around, join, ch3. (60 dc)

R: 7 - 1 dc in same st as ch3, 1 dc in the next 5 sts, *2 dc in the next st, 1 dc in the next 5 sts*, 
Repeat from *to* around, join, ch3 (70dc)

R: 8 - 1 dc in same st as ch3, 1 dc in the next 6 sts, *2 dc in the next st, 1 dc in the next 6 sts, 
Repeat from *to* around, join, ch3 (80dc)

R: 9 – 1 dc in same st as ch3, 1 dc in the next 7 sts,
*2 dc in the next st, 1 dc in the next 7 sts, Repeat from *to* around, join, ch3 (90 dc)

R: 10 –1 dc in same st as ch3, 1 dc in the next 8 sts,
* 2 dc in the next st, 1 sc in the next 8 sts, Repeat from * to*around, join, ch3 (100 dc)

R: 11 – Chg to 3 Strands of C1, 1 dc in same st as ch3, 1 dc in the next 9 sts,
* 2 dc in the next st, 1 sc in the next 9 sts, Repeat from *to* around, join,
tie off weave in your ends. (110 dc)

R: 12 – Chg to 3 strands of C3, 1 dc in same st as ch3, 1 dc in the next 10 sts,
* 2 dc in the next st, 1 sc in the next 9 sts, Repeat from *to* around, join, ch1
 (129 dc)

R : 13 - *1 sc in the 1st 11sc, 2 sc in the next st* Repeat from * to * around, join,
tie off and weave in all your ends. (120 sc)

Pepperoni: Make 8 or as many as you want!

R: 1 – With 1 strand of C1, and H Hook

Ch 4, 9 dc in the 2nd ch from the hook, join with a sl st to the 1st sc to form a circle.
Ch 3. (10dc)

R: 2 - 1 dc in same st as ch3, 2 sc in each sc around. join, tie off. (20 dc)

Sew them onto the rug in a random pattern.
I hope Murphy's Mommy sends me a pic of him
 on his Pizza rug.

An Ad Free Instant Download PDF file is Available in
 my Ravelry shop-
includes both the Pizza Pillow and Blanket pattern -
For $2.50 at This LINK

Live Video Chat With Sara - Let's Talk About Fringe | Posh Pooch Designs

Live Video Chat with Sara Sach of
Let's Talk About Fringe
So What is Fringe?
I found 2 Definitions:

1.  The front part of a person's hair, cut so as to hang 
over the forehead; bangs.

2. An ornamental Border of threads left loose or
 formed into tassels or twists, used to edge clothing
 or material.
See The Live Video Chat on my 
Youtube Channel at this LINK


See a Demo of how to add Fringe to 
Your next project at this LINK


Whats New This Week at
Posh Pooch Designs

Coming Soon!
 Murphy's Pizza Dog Rug
Free Crochet Pattern LINK

4 Leaf Clover Free Crochet Pattern
 and Video  LINK

Whispering Pines Scarf
Free Crochet Pattern and Video LINK

Leprechaun Hat 
Free Crochet Pattern and Video LINK


Saturday, February 18, 2017

Whispering Pines Scarf Crochet Pattern | Posh Pooch Designs


Whispering Pines Scarf 

Crochet Pattern
 By Sara Sach of Posh Pooch Designs


I purchased 2 rolls of the yarn, Sweet Roll Wasabi Pop,
 and took it with me when we went on a 4 Wheel drive,
 up into the Rocky Mountains. 

The Yarn reminded me of all the different colors
 of the pine trees. The Pinion Pines, 
the Blue Spruce Pines and the Ponderosa Pines
 and many others.

I designed This scarf with the pines of 
The Rocky Mountains as my inspiration.
I Love how beautiful it turned out.
And although it looks complicated, it is really quite simple.
I named it The Whispering Pines Scarf because I love 
the sound  the Pines make, when there is a slight breeze "whispering" thorough the branches.

See The video on the Youtube Crochet
Channel at this LINK


Whispering Pines Scarf Crochet Pattern 
By Sara Sach
Please, add this Pattern to Your Ravelry Favorites

Skill: Easy

Materials:
Crochet Hook – I / 5.50 MM
Yarn – Worsted Weight yarn (4) 7 oz.
            I used Sweet Cream – Wasabi Pop
Yarn Needle – weaving in ends

Stitches:
Chain (ch)
Double Crochet (dc)
Skip (sk)
Space (sp)

Size: 7 inches wide X 62 inches long

Notes:
Ch3 counts as a dc.

R: 1 – Ch 25, dc in the 4th ch from the hook
1 dc in each ch across, turn (23dc)


R: 2 – ch3, 1 dc in the next dc, ch1, sk 1 dc,
 1 dc in the next 8 dc, ch1, sk1,
1 dc in the next 8 dc, ch1, sk1, 1 dc in the last 2 dc, turn.
(2dc, ch1, 8dc, ch1, 8dc, ch1, 2dc = 23 sts)


R: 3 – ch3, 1 dc in the next dc, ch2, sk 2,
 1 dc in the next 6 dc, ch3, sk3,
1 dc in the next 6 dc, ch2, sk2, 1 dc in the last 2 dc, turn.
(2dc, ch2, 6dc, ch3, 6dc, ch2, 2dc = 23 sts)


R: 4 - ch3, 1 dc in the next dc, ch3, sk 3,
 1 dc in the next 4 dc, ch5, sk5,
1 dc in the next 4 dc, ch3, sk3, 1 dc in the last 2 dc, turn.
(2dc, ch3, 4dc, ch5, 4dc, ch3, 2dc = 23 sts)


R: 5 - ch3, 1 dc in the next dc, ch4, sk 4,
 1 dc in the next 2 dc, ch7, sk7,
1 dc in the next 2 dc, ch4, sk4, 1 dc in the last 2 dc, turn.
(2dc, ch4, 2dc, ch7, 2dc, ch4, 2dc = 23 sts)


R: 6 – 1 dc in each dc and in each ch cross, turn. (23dc)


Repeat R: 2 – R : 6 – 20 times

Ch3, turn, 1 dc in each dc, across, tie off weave in your ends.

I can almost smell the 
Rocky Mountain Pine trees from here!


An Ad Free Instant Download PDF file
 is Available in my RAVELRY shop
 For $4.50 At This LINK

Thursday, February 16, 2017

4 Leaf Clover Applique Crochet Pattern | Posh Pooch Designs

Is it a Shamrock or A Clover?
"The shamrock is a three-leaved clover
the plant was used by Saint Patrick
 to illustrate the doctrine of the Trinity. 
It has subsequently become a national 
symbol of Ireland. The word comes from seamróg,
 the Irish name for the plant."


See The Video on my Youtube Channel at This LINK

4 Leaf Clover Applique Crochet Pattern By Sara Sach
Please add this pattern to Your Ravelry Favorites


Skill: Super Easy

Materials:
Crochet Hook - H
Yarn - Worsted Weight (4) any green you like
Yarn Needle

Stitches:
Chain (ch)
Single Crochet (sc)
Double Crochet (dc)
Slip Stitch (sl st)

Size: Approx. 2 x 2 inches

 Applique
R : 1 - Ch3, 8 sc in the 2nd ch from the hook,(6 sc for a 3 leaf clover)
 join with a sl st in a circle, ch1


R : 2 -  *1 sl st in the next st, 3 dc in the next st, ch1, sl st in the same st
* repeat 3 more times, for 4 leaves, (OR 2 times for  3 leaves).

Stem - ch 6, then turn, sl st in the 2nd ch from the hook, and sl st at back up the ch, 
 Join with a sl st. tie off. 
This is fun applique that can added to just about anything. 
A hat, bag, headband, bandanna, sweater, gloves. 
coffee cozy, blanket, dog hat, dog sweater, purse....
the possibilities are endless!

Enjoy!

Tuesday, February 14, 2017

Live Video Chat - How to Make Tassels | Posh Pooch Designs

In Today's Live Video Chat With Sara of
we are going to discuss Tassels.
First of all how do you pronounce it?
 Do you say ta-ssel or taw-ssel?
I suppose it depends on where you are from?

The first thing we need to establish is,
 what is and what isn't a Tassel.
Pom poms are shaped like Yarn balls, 
Fringe is similar put on in a row to form
 a sort of edge or "curtain".
A Tassel is an individual 
Fringe with more 'strings", and usually hang separated.

You can  see the Live Video Chat
at this LINK
For me,  the easiest way to make tassels
 is with a piece of card board.
Cut your card board into a rectangle,
 the length you want your tassel to be.

Wrap your yarn around the board gently and evenly, 
until the tassel is as thick as you would like it.
I usually wrap my yarn about 25 times.

Cut 2, 12 inch pieces of matching yarn.
Slide 1 piece of yarn  through the loops to the top,
 and tie a knot.

Slide the tassel off the board

Tie around the center of the tassel with the 2nd piece of yarn.
Slide it up some, about an inch from the top, and tie securely.

Cut the bottom of the tassel, and trim evenly.

See The Video on my Youtube Channel 
at This LINK


Whats new This Week at 
Posh Pooch Designs

Whispering Pines Scarf 
A Brand New  Design made using the
 Sweet  Roll Yarn - Wasabi Pop
Free Crochet Pattern, and Video LINK

How to make Polymer Clay Dog tags
 and Charms for you  LINK

Fringed Cowl Free Crochet Pattern
 And Video  LINK

Cupcake Birthday Hat Free Crochet
 Pattern and Video  LINK

Enjoy and Crochet on!

Monday, February 13, 2017

How I Make Easy Polymer Clay Dog Tags | Posh Pooch Designs

How I Make Easy Polymer Clay Tags for your Pets and Charms for You!
This is one of my favorite things
 to make with Polymer Clay.
 It is fun, easy and has a million uses.
Add them to backpacks, luggage, bags and purses.
Add them to necklaces, bracelets,
leashes and collars.
Put them on Everything!

Here is what you need:
Parchment Paper
Polymer Clay
 A Straw
Metal Rings and Clips of choice
 A Few Small Cookie Cutters
Clear Nail Polish - 
(I prefer Sally Hansen's Hard as Nails)
Rolling pin - 
(a glass or jar will work)


See The Video on my Youtube Channel
 at This LINK

Here is what you do:
1. Preheat your over to 275 degrees.

2. Line your baking pan with parchment paper.
Also cover your work surface with the Parchment paper.

3. Knead your Clay of Choice and Roll it our to about
 1/12th of an inch. 

4. Cut your shapes using the small Cookie cutters.

Use the Straw to make a nice round hole in the top for the ring.
Bake your pieces at 257 for 15 minutes.
Let them rest or cure for about 24 hours.

5. With the Sharpie, you can write or draw on the shapes.
Let dry.

6. Gloss with the Nail polish and let dry.

7. Pop on your Rings and clips of choice.
And Add them to everything!
See now wasn't that easy!
And So, So, So fun!