Pages

Friday, February 28, 2020

Loop Handle Bag Crochet Pattern | Posh Pooch Designs


Loop Handle Bag Crochet Pattern 
By Sara Sach of| Posh Pooch Designs


The Loop Handle Bag is a fun bag to make, and
for taking to the market.
It fits more than it looks like, but is is also a great size 
when just picking up a few things.
You are really going to enjoy making and using this bag.


It is designed using Caron Cotton Blend Yarn By Lion Brand.
This yarn is perfect for this bag as it is 50% cotton
 and 50% Acrylic.
The Label put it at a light (3), I but feel like it is
 closer to Med (4).
But any cotton will work.

See The Video On my Youtube Crochet Channel At This LINK


Loop Handle Bag Crochet Pattern
Please Add This Crochet Pattern to Your Ravelry Favorites

Skill: Easy

Materials:
Crochet hook – H / 5.00 MM
Yarn- Med (4) Cotton or Cotton Blend – 3.5 0z.
Yarn Needle

Stitches:
 Chain (ch)
Slip Stitch (slst)
Single crochet (sc)
Double crochet (dc)
Space (sp)
Skip (sk)

Size: 12 X 10 inches

Notes:
Ch1 does not count as a sc.
Ch 3 Counts as a dc
Ch 8 Counts as a dc, ch5
Rounds are joined to the ch3 with a slst

Pattern:
R: 1- Ch 31, 1 sc in the 2nd ch from the hook, 1 sc in each ch across,

Turn Working down the opposite side of the ch,
1 sc in each ch, join to 1st sc, ch 3
(30 + 30 = 60 sc)

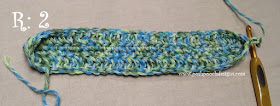
R: 2 – 1 dc in each sc, join, ch 3 (60 dc)

R: 3 – 1 dc in each sc, join, ch 8 (60 dc)

R: 4 – Sk the next 4 dc, dc in the next dc, ch 5
*sk the next 4 dc, dc in the next dc, ch 5*
Repeat from * to * around Row, join with a slst in the 3rd ch of the ch8.
(12 loops, 12 dc))

R: 5 – 5 sc in the 1st ch5 loop, 1 sc in the next dc,
*5 sc in the next ch5 loop, sc in the next dc*
Repeat From * to * around, sc in the ch3,
join to the 1st sc, slst in the next 2 sc, ch 8
(60 sc, 12 dc)

R: 6 – *DC in the 3rd sc of the next ch5 loop, ch5*
Repeat From * to * around, join to the 3rd ch of the ch 8,
(12 loops, 12 dc)

R: 7 - 5 sc in the 1st ch5 loop, 1 sc in the next dc,
*5 sc in the next ch5 loop, sc in the next dc*
Repeat From * to * around, sc in the ch3,  
 join to the 1st sc, slst in the next 2 sc, ch 8
(60sc, 12 dc)

R: 8 – R: 15   - Repeat R: 6 and R: 7, Alternating Rows

You can add more rows here for length. Make sure your last row is The Repeat of R: 7

R: 16 – Repeat R: 6

R: 17 –Slst in the ch 5 loop, ch3, 4 dc in the ch5 loop, dc in the dc, 
*5 dc in the next ch5 loop, dc the next dc *
Repeat From * to * around, dc in the ch3,
 join to the 1st dc, ch3
(72dc)

R: 18 – 1 dc in each dc around, join to ch3, ch1 (72 dc)

R: 19 – Slst in the next 15sc, this will get you to the side of the bag.
1 sc in the next 15 dc, ch 12, sk the next 6 dc,
sc in the next 30 dc, Ch 34, sk the next 6 dc, 1 sc in the last 15 sc,
Join to the 1sc, ch 1 (60 sc, 12 sk dc, ch12, ch34)

R: 20 – 1 sc in each sc and in each ch around, join, ch 1
(60sc + 12 sc + 34 sc = 106 sc)

R: 21 – 1 sc in each sc, join, tie off weave in your ends. (106 sc)

Loop the longer loop handle through the shorter loop Handle.

An Ad Free PDF File Is Available
In my Raverly Shop At This LINK
For $4.50


It's A Perfect Yarn Bag, Too!

Wednesday, February 26, 2020

Square Face Washcloth Crochet Pattern | Posh Pooch Designs

Square Face Washcloth Crochet Pattern  
By Sara Sach of Posh Pooch Designs

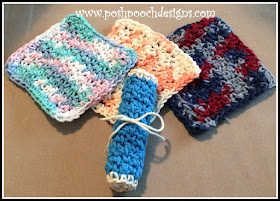
The Square Face Washcloth is the perfect size For washing
 your face and taking off your makeup.
I designed them in 100 % cotton yarn, so you can toss
 them in the wash along with your bath towels.

Make them in sets of 4 and give as gifts.
Everyone will love them.


This Crochet Pattern Was originally designed in 2012, 
and I decided it needed to be retested and updated.
And We it has a brand new Video.
And it is still one of my favorites to make and Give.

See The Video on my Youtbe Crochet
 Channel At This LINK


Square Face Washcloth Crochet Pattern
Please Add This Crochet Pattern to Your Ravelry Favorites

Skill: Easy

Materials:
Hook - H / 5.0 MM
Yarn - Cotton Yarn Med (4) - I used peaches and Cream

Stitches:
Chain (ch)
Slip Stitch (sl st)
Single Crochet (sc)

Size: 4 X 4 Inches
3 chs = 1 inch
2 Rows + 1 inch
Add beginning chs in increments of 2

Notes:
Ch1 Does not count as a st.

Pattern:

R: 1 - Ch 13, 1 sc in the 2nd ch from the hook,
 *1 dc in the next ch, 1 sc in the next ch*,
repeat from * to *  across row, ch1, turn. (12 sts)


R: 2 - * 1 sc in the 1st st, 1 dc in the next st*
 ( dc in the scs, sc in the dcs for pattern)
repeat from *to* across row, ch1, turn. (12 sts)


R: 3 - * 1 sc in the 1st st, 1 dc in the next st*
 ( dc in the scs, sc in the dcs for pattern)
repeat from *to* across row, ch1, turn. (12 sts)


R: 4 - R: 13 - Repeat R: 3


Trim: 
Sc evenly around all four sides of the cloth,
stitching 2 scs each corner. join to first sc,
 tie off, weave in your ends.

I Love This Easy Crochet Pattern because 
of the wonderful texture
  and feel of the washcloth.


An Add Free PDF file is Available
 in my Ravelry Shop At This LINK
For $ 2.50


Tuesday, February 25, 2020

COFFEE AND CROCHET WITH SARA (51) Let's Crochet Together | Posh Pooch Designs

COFFEE AND CROCHET WITH SARA (51) 
Let's Crochet Together
With Sara Sach of Posh Pooch Designs

🍀🍀🍀🍀🍀🍀🍀🍀🍀🍀🍀🍀🍀🍀🍀🍀🍀🍀🍀🍀🍀🍀🍀


Where Do I post Pictures of items I made
 From your patterns?

I LOVE To see what you crocheted, even if it's not from my patterns. 

Post All Pictures to The
PPD Puppy Love Crochet Group - LINK
Ask To join, Answer 3 Questions, 
and Start posting pics!


See The Video on my Youtube Crochet
 Channel At This LINK


Open 4 Leaf Clover And Flower

Skill: Easy

Materials:
Crochet Hook - H / 5.00 MM
Yarn- Med (4) I used left overs I had on hand
Yarn Needle


Stitches:
Chain (ch)
Single Crochet (sc)
Slip Stitch (slst)

Size: 2 inches

Pattern:

R: 1 - Ch3, 5 sc in the 2nd ch from the hook, 
join in a circle with a slst to the 1st sc,
(5sc)

R: 2 - *Ch6, slst in the next sc*
Repeat from * to * 3 more times For Clover,
slst in the last sc
(4 ch 6 loops)

To Make the Flower make 5 ch 6 loops,
 tie off, weave in your ends. 

R: 3 - *6 sc in the ch6 loop*
Repeat from * to * 3 more times,
sc in the last sc, ch 6, turn sl in the 2nd ch from the hook, 
slst in next 4 chs, join to sc with a slst, tie off weave in your ends.

Use beginning tail of yarn to make sure there is not a hole 
in the center of the clover, and weave in your ends. 

🍀🍀🍀🍀🍀🍀🍀🍀🍀🍀🍀🍀🍀🍀🍀🍀🍀🍀🍀🍀🍀🍀🍀

What's New This Week at

Round Face Washcloth
 Crochet Pattern and Video -  LINK

Sequin Dina Cowl
Crochet Pattern and Video - LINK

Cold Snap Hat and Cowl
 Crochet Pattern and Video - LINK


Thank you For stopping by!

See You Next Week.

Monday, February 24, 2020

Cold Snap Hat and Cowl Crochet Pattern | Posh Pooch Designs


Cold Snap Hat and Cowl

 Crochet Pattern 
By Sara Sach of  Posh Pooch Designs


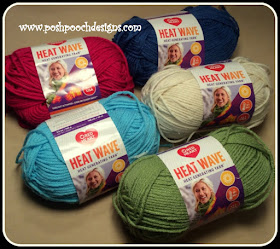
The Cold Snap Hat is designed using 
Heat Wave Yarn From Red Heart Yarn
It is a heat generating yarn activated by sunlight
 - even on cloudy days.

It is a med (4) Acrylic yarn.
Any Med (4) yarn will work for this pattern.
The Pattern is designed To work for both the Hat and Cowl, 
so you can even make a nice set that matched. 


See The Video On My Youtube Crochet

Channel At This LINK


Cold Snap Hat and Cowl Crochet Pattern 

Please AddThis Crochet Pattern To Your Raverly Favorites

Skill: Easy

Materials:
Crochet Hook – I / 5.50MM
Yarn - Med (4) I used heat Wave By Red heart Yarns (2 oz. of 3 colors)
           (C1- Sandy Shores – C2 –Blue Skies, C3 –Swim Short)
Yarn Needle

Stitches:
Chain (ch)
Slip Stitch (slst)
Double crochet (dc)
Change to (chgto)
Back Loop Only (BLO)
Front Post Double crochet (FPDC)
Foundation Double Crochet (FDC)

Size: Adult (24 Inches)
2.5 Chs = 1 inch
1 Row = 1 inch

Notes:
Ch 3 Counts as a dc
Rounds are joined with a slst to the ch3
When Changing colors Ch3 After the Color change

Pattern: We Will be starting at the Hat/ Cowl band.
The Hat and Cowl are stitched the same.
The Difference is the Hat is closed at the top and the cowl is not.

R: 1 – With C1, 60 FDC, join in a circle, ch 3 (60 FDC)
Don't worry about the split,
 we will close it when we are done.

R: 2 – Ch3 Counts as the first dc, *FPDC in the next st, dc in the next st*
Repeat From * to * around, join, ch3 (30 FPD, 30 DC = 60 sts)

R: 3 – Repeat R: 2, do not ch 3

R: 4 – Chgto C2, ch3, BLO 1 dc in each st around, join, ch 3 (60dc)

R: 5 – Ch3 counts as 1 dc, 1 dc in the next 2 st, *FPDC in the next dc, 1 dc in the 3 sts*
Repeat From *to * around, join, ch 3 (15 FPDC, 45 dc = 60 Sts)

R: 6 – Repeat R: 5

R: 7 – Ch3 Count as 1st dc, *FPDC in the next dc, 1 dc in the 3 sts*
Repeat From *to * around, 1 dc in the last st,
join, ch 3 (15 FPDC, 45 dc = 60 Sts)

R: 8 – Repeat R: 7

R: 9 – Repeat R: 5

R: 10 – Repeat R: 5

R: 11 – Chgto C3 – Repeat R: 7

R: 12 – Repeat R: 7

R: 13 – Repeat R: 5

R: 14 – Repeat R: 5

R: 15 – Repeat R: 7

R: 16 – Repeat R: 7

R: 17 – Chto C1, 1 dc in each dc, join, ch 3 (60 dc)

R: 18 – Repeat R: 17

For The Cowl- Tie off weave in your ends

For The Hat:
leave a tail of yarn 16 - 18 inches long, thread it on the needle.
Turn the hat Wrong side out and gather the hat closed.

 Remember to Close the Split From R: 1 
Thread the tail of yarn in the a needle and sew it closed securely. 
Add a pom pom if desired.


An Ad Free PDF File is Available 
In my Raverly Shop At This LINK
For $4.50