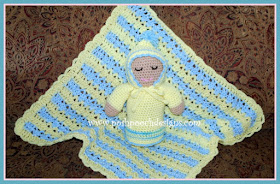
Isn't This the Sweetest Thing?
The Video Crochet A Long is Oct 14 - 18, 2019
The Videos will be added here,
so remember to refresh your page often.
Sweet Baby Doll Stuffie
I was asked to make a Baby Doll For a little girl
who is about to get a new baby Brother or sister.
I Designed the Baby Doll
so it can be customized for a boy or girl baby.
I designed the Baby Doll
with worsted weight yarns so it will be easily washed.
The Baby Doll measures about 12.5 inches long,
so it is a nice size.
It is the perfect size for little arms to cuddle and love.
The matching blanket Free crochet pattern
Baby Doll Stuffie Crochet Pattern
Add This Crochet Pattern To Your Ravelry Favorites
Skill:
Easy
Materials:
Crochet Hook – G/ 4.25
Yarn – Worsted Weight (4) 2 oz Beige – C1, 3 oz of Yellow, 1 oz Blue
Tiny bit
of pink and brown for face
I used Red Heart Super Saver – beige, and Caron Baby Cakes
Yarn needle
Stuffing- polyester fiberfill, 1 bag
Stitches:
Chain (ch)
Single Crochet (sc)
Slip Stitch (sl st)
Skip (sk)
Size :
Doll Measure about 12.5 inches long,
and 12 inches around.
Notes:
Doll is worked in rounds, no joining
Pattern:
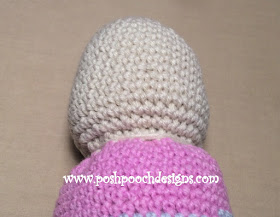
Crochet A Long Step 1- Baby Doll Head
Crochet A Long Step 1- Baby Doll Head
See The Step 1 Video On my Youtube Channel
R: 1 - With C1, ch 3, 6sc in the 2nd ch from the hook.
Join in a circle with a slst (6sc)
R: 3 – *2 sc in 1st st, 1 sc in the next st*
Repeat From * to * around (18sc)
R : 5 - *2 sc in the 1st st, 1 sc in the next st*
Repeat From * to * around (27sc)
R: 7 -*2 sc in the 1st st, 1 sc in the 2 next st*
Repeat From * to * around (36sc)
R: 8 - 1 sc in
each sc (36sc)
R: 9 - R: 19 - Repeat R: 8
Crochet A Long- Step 2- Baby Doll Body
R: 9 - R: 19 - Repeat R: 8
See Step 2 Video on my Youtube Crochet
Channel At This LINK
R: 41 – Change to C3, Repeat R: 22
R: 42 – Change to C2, Repeat R: 22
R: 43 – Repeat R: 41
R: 44 –46 – Repeat R : 42, Tie off after R: 46.
Baby Bottom – is
a simple circle,
stitched in rounds, no joining.
R: 47 – With C2, ch2, 6 sc ( 6sc)
R: 48 – 2 sc in each sc (12sc)
R: 49 – *2sc in the 1st st, 1 sc in the next*,
Repeat From * to * around (18sc)
R: 50 - *2sc in the 1st st, 1 sc in the next 2
sts*,
Repeat From * to * around (24sc)
R: 51 –*2sc in the 1st st, 1 sc in the next 3
sts*,
Repeat From * to * around (30sc)
R: 52 ––*2sc in the 1st st, 1 sc in the next 4
sts*,
Repeat From * to * around (36sc)
R: 53 -*2sc in the 1st st, 1 sc in the next 5sts*,
Repeat From * to * around (42sc)
Tie off
Tie off
Arms: Make
2 -Worked in rounds
R: 1 – With C1, ch 2, 5 sc in the 2nd ch from
the hook,
Join in a circle with a slst(5sc)
R: 2 – 2 sc in each sc, (10sc)
R: 3 – 2 sc in the 1st st, 1 sc in the next st, Repeat
(15 sc)
(15 sc)
R: 4 - 2 sc in the 1st st, 1 sc in the next 2st, Repeat
(20 sc)
(20 sc)
R: 7 – Change to C2, 1 sc in each sc (20sc)
R: 8 - R: 19 – 1 sc in each sc, (20sc)
Stuff the arm, then flatten at the last row and sew closed,
By sl st across the top. Tie off leaving a 18 inch tail of
yarn.
Crochet A Long Step 4 - Baby Doll Bonnet -
And Assembling The Doll
And Assembling The Doll
See The Video On my Youtube Crochet
Stuff the head and body of the doll.
I stuffed mine pretty tightly,
the amount of stuffing is up to you.
Place the baby bottom onto the bottom of the doll,
Then sc in place, you will need to ease it in place, as there are more sts
in the body than in the circle.
Make sure every st is stitched on both the circle and body,
you may need to st more than once in the circle stitches, so there is not any holes.
in the body than in the circle.
Make sure every st is stitched on both the circle and body,
you may need to st more than once in the circle stitches, so there is not any holes.
Trim : Attach the yarn to the last row,
in the back of the doll, and stitch the trim,
*Ch3, sk 3 sts, slst in the next st* Repeat From * to *
Arms: When Sewing The arm on The Doll, Line the Arm up
on the neck, so the bonnet will cover your stitches.
Stitch on the face according to the picture.
Cinching in the neck : Thread a 24 inch piece of C1 yarn,
sew around and R: 19,
And gather around, then wrap yarn around neck and
Bonnet: ch1 is a turning ch, and does not count as a st.
R: 1 – With C2, Ch 16, 1 sc in the 2nd ch and in the next 14 chs, 2
sc in the last ch,
TURN Working down the OPPOSITE side of the ch,
2sc in the 1st st, 1 sc in the next 14 chs, ch1, Turn
R: 14 – Change to C3, 1 sc in each sc, ch1, turn ( 32sc)
R: 15 – 1 sc in each sc, ch1 , turn (32sc)
R: 17– 1 sc in each sc, Turn,
working across the bottom
of the Bonnet,
1 sc in the end of each row across, ch30, 2 dc in the2nd ch,
turn and sl st back up the ch ( 1st tie made) join
with sc,
sc in each sc across, ch 30, 2 dc in the end 2nd ch,
turn and sl st back up the ch ( 2nd tie made).
join and tie off.
Put The Bonnet on the baby head and tie at the neck.
Add the trim to
front of bonnet :
Attach the Blue *Ch3, sk 3 sts, slst in the next st
* Repeat From * to *, tie off weave in ends.
Step 5 -The Sweet Baby Doll Blanket


I wish there was a video for this sweet little cutie
ReplyDeleteIt's coming soon!
ReplyDeleteI love it. Perfect timing Sarah, I am going to make one for my best friends 1st granddaughter. I know it's to big for her now, she's not due till Dec. But she will always have it. Matter of fact I'm going to make 5 of them. 4 for my granddaughters. So thank you so much ❤️
ReplyDeleteGreat pattern! Trying to get better at reading patterns but like having the video there if I should need a little help. BUT I did not need it. Made 1 for my granddaughter. Thanks so much!
ReplyDelete