Happy Hearts Valentine Headband Crochet Pattern
By Sara Sach of Posh Pooch Designs
I think you will have fun making this headband.
I designed it in 3 sizes.
And I have made a photo tutorial to help you understand the technique. I decided to design it in
Red Heart Super Saver I had on hand.
Any Worsted Weight yarn will work for this pattern.
This headband is a great way to use up some of your left over WW yarns. I really like the flow of the head band.
How it has a graceful flow across the top and bottom of the the ring of hearts.
We Decided To retest The pattern and update it with lots of new pictures, and a Brand new Video.
Happy Hearts Valentine Headband Crochet Pattern
By Sara Sach
Please add this pattern to your Ravelry Favorites
Skill: Intermediate -
not too hard, but a little challenging.
Materials:
Crochet Hook
– I/ 5.50 MM
Yarn –
Worsted Weight (4) 1 oz. of each color.
Pink C1, Lavender C2, White C3
I used Red Heart Super Saver
Yarn Needle
Stitches:
Chain (ch)
Slip Stitch
(sl st)
Single
Crochet (sc)
Half Double
Crochet (hdc)
Double
Crochet (dc)
Triple
Crochet (tr)
Skip (sk)
Sizes: are approximates
Child – Small/16
inches
Youth – Medium/18
inches
Adult – Large/20
inches
Notes:
Pattern is
written in Large (medium and small in parenthesis)
12 + 3 is
the beginning ch repeat.
Small – 5 repeats
for 5 hearts (ch 60+3)
Medium – 6 repeats
for 6 hearts (ch 72+3)
Large – 7 repeats
for 7 hearts (ch 84+3)
Pattern:
R: 1 – We
will be starting with the hearts –
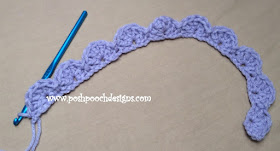
With C1, Ch87
(75, 63), 1 dc in the 6th ch from the end.
Ch3 counts
as 1st dc.
3dc in the
same st. (5dc)
Sk next 2
chs, 1 sl st in the next ch,
Sk the next
2 chs, 5dc in the next ch,
Sk the next
2 chs, slst in the next ch
*sk next 2
chs, 5 dc in the next ch, sk next 2 chs,
1 sl st in
the next ch, sk next 2 chs,
5 dc in the
next ch, sk the next 2 chs, cl st in the next ch*
Next 2 heart bumps made.
Repeat From *
to * 5 more times for large,
4 times for medium, 3 times for small.
R: 2 – Turn, ch1, Working down the Opposite side of the ch,
*working in
the slst between the next 2 hearts bumps,
4 Tr, ch1, 4
Tr
Repeat From
* to* 6 (5, 4) times.
R: 3 – Join C2,
Working the top of the heart bumps,
Dc, hdc, sc,
sc, sc, hdc,
dc in the
center of the slst from previous row.
Hdc, sc, sc,
sc, hdc, dc*
Repeat From
* to * around, join to 1st dc.
Do not tie
off, Ch 4,
R: 4 - From
behind your work, Working the heart Points.
Move to the
bottom of the 1st heart,
*Tr, dc,
hdc, sc, sc, sc in the ch2 of the heart point,
Sc, sc, hdc,
dc, tr*
Repeat From *
to * around, join to 1st heart and tie off.
R: 5 – Join C3
to the top row of the headband,
1 hdc in each st around, join, ch 5
R: 6 –
Moving to the bottom row, from behind your work,
Join c3, to the bottom row of headband,
1 hdc in each st around, join to 1st
st, and tie off.
Weave in
your ends.
TIP: By chaining
behind the headband, when moving from rows,
It eliminates having lose ends to weave in.
If your headband is a little "bunchy" you
may need to loosen up your stitching.
You can also use a Styrofoam head to
block the headband,
by Dampening the headband
and put it on the head and let it dry.
An Ad Free PDF Download
is available in my Ravelry Shop


No comments:
Post a Comment
Note: Only a member of this blog may post a comment.