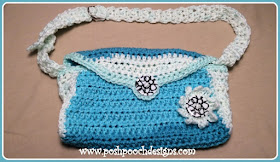
"Fanny Packs Are Back" Crochet A Long
Crochet Pattern By Sara Sach of
I originally designed this Crochet Pattern in
August 2013. It is going to be great fun to bring it
The Crochet A Long Last 5 Days.
Each Day I will post a Part of the Crochet Pattern, pictures of the Pattern and a Video.
Skill level - Easy
Materials:
Hook - H / 5.00 mm
Yarn needle
2 - 1 to 2 inch buttons
2 - 1 inch D rings
Yarn - 2.5 oz of Med (4) Any blend (Cotton, Acrylic)
Chain (ch)
Single Crochet (sc)
Half double Crochet (hdc)
Stitch 2 Half Double Crochets Together (hdctog)
Size: measures approximately 6 X 11 X 2
Gauge:
1 inch = 4 chs
1 inch = 4 hdc
R: 1 - With C1, Ch 29, 1 hdc in
the 2nd ch from the hook, 1 hdc each ch, ch 2 turn.
(28 hdc)
R: 2 – 1 hdc each St, ch 2 turn. (28 hdc)
R: 3 -R: 28 - Repeat R: 2
Do not tie off
Step 2 - Bag Flap
Step 3 -Side Panels , Make 2 with C1
Video LINK
R: 3 -R: 28 - Repeat R: 2
Do not tie off
Step 2 - Bag Flap
Video LINK
R: 29 - 1 hdctog the 1st 2 sts, 1 hdc in the next 24 hdc,
1 hdc
with the last 2 hdc, ch 1 turn (26 hdc)
R: 30 - 1 hdctog the 1st 2 sts, 1 hdc
in the next 22 hdc,
1 hdc with the last 2 hdc, ch 1 turn
(24 hdc)
R: 31 - 1 hdctog the 1st 2 sts, 1 hdc
in the next 20 hdc,
1 hdc with the last 2 hdc, ch 1 turn
(22 hdc)
R: 32 - 1 hdctog the 1st 2 sts, 1 hdc
in the next 18 hdc,
1 hdc with the last 2 hdc, ch 1 turn
(20 hdc)
R: 33 - 1 hdctog the 1st 2 sts, 1 hdc
in the next 16 hdc,
1 hdc with the last 2 hdc, ch 1 turn (18 hdc)
R: 34 - 1 hdctog the 1st 2 sts, 1 hdc
in the next 14 hdc,
1 hdc with the last 2 hdc, ch 1 turn (16 hdc)
R: 35 - 1 hdctog the 1st 2 sts, 1 hdc
in the next 12 hdc,
1 hdc with the last 2 hdc, tie off weave in your ends. (14 hdc)
Step 3 -Side Panels , Make 2 with C1
Video LINK
R: 1 - Ch 6, skip first ch, 1 hdc in
each ch, ch1 turn. (5 hdc)
R: 2 – 1 Hdc in each hdc , ch1, turn (5
hdc)
R: 3 – R: 10 -
Repeat R: 2, tie off after R: 47
(5 hdc)
Line up The Side panel to the bottom of
the side of the bag and sew in place.
by sewing up the side, then across
bottom and down the other side.
Repeat on the other side of bag.
Step 4-Trim And Straps.
Trim: With C2, join yarn at the right inside corner of the
bag,
sc around the top of the bag, and
around the flap of the bag till you reach
the center of the flap, ch 8, join ch
to the last sc, (this makes your button hole)
sc the rest of the way around bag flap, and around the tip of bag,
join to the sc were you started. Ch1.
Turn, working across the front of the bag, sc in each sc,
till you reach the ch8 sp, 8 sc in the ch8 sp,
Sc i each sc, join, tie off, weave in your ends.
Turn, working across the front of the bag, sc in each sc,
till you reach the ch8 sp, 8 sc in the ch8 sp,
Sc i each sc, join, tie off, weave in your ends.
Straps: with C2
Strap 1 -
R: 1 - Ch 4, 1 hdc in the 2nd ch from
the hook, 1 sc in the next 2 chs, ch 1 turn (3 hdc)
R: 2 - 1 hdc in each hdc, ch 1 turn (3
hdc)
R: 3 - 35 - Repeat R: 2 leaving a 12 inch tail for sewing in place.
Strap 2 -
R: 1 - Ch 4, 1 hdc in the 2nd ch from the hook, 1 sc in the next 2 chs, ch 1 turn (3 hdc)
R: 2 - 1 hdc in each hdc, ch 1 turn (3 hdc)
R: 3 - 40 - Repeat R: 2 leaving a 12 inch tail for sewing in place.
R: 41 - Repeat R: 2,leaving a 12 inch tail.
Fold end of the strap
over the 2 D rings and sew in place
Place end of strap even with the top of
the side panel and sew in place securely.
Step 5 Flower And Buttons –
With C2, ch3, 10 sc in the 2nd ch from
the hook,
join to 1st sc with a sl st to form a circle.
Ch 10, sl into the next sc, *ch 10, sl
st into the next sc*
Repeat from * to * 8 more times to form 10 petals,
sl st
into the 1st sl, tie off.
Place the button into the center of the
flower,
sew on to the bottom right side of the bag.
Sew Button onto the center front of the
bag,
lined up with the buttonhole on the flap.
Please Post your picture to the
PPD Puppy Love Crochet Facebook Group
An Ad Free PDF File is Available
in my Ravelry Shop At This LINK
For $4.50
An Ad Free PDF File is Available
in my Ravelry Shop At This LINK
For $4.50


hello sara I am ready for the crochet along.
ReplyDeleteCan't wait to make this personal fannie pack. My colors and your design great combination. Thank you!
ReplyDelete