Continuous Granny Square
Blanket Crochet Pattern
By Sara Sach of Posh Pooch Designs
It's Scrap Happy Crochet A Long time, and thought
this stitch pattern is the perfect scrap happy project.
I have heard This Crochet Pattern Technique Called
The Continuous Granny Square, as well as, the Never
Ending Granny Square. I do My style a little different
than what I have seen, but either way, is is a wonderful
way to use up some left over yarns and make a
lovely and useful project.
It can be stitched up as a blanket, lap blanket, baby
blanket, pillow, mat, table cloth, placemat
and so many more projects.
I decided on a blanket for my project and added a
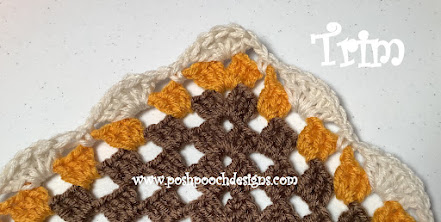
simple Shell trim, which gives it a nice finishing touch.
See The Video On My Crochet Youtube
Channel At This LINK
Continuous Granny Square Blanket Crochet Pattern
Please Add This Crochet Pattern To Your Raverly Favorites
Materials:
Crochet Hook - H / 5.00mm
Yarn - med (4) Acrylic yarn from your yarn stash.
The Amount is up to you, and how big you want to make your Blanket.
Yarn Needle
Stitches:
Chain (ch)
Single Crochet (sc)
Double Crochet (dc)
Skip (sk)
Space (sp)
Shell Stitch (shst) – 5 dc in the same space
Size:
Make it as large you want
1 Row = 1 inch
Changing colors:
Changing color is easiest on a dc stitch,
Yo, pull up a loop, yo, go through the 2 loops,
Yo, pull up a loop of the next color and complete the dc with the new color.
Crochet Hook - H / 5.00mm
Yarn - med (4) Acrylic yarn from your yarn stash.
The Amount is up to you, and how big you want to make your Blanket.
Yarn Needle
Chain (ch)
Single Crochet (sc)
Double Crochet (dc)
Skip (sk)
Space (sp)
Shell Stitch (shst) – 5 dc in the same space
Make it as large you want
1 Row = 1 inch
Changing color is easiest on a dc stitch,
Yo, pull up a loop, yo, go through the 2 loops,
Yo, pull up a loop of the next color and complete the dc with the new color.
Ch2 counts as ch3, unless indicated otherwise
*3 dc, ch2* Repeat From * to * 2 More Times,
join to the ch3 with a slst, slst in the next 2 dc,
slst in the ch2 sp, ch3
(4 sets of 3 dc, ch2)
*3dc, ch2, 3dc, ch2 in the next ch2 sp*
Repeat From * to * 2 More Times,
join to the ch3 with a slst, slst in the next 2 dc,
slst in the ch2 sp, ch3
(4 sets of 3dc, ch2, 3dc, ch2)
ch2 in the next ch2 sp,
*3dc, ch2 in the next ch2 sp, 3dc, ch2,
*3dc, ch2 in the next ch2 sp, 3dc, ch2,
3dc, ch2 in the next ch2 sp*
Repeat From * to * 1 more time,
Do Not Stitch in the next ch2 sp (corner)
Repeat From * to * 1 more time,
Do Not Stitch in the next ch2 sp (corner)
and Do Not join
(3 sets of 3dc, ch2, 3dc, ch1, 3dc, ch1 and 3dc, ch1)
(3 sets of 3dc, ch2, 3dc, ch1, 3dc, ch1 and 3dc, ch1)
3 dc, ch 1 in the next ch2 sp,
*3 dc, ch2, 3dc, ch2 in the next ch2 sp,
3 dc, ch2 in the next 2 ch2
sps*
Repeat From * to * 2 More times, do Not join.
Repeat From * to * 2 More times, do Not join.
3 dc, ch 1 in the next 2 ch2 sps,
*3 dc, ch2, 3dc, ch2 in the next 2 ch2 sp,
3 dc, ch2 in the next 3 ch2
sps*
Repeat From * to * 2 More times, do Not join.
Repeat From * to * 2 More times, do Not join.
3 dc, ch 1 in the next 3 ch2 sps,
*3 dc, ch2, 3dc, ch2 in the next 2 ch2 sp,
3 dc, ch2 in the next 4 ch2
sps*
Repeat From * to * 2 More times, do Not join.
Repeat From * to * 2 More times, do Not join.
until the blanket is
the size you want.
Finishing off –
*5 dc in the next ch2 sp, ch1, sc in the next ch2 sp, ch1*
Repeat From * to * around the blanket,
join to the next ch2 sp, tie off and weave in your ends.
An Ad Free PDF file is Available
In My Ravelry Shop At This LINK
For $3.50


No comments:
Post a Comment
Note: Only a member of this blog may post a comment.