FRIDAY FUN DAY!
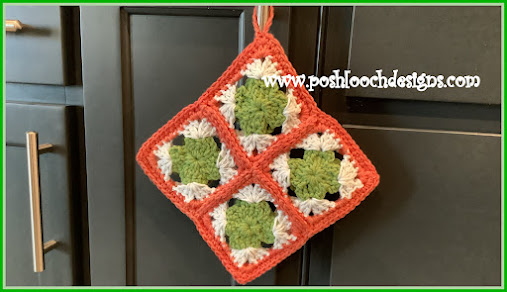
Four Leaf Clover Pot Pad / Pot Holder
Crochet Pattern
By Sara Sach of Posh Pooch Designs
By Sara Sach of Posh Pooch Designs
🍀🍀🍀🍀🍀🍀🍀🍀🍀🍀🍀🍀🍀🍀🍀🍀🍀🍀
This 4 Leaf Clover Hot Pad/ Pot Holder
is made using 8 granny squares that
is made using 8 granny squares that
are about 4 inches. 4 For The Front and 4 For the back.
When it's All Put together, it measure 8 X 8 inches,
so it's little bigger than most pot holders.
This little Clover Granny squares can be used
for lots of other projects as well. Add Them
to table runners, towels, washcloths, headbands, hats,
scarves or bags. You can also use them to
decorate for St. Patrick's Day.
I chose to use medium (4) Cotton yarns because I am
making a Pot holder. You can use any med (4) weight yarn
of your choosing, and any colors also.
See The Video On My Crochet Youtube
Channel At This LINK
4 Leaf Clover Pot Pad / Pot Holder Crochet Pattern
Skill - Easy
Materials:
Hook - H / 5.00 MM
Yarn - Med (4) Acrylic or Cotton
2 oz of each color - Green - C1, White - C2, Orange - C3
Yarn Needle
Stitches:
Chain (ch)
Slip Stitch (slst)
Single Crochet (sc)
Double Crochet (dc)
Space (sp)
Size: 10 X 10 inches
Each Square = 4 inches, You will need 8 squares
Notes: You will need 8 squares for 1 pot holder
Pattern:
R: 1 - With Green Yarn, Ch 5, join in a circle,
*ch2, 2dc, ch2,sl st in the Circle*, Repeat From * to * 3 more times
For 4 petals of the clover
R: 2 - *Ch 3, 1 sc in the 1st dc, ch1, 1sc in the next dc,
ch3, sl st in the sl st*
Repeat From * to * for the next 3 shamrock petals,
tie of yarn weave in your ends.
R: 3 - Changing to White yarn, forming the corners,
attach yarn to the ch 1 space
on one of the clover petals, ch3, 2dc, ch2,
3 dc in that ch1 space,
*Ch 2, then 3dc, ch2, 3dc in the ch1 space in the next shamrock petal*
Repeat from * to * 2 more times, ch2
join to the ch 3, slst to the corner ch2 sp.
(4 corners made)
R: 4 - Change to Orange yarn, ch1, 2sc, ch1, 2sc in ch2 space
of the 1st corner, 1 sc in next 3 dc,
2 sc in the next ch2 space, 1 sc in the next 3 dc,
*2sc, ch1, 2sc, in the next corner,
1sc in the next 3 dc, 2 sc in the ch2 sp, 1 sc in the next 3 dc*
Repeat From *to* 2 more times.
join to the beginning ch 1,Tie off weave in your ends.
Repeat R: 1 - R: 4 - 7 More Times
Join 4 of the Squares together With C3
*Place 2 squares right side out, slst together.
Set aside.
Join The next 2 squares together with slst.
Place the 1st 2 squares and the 2nd 2 squares together,
right sides out, and slst them together.*
Repeat From * to *
You will have a Front and back of 4 squares each
Tie off and weave in all the ends.
Place Them together right side out, Join C1 to on of the corners,
Sc evenly around the 4 sides, placing a sc, ch1, sc in each corner,
Stitching the front and back together,
Join to the 1sy sc, ch 12, join to the same sc to form a loop,
Tie off and weave in your ends.
An Ad Free PDF file Is Available
In My Ravelry Shop At This LINK
For $3.50


No comments:
Post a Comment
Note: Only a member of this blog may post a comment.