Easter Egg Pillow
Crochet Pattern
By Sara Sach of Posh Pooch Designs
The Easter Egg Pillow is so soft and squishy!
It is super easy and quick to stitch up.
Just grab some super bulky (6) yarn and your
9 mm hook, and your on your way.
Oh, and some polyfiberfil to stuff it with.
I chose to make mine 3 different spring colors,
You can use whatever colors you like.
Everyone will love it.
Leave it as a regular Easter Egg or
add a face for a fun and silly look.
They are perfect For Easter and spring decorating,
and perfect as gifts, also. Set them out and everyone will
want to hug and squeeze them.
I used Bernat Baby Blanket in the Dappled Ombre,
pink, yellow and purple. Any Super Bulky (6) yarn
can be used. You Might even have some in Your yarn stash.
See The Video On My Crochet Youtube
Channel At This LINK
Easter Egg Pillow Crochet Pattern
Please Add This Crochet Pattern To Your Ravelry Favorites
Skill: Easy
Materials:
Crochet Hook: N / 9.00 MM
Yarn – Super Bulky (6) Bernat Baby Blanket, Dappled Ombre (8 oz. total)
C1 - Purple, C2 - Pink, C3 - yellow
Stuffing – 10 - 12 oz. polyfiberfil
Yarn Needle
Crochet Hook: N / 9.00 MM
Yarn – Super Bulky (6) Bernat Baby Blanket, Dappled Ombre (8 oz. total)
C1 - Purple, C2 - Pink, C3 - yellow
Stuffing – 10 - 12 oz. polyfiberfil
Yarn Needle
Optional For Face - 2 Safety eyes, Black yarn For Smile
Stitches:
Chain (ch)
Single Crochet (sc)
Half Double Crochet (hdc)
Half Double Crochet V st (hdc Vst)
Double crochet (dc)
Change to (chgto)
Double Crochet Together (dctog)
Space (sp)
Skip (sk)
Size: 14 X 12 Inches
Notes:
Ch 3 at beginning of rows counts as a Dc.
When Changing colors, Ch1 /ch2 /ch3 after the Color change.
Pattern:
Make 2 – A Front and A Back
R: 1 – With C1, Ch 17,
1 dc in the 4th ch from the hook,
Chain (ch)
Single Crochet (sc)
Half Double Crochet (hdc)
Half Double Crochet V st (hdc Vst)
Double crochet (dc)
Change to (chgto)
Double Crochet Together (dctog)
Space (sp)
Skip (sk)
Ch 3 at beginning of rows counts as a Dc.
When Changing colors, Ch1 /ch2 /ch3 after the Color change.
Make 2 – A Front and A Back
1 dc in each ch across, Turn, Ch3 (15
dc)
R: 2 – 1 dc in the
same st as the ch 3, 1 dc in the next 13 dc,
2 dc in the last dc, Turn, ch 3 (17 dc)
2 dc in the last dc, Turn, ch 3 (19 dc)
R: 5 – 1 dc in the
next dc, 1dc in each dc across, turn (19 dc)
R: 6 – Chgto C2, (do
not tie off C1)
Ch2, 1 hdc in the next dc, sk the next dc,
*hdc, ch1, hdc in the next dc, sk the next dc*
Repeat From * to * 6 more times,
1 hdc in the last 2 dc (2dc, 7 hdc V sts, 2dc)
Ch2, 1 hdc in the next dc, sk the next dc,
*hdc, ch1, hdc in the next dc, sk the next dc*
Repeat From * to * 6 more times,
1 hdc in the last 2 dc (2dc, 7 hdc V sts, 2dc)
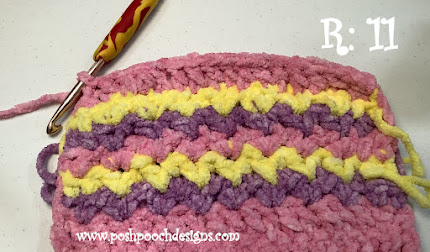
Ch2, 1 hdc in the next hdc, ch1,
*hdc VST in the ch1 sp of the next V st, ch1*
Repeat From * To * 6 more times,
1 hdc in the last 2 hdc (2dc, 7 hdc Vst, 2dc)
Ch1, dctog 1 2 hdc, 1 dc in each the hdc of the V sts,
Dctog the last 2 hdc, ch1 (16 dc)
dctog the last 2 dc, turn (14
dc)
dctog the last 2 dc, turn (12
dc)
dctog the last 2 dc, turn (10 dc)
If adding eyes and smile do so at this time.
Place The 2 eggs
together, right sides facing out.
Sc them together, leaving a 5 inch opening,
Stuff with polyfiberfil and sc the opening closed.
Tie off and weave in the ends.
Sc them together, leaving a 5 inch opening,
Stuff with polyfiberfil and sc the opening closed.
Tie off and weave in the ends.
They are so squishy and soft you won't be
able to resist squeezing them!
An Ad Free PDF file is Available
In My Ravelry Shop At This LINK
For $4.50


No comments:
Post a Comment
Note: Only a member of this blog may post a comment.