Pages

Friday, June 30, 2023

Beaded Braided Necklace Crochet Pattern | Posh Pooch Designs

 Beaded Braided Necklace 
Crochet Pattern 
By Sara Sach of Posh Pooch Designs


The Beaded Braided Necklace makes a beautiful necklace.
 It also works great for a belt, headband, purse handle 
and hat band. 


This Crochet Pattern is super easy and very versatile. 
 Mix and match yarn colors and beads.
Use a light 3 or Medium 4 weight yarn and beads will
 work, I just prefer the small pony beads.
You choose the yarn and the beads and see what fun
 designs you come up with.


This is also great group craft for beginners and
 expert crocheters. It's easy, It's fun and a wonderful 
way to  create something we will love wearing.

See The Video On My Crochet Youtube
Channel At This LINK


Beaded Braided Necklace Crochet Pattern


Please Add This Crochet Pattern To Your Ravelry Favorites


Skill: Easy
 
Materials:
Crochet Hook – H / 5MM
Yarn – Any Light (3) or Medium (4) yarn of choice 3 colors, total of 1 or 2 oz.
Beads – 30 to 40 Small Pony Beads, or beads of your choosing
Tarn Needle
 
Stitches:
Chain (ch)
 
Size: Make it as long as you like.
 
Pattern:

R: 1 - With C1 -Thread the yarn onto the needle,
Slide on the beads,


 starting with a 6 inch tail of yarn
 *Ch 10, slide one bead*


You can add or subtract chs between your beads

You can add the beads by 1, 2 or 3 at a time


Repeat From * To * 7 more times,
or more if a longer necklace is wanted.
 
You can make your chs as long as you like.

Ch 10, tie off, leaving a 6 inch tail of yarn.
Set a side.
 
R: 2 - With C2 - Repeat R: 1

R: 3 –  With C3 - Repeat R: 1
 

Make sure all 3 chs are the same length.

Lay the 3 chs out and tie one end together securely.
 

You may have extra beads, just slide those off.

Braid them together a little bit loosely, but not too loose.
We do not want them to droop.
 
Once you have braided them together, tie the end securely.
 
Place the 2 ends of the braids together, and tie them together securely
And trim the ends.
 
Slide it on and you are ready to go.


An Ad Free PDF File Is Available
In My Ravelry Shop At This LINK
For $2.50


Tuesday, June 27, 2023

COFFEE AND CROCHET PODCAST Premier Yarns New Just Yarn Value And Can We Use Acrylic Yarn In The Summer? | Posh Pooch Designs

COFFEE AND CROCHET PODCAST
Premier Yarns New Just Yarn Value
And Can We Use Acrylic Yarn In
 The Summer?
With Sara Sach of Posh Pooch Designs


Let's Talk About Premier Yarns
New Just Yarn Value Size


It is a Med (4) Acrylic Yarn
There 22 colors to choose from
It's called Value Size because it is 8 of the original
 balls of Just Yarn in One Value Size.


Get Some For Yourself At This LINK
And give it a try.


To See My Honest opinion 
of this New Yarn
What The Video Podcast On My Youtube Crochet Channel
At This LINK


I am asked this question almost every day. 
Can we use acrylic yarn in the summer? 

I give you my thoughts an opinion on this question
 on the today's video.

**********************************


What Is New This Week At

THIS OR THAT?
Which Came First The Yarn Or The Pattern? Video LINK


The Messy Bun Bucket Summer Hat
 Crochet Pattern And Video - LINK


The Wedding Shrug
Crochet Pattern And Video - LINK


Thanks For Stopping By!


Monday, June 26, 2023

The Wedding Shrug Crochet Pattern | Posh Pooch Designs

 The Wedding Shrug 
Crochet Pattern 
By Sara Sach of  Posh Pooch Designs


The Wedding Shrug was designed for weddings. 
For the bride to wear at the reception, or for the mother
 of the Bride and groom, and for bridesmaids to wear,
 as well. It is perfect for any formal occasion, as well as,
 with a sundress or tank top for casual wear.

I designed this pattern using yarn Bee Soft Secret
 From Hobby Lobby. Any Med (4) yarn of your 
choice will work just fine. I think it would ne lovely in an
 Ombre for summer.


What is a Shrug?
Some people call them boleros. Boleros are usually longer.
 A shrug is a close fitting cardigan or jacket, that is designed
 short, so that only the arms and shoulders are covered.
Sort of  a wrap with arm holes.

The main thing in getting a good fit is to measure as you go.
You can measure yourself, or a shirt to sweater that you know fits well. You need a back measurement for width, 
and upper arm measure for length.


See The Video On My Crochet Youtube
Channel At This LINK


The Wedding Shrug Crochet Pattern

Please Add This Crochet Pattern To Your Raverly Favorites
 
Skill: Easy
 
Materials:
Crochet Hook – I / 5.5mm
Yarn – Med (4) Acrylic – Yarn Bee/ Soft Secret/ White – 8 oz. / 400 yds.
Yarn Needle
Tape Measure - measure as you go for a good fit.
 
Stitches:
Chain (ch)
Double Crochet (dc)
Skip (sk)
Space (sp)
Foundation Double Crochet (FDC)
Shell Stitch (shst) – (2dc, ch1, 2dc in the same st)
 
Size: 15 X 43 inches
3 row of Shst = 2 inch 
Multiples:  4 + 9 FDC
 
Notes:
Ch3 counts as a dc
 
Pattern:

R: 1- 41 FDC, turn, ch3 (41 FDC)


R: 2 – 1 dc in each FDC, turn, ch 3 (41dc)


R: 3 – 1 dc in the next 2 dc, ch2, sk 3 dc, shst in the next dc,
*ch2, sk 3 dc, shst in the next dc*
Repeat from * to * 6 more times,
Ch2, sk 3 dc, 1 dc in the last 3 dc, turn, ch 3
(6 dc, 8 shsts)


R: 4 – 1 dc in the next 2 dc, ch2, shst in the ch1 sp of the next shst,
*ch2, shst in the ch1 sp of the next shst*
Repeat from * to * 6 more times,
Ch2, 1 dc in the last 3 dc, turn, ch 3
(6 dc, 8 shsts)


R: 5 - 1 dc in the next 2 dc, ch2, shst in the ch1 sp of the next shst,
*ch2, shst in the ch1 sp of the next shst*
Repeat from * to * 6 more times,
Ch2, 1 dc in the last 3 dc, turn, ch 3
(6 dc, 8 shsts)


Repeat R: 6 – R: 48


R: 49 - 1 dc in the next 2 dc, 
*1 dc in the next 2 dc of the next shst,
Sk the ch1 sp, 2 dc in the next 2 dc, 1 dc in the next ch2 sp*
Repeat From * to* across,
Sk the last ch2 sp, 1 dc in the last 3 dc, turn, ch 3 (41 dc)


R: 50 – 1 dc in each dc across, tie off weave in your ends.


Forming The Arm Holes:
The Shrug in half, lengthwise.
Join yarn to the outside edge, wrong side facing out.
Single crochet evening, stitching 2 sides together,
For approximately 3 inches. Tie off, weave the end in securely.


Repeat On The other side.


AN Ad Free PDF file is Available
In My Ravelry Shop At This Link
For $4.50


Friday, June 23, 2023

Summer Messy Bun Bucket Hat Crochet Pattern | Posh Pooch Designs

 Summer Messy Bun Bucket Hat 
Crochet Pattern 
By Sara Sach of  Posh Pooch Designs


I Love my "Bucket Hats", they are roomy and comfy.
 I Love my "Sun Hats", they are lose and lacy, 
and they have a brim to keep the sun out of my eyes.
I also love my "Messy Bun Hats" so I can put my hair up. 
I decided to do a "mash up" And combine all three
 styles into one.

And So "The Summer Messy Bun Bucket Hat" 
was designed. 


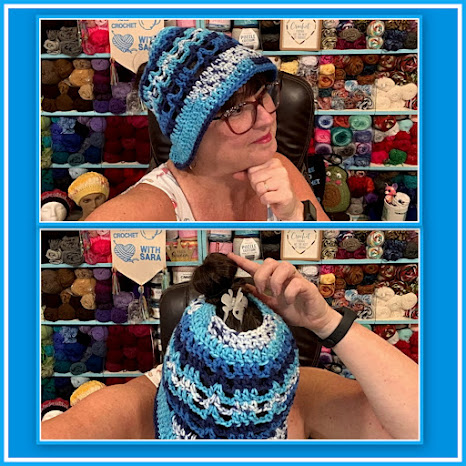
It has room for a bun or ponytail on top,
 the sides are open and airy, it has a shape like a
 bucket hat, and it has a brim to keep the sun
 out of my eyes.
I Love It So Much!


The Premier Yarn, Sweet Roll Fruits if the perfect
 yarn for the hat. I chose to use the Blueberry 
colorway. You can make this adorable hat with just
 cake of yarn.  I love how it looks and fits.


There are so many fruits to choose from, 
you will want to make a hat in each "flavor".
Get Yours at This LINK


See The Video On My Crochet Youtube
 Channel At This LINK


Messy Bun Bucket Hat Crochet Pattern

Please Add This Crochet Pattern To Your Raverly Favorites
 
Skill: Easy
 
Materials:
Crochet Hook – I / 5.5 MM
Yarn – Med (4) 3.5 oz. Sweet Roll Fruits / Blueberry/ Premier Yarns
Yarn Needle
 
Stitches:
Chain (ch)
Slip Stitch (slst)
Single Crochet (sc)
Double Crochet (dc)
Space (sp)
Skip (sk)
V Stitch (V St)
Foundation Double Crochet (FDC)
 
Size: Fits a 22- 24 inch head
Hat is designed to fit loosely
 
Notes:
Ch1 Does Not Count as a st
Ch3 Counts as a dc
 
Pattern:

R: 1 – 40 FDC, join in a circle, ch3 (40 FDC)


With Needle And Beginning tail of yarn,
Close the joining gap


R: 2 – 1 dc in the next 3 FDC, 2 dc in the next FDC,
*1 dc in the next 4 FDC, 2 dc in the next FDC*
Repeat From * to * around, join to the ch3 with a slst, ch 3
(48 dc)


R: 3 – 1 dc in the next 2 dc, ch1, sk the next dc,
V st in the next dc, ch1, sk 1 dc,
*dc in the next 3 dc, ch1, sk the next dc,
 V st in the next dc, ch1, Sk the next dc*
Repeat From * to * around, join to the ch3 with a slst, ch 3
(24 dc, 8 V sts, 16 ch1)


R: 4 - 1 dc in the next 2 dc, ch2,
V st in the ch1 sp of the next V st, ch2,
*dc in the next 3 dc, ch2,
 V st in the next ch1 sp of the next V st, ch2, *
Repeat From * to * around, join to the ch3 with a slst, ch 3
(24 dc, 8 V sts, 16 ch2)


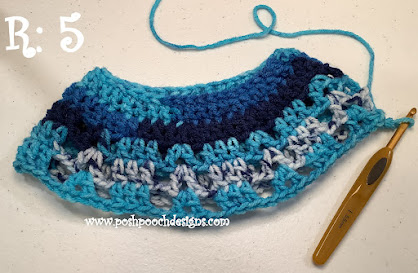
R: 5 - 1 dc in the next 2 dc, ch2,
V st in the ch1 sp of the next V st, ch2,
*dc in the next 3 dc, ch2,
 V st in the next ch1 sp of the next V st, ch2, *
Repeat From * to * around, join to the ch3 with a slst, ch 3
(24 dc, 8 V sts, 16 ch2)


R: 6 – R: 10 – Repeat R: 5


R: 11 – Dc in the next 2 dc, 2 dc in the ch2 sp,
Dc in the dc, ch1 sp of the Vst, dc, 2 dc in the next ch2 sp,
*dc in the next 3 dc, 2 dc in the ch2 sp,
dc in the dc, ch1 sp of the next Vst, dc,  2 dc in the ch2 sp*
Repeat From * to * around, join to the ch3 with a slst, ch3 (80 dc)


R: 12 – 1 dc in each dc around, join, to the ch3 with slst, ch3 (80 dc)
 
R: 13 – 1 dc in each dc around, join, to the ch3 with slst, ch1 (80 dc)


R: 14 -  1 sc in each dc around, join to the 1st sc with a slst,
 tie off and weave in the ends. (80 sc)


An Ad Free PDF file Is Available
In My Ravelry Shop At This LINK
For $4.50