The Christmas Country Stripe Hot Pad And Pot Holder
is a quick and easy Crochet pattern. I really enjoyed
stitching up this pattern and love the texture it has.
It is doubled for extra thickness, so you will not burn
your hands or counter surface.
I designed it using the Sugar And Cream Medium (4)
weight cotton yarn with the Holiday Stripes Color.
It is a long striping yarn with muted colors of green,
red and cream. I love how the muted colors give it a
country feel. I have used it to design these other
country style crochet patterns.
Country Tree ornament
Country Dress Pot Holder
Country Heart Ornament
Country Bell Ornament
Country Round Doily
You can Find these Country Style
Crochet Patterns At This LINK
I love these Christmas Country Style Crochet Patterns,
but had not designed a basic pot holder/ hot pad.
I decided it was time to make one and I really love
how it worked up.
It can be stitched up in any colors you like, it does not
have to be Christmas or country. Make some to match
your kitchen, or some one else's kitchen as a gift.
They will love them.
See The Video On My Crochet Youutbe
Channel At This LINK
Christmas Country Stripe Hot Pad And
Pot Holder Crochet Pattern
Please Add This Crochet Pattern To Your Ravelry Favorites
Skill: Easy
Crochet hook - H / 5 mm.
Yarn - Med (4) Cotton – 4 oz / Sugar And Cream/Holiday Stripe
Yarn Needle
Decorative Button
Stitches:
Chain (ch)
Single Crochet (sc)
Slip Stitch (slst)
Double Crochet (dc)
Triple Front Triple (FPTR)
Size: 9 X 9 Inches
Notes:
Ch1 Does not Count as a st
Ch3 Counts as a dc
Pattern:
Make 2 Squares For A Front And A Back
R: 1 – Ch 24,
dc in the 4th ch from the hook,
Dc in each ch across, turn, ch 3 (22 dc)
Chain (ch)
Single Crochet (sc)
Slip Stitch (slst)
Double Crochet (dc)
Triple Front Triple (FPTR)
Ch1 Does not Count as a st
Ch3 Counts as a dc
Make 2 Squares For A Front And A Back
Dc in each ch across, turn, ch 3 (22 dc)
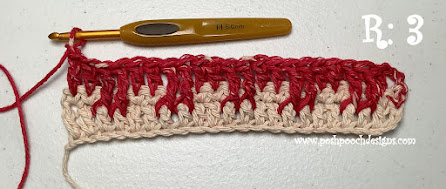
*FPTR in the next 2 dc below the previous row, 1 dc in the next 2 sc*
Repeat from * to * 4 more times, turn, ch 1 (10 FRTR), 12 dc)
*FPTR in the next 2 dc below the previous row, 1 dc in the next 2 sc*
Repeat from * to * across 3 more times,
1 dc in the last 2 dc, turn, ch 1 (8 FPTR, 14 dc)
Place the 2 Squares together, right sides out.
Sc around all 4 sides of the squares, stitching them together,
Place a sc, ch1, sc in the 4 corners,
Join to the 1st sc with a slst,
Repeat from * to * around the hot pad,
Join to the 1st slst with a slst,
ch12, 12 sc around the ch12 loop, join to the 1st sc,
tie
off, weave in the ends.
AN AD Free PDF file is Available
In My Ravelry Shop At This LINK
For $3.50


No comments:
Post a Comment
Note: Only a member of this blog may post a comment.