Friday Fun With Sara
Pallet Garden Sign And
Pallet Garden Sign And
A Garden Whirly Jig Crochet Pattern
By Sara Sach of Posh Pooch Designs
I am so excited about today's projects.
Container Garden Area Clean Up
A Pallet Garden Sign
I explain what I did in today's video.
A Garden Whirly Jig Crochet Pattern
Whirly Jigs move in the wind and help to keep birds
out of the garden. And they bring color and fun
to any garden area.
Yarn Bee / Hobby Lobby
Scrub-ology / Scrub it Yarn
for the garden. I purchased a bunch when it was on
sale at Hobby Lobby at 30% off.
This Yarn is made of nylon. It is made to withstand
water and wear.
It has bright colors and it's easy to work with.
I will have some more projects made with this
yarn coming for the garden.
If you do not have this yarn, And bulky (5) or
2 strands of Med (4) yarn will also work.
See The Video On My Crochet Youtube
Channel At This LINK
Garden
Whirly Jig Crochet Pattern
Materials:
Crochet Hook
– K/ 6.500 MM
Yarn – Scrub
– ology Scrub It Yarn, Hobby Lobby 2.5 0 oz. / 60 yds.
(C1 – 1.5 oz., C2 – .5 oz., C2 5.
oz.
12 -14 -Beads (3/4 inch) Ones That will slide on the yarn.
(wooden, plastic, glass, clay or whatever you prefer)
Yarn Needle with a big eye
Stitches:
Chain (ch)
Single
Crochet (sc)
Double Crochet
(dc)
Skip (sk)
Space (sp)
Size: 40 inches long
2 chs = 1
inch
Notes:
Color
Choices are up to you
When
changing color leave a 6 in tail of yarn.
Pattern:
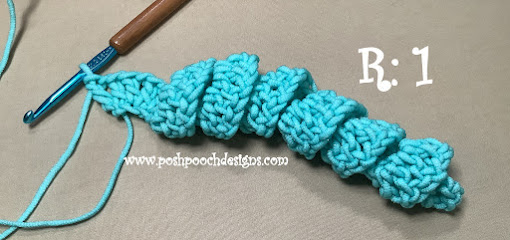
R: 1 – With
C1, Ch 80, dc, ch1, dc in the 4th ch from the hook,
ch1, dc in the same ch,
dc, ch1, dc
in each ch across, turn
For more
less ch as more, as needed
For Shorter
ch ch less, as needed.
R: 2 – Chg to C2, ch1, sc in the 1st st, ch1, sk next st,
*sc in the
next st, ch1, sk the next st*
Repeat from
* to * around,
R: 3 – Chgto
C3, ch 1, sc in the 1st sc,
*sc in the
next ch1 sp, ch1,sk the sc*
Repeat from
* To * around,
sc in the last sc,
Tie off,
gather the tails of yarn at the top,
and tie a
knot for a hanger, trim evenly.
Cut 2
strands of each color 18 inches long.
Attach to
the bottom of the jig in Fringe style.
Add a Bead or 2 to 2 strands, tie them together and trim.
Repeat on the rest of the strands.
Hang and enjoy!
See You Next Friday!


No comments:
Post a Comment
Note: Only a member of this blog may post a comment.