May Emerald Crochet Square
Crochet Pattern
By Sara Sach of Posh Pooch Designs
The May Emerald Crochet
Square Crochet Pattern is For
Our 2024Year Long Crochet A Long
It is a fun, unique granny square design.
I wanted the square to
resemble a gem stone, And I really like how
the square stitched up.
I chose to do the Photo Tutorial in lighter green
this way the pictures would be easier to see.
Remember like all the Squares, you an make
your squares in any colors you like.
What is the This Crochet ALong
All About?
FYI: Each month there is a crochet Granny Square
that is inspired by the Birthstone of each month.
There is a written pattern with pictures,
and a Brand New Video Tutorial.
Make at least 2 squares for each month.
When we finish all 12 squares we will be joining
them into a blanket,
but you can make whatever you would like.
A Bag, A Scarf, a Hat, or Whatever.
May Emerald Square
Crochet Pattern By Sara Sach
Please Add This Crochet Pattern To Your Raverly Favorites
Skill: Easy
Materials:
Crochet Hook – H / 5.00 MM
Yarn- Worsted Weight (4) I used Red Heart Super Saver
Yarn Needle
Stitches:
Chain (ch)
Slip Stitch (slst)
Double Crochet (dc)
Space (sp)
V Stitch (V st) "dc, ch1, dc"
Size: 6 inch Square
Notes:
Ch 3 counts as a dc,
Ch4 counts as dc, ch1
Round are joined with a slst
Pattern:
R: 1 - Ch5,
Join in a Circle
In the circle ch4, *dc, ch1* Repeat From * to * 10 times,
join to the top of the ch3, slst in the ch 1 sp.
(12 sets of dc, ch1)
R: 2 – Ch4, dc in
the 1st ch1 sp,
Join to the ch3. slst in the ch 1 sp. (12 V sts)
Join to the ch3. slst in the ch 1 sp. (12 V sts)
R: 3 - Forming the Corners -
Working in the ch1 sp of the
1st V St,
ch3, dc, ch1, 2 dc, (1st corner made)
*1 V St in the ch1 sp of
the next 2 V Sts, 2dc, ch1,
ch3, dc, ch1, 2 dc, (1st corner made)
2dc in the next V St*
Repeat From * to * 2 more times.
1 V St in the last 2 V Sts, join to the top of the ch3.
(4 Corners and 8 V sts)
Repeat From * to * 2 more times.
1 V St in the last 2 V Sts, join to the top of the ch3.
(4 Corners and 8 V sts)
Working
in the ch1 sp of the 1st corner,
1 V st in the next V St,
ch1, 1 V St in the next V st, ch1
*2dc, ch1, 2 dc, ch1 in the next Corner, V St,
*2dc, ch1, 2 dc, ch1 in the next Corner, V St,
ch 1 in the next 2 V sts, ch1*
Repeat From * to * 3 more times, join to top of ch 3.
(4 corners, 8 V st with ch1s between)
Repeat From * to * 3 more times, join to top of ch 3.
(4 corners, 8 V st with ch1s between)
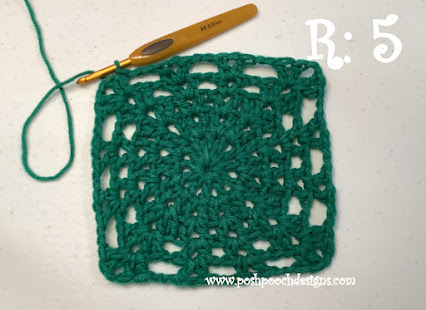
R: 5 - Slst in the 1st dc, then
Working in the ch1 sp of the 1st corner,
2dc, ch1, 2dc, 1 dc in the next 2 dc, ch2
V St in the next V St, ch2, V st in the next V st, ch 2,
*1 dc in the Next 2 dc,
2dc, ch1, 2 dc in the next corner, dc in the next 2 dc,
V St in the next V St, ch2, V st in the next V st, ch 2*
Repeat From * to * 3 times
1 dc in the next 2 dc, join to the top of the Ch3,
slst in the next ch1 sp, ch1
R: 6 –* 2sc, ch1, 2sc in the 1st ch1 sp,
Repeat from * to * on the next 3 sides,
Join to the 1st sc, tie off weave in your ends.
An Ad Free PDF file is Available
In My Ravelry Shop At This LINK
For $3.50


No comments:
Post a Comment
Note: Only a member of this blog may post a comment.