Tuesday, April 30, 2013

Key Chain Bag Crochet Pattern

Keychain Bag Crochet Pattern
By Sara Sach of Posh Pooch Designs


The perfect size to fit change, lip balm,
or any little thing you do not want to loose.

Hook this bag to your keys, bag, backpack, 
purse, or hang it on your car mirror.

See the Video on my Youtube Channel
At This LINK


Keychain Bag Crochet Pattern by Sara Sach
Please, Add This Crochet Pattern to your Ravelry Favorites.

 Skill: Easy

Materials:
Crochet Hook - H / 5.0 MM
Cotton Yarn - Peaches and Cream(. 5 oz.)
                       or any Med (4) yarn you choose
Key Chain circle
1 cute little 1 inch button of Choice

Stitches:
chain (ch)
Slip Stitch (slst)
Single Crochet (sc)

Size: Bag measure 3.5 inches  by 2.5  inches.

Pattern Notes:
Ch1 does not count as a stitch
Rounds are joined with a Slip Stitch

R: 1 - Ch 9, 2 sc in the 2nd ch from the hook, 1 sc in the next 6 chs, 2 sc in the last ch,
 turn working down the opposite side of the ch,
2 sc in the 1st st, 1 sc in the next 6 chs, 2 sc in the last ch,
 join with a sl st to the 1st sc, ch 1 (20 sc)

R: 2 - 1 sc in each sc around, join, ch 1 (20sc)

R: 3- R: 8  - Repeat R: 2

R: 9 - 1 sc in the next 10 sc, ch 1, turn (10sc)

R: 10-11  - Repeat R: 9


R: 12 - St 1st 2 sc together, 1 sc in the next 6 sc, st the last 2 sc together, ch 1 turn (8sc)

R: 13 - St the 1st 2 sc together, 1 sc in the next 4 sts, St the last 2 sc. (6sc)

R: 14 - St 1st 2 sc together, 1 sc in the next st, then ch 4, 1 sc in the next st, 
st the last 2 sc together, tie off and weave in your end. (2sc, ch4, 2sc)


R: 15 -Attach yarn to the inside of the bag flap, on the right side,
sc up the side of the flap, when you reach the ch4,
 st 4 sc in the ch 4 space, then sc down the remaining side of the bag flap.

R: 16 - Bag Handle: Then ch 18, cut the yarn leaving about 10 inches. 
Slip the ring over the ch, and attach to the opposite side of the bag, to form a handle.


Perfect size to slide your ID or business card.
Super quick and easy to stitch up.

An AD Free PDF File is Now Available 
For $2.50 in my Ravlery shop
 At This LINK

Saturday, April 20, 2013

Dog Bed Crochet Pattern

Dog Bed Crochet Pattern -  Adjustable Dog Bed
Maximo and Rosie are getting used to their new bed.

Please, Add This Crochet pattern to Your
Skill level : Easy

Materials:
Hook size : J / 6.00 MM
16 oz. of Worsted Weight Yarn ( I used Caron One pound - Taupe)
Stitch marker or 15 inch piece of a different color of yarn

Stitches :
Chain  (ch)
Slip Stitch ( sl st)
Single Crochet  (sc)
Double Crochet ( sc)


Pattern Notes :  2 sts = 1 inch

We will be working the whole pattern with 2 strands of yarn. I pull 1 strand from the center and  1 strand from the out side, in order to use just one skein of yarn.

We will work The center section of the dog bed  in rounds.

Pattern :

R : 1 - Ch 3, 10 sc in the 2nd ch from the hook, join  with a sl st to the 1st sc to form a circle.

R : 2 - 1 sc in next st, 2 sc in each sc around.

R : 3 - 1 sc in the next st,  1 sc in the next st, * 2 sc in the next st, 1 sc in the next st, Repeat from * around.

R : 4 - 1 sc in the next st,  1 sc in the next 2  sts, * 2 sc in the next st, 1 sc in the next st, Repeat from * around.

R : 5  - 1 sc in the next st,  1 sc in the next  3 sts, * 2 sc in the next st, 1 sc in the next 3 sts, Repeat from * around.

R : 6 - 1 sc in the next st,  1 sc in the next  4 sts, * 2 sc in the next st, 1 sc in the next 4 st, Repeat from * around.

R : 7 -  1 sc in the next st,  1 sc in the next  5 sts, * 2 sc in the next st, 1 sc in the next 5 sts, Repeat from * around.

R : 8 - 1 sc in the next st,  1 sc in the next  6 sts, * 2 sc in the next st, 1 sc in the next 6 sts, Repeat from * around.

R : 9 - 1 sc in the next st,  1 sc in the next  7 sts, * 2 sc in the next st, 1 sc in the next 7 sts, Repeat from * around.

R : 10 - 1 sc in the next st,  1 sc in the next  8 sts, * 2 sc in the next st, 1 sc in the next 8 sts, Repeat from * around.

R : 11 - 1 sc in the next st,  1 sc in the next  9 sts, * 2 sc in the next st, 1 sc in the next 9 sts, Repeat from * around.

R : 12 - 1 sc in the next st,  1 sc in the next  10 sts, * 2 sc in the next st, 1 sc in the next 10 sts, Repeat from * around.

R : 13 - 1 sc in the next st,  1 sc in the next  11 sts, * 2 sc in the next st, 1 sc in the next 11 sts, Repeat from * around.

R : 14 - 1 sc in the next st,  1 sc in the next  12 sts, * 2 sc in the next st, 1 sc in the next 12 sts, Repeat from * around.

R : 15 - 1 sc in the next st,  1 sc in the next  13 sts, * 2 sc in the next st, 1 sc in the next 13 sts, Repeat from * around. 

R : 16 - 1 sc in the next st,  1 sc in the next  13 sts, * 2 sc in the next st, 1 sc in the next 14 sts, Repeat from * around.

R : 17 - 1 sc in the next st,  1 sc in the next  13 sts, * 2 sc in the next st, 1 sc in the next 15 sts, Repeat from * around. 

R : 18 - 1 sc in the next st,  1 sc in the next  13 sts, * 2 sc in the next st, 1 sc in the next 16 sts, Repeat from * around.

R : 19 - 1 sc in the next st,  1 sc in the next  13 sts, * 2 sc in the next st, 1 sc in the next 17 sts, Repeat from * around.

R : 20 -  1 sc in each sc around.

 Circle should measure approximately 17 inches at this point.

This bottom section may curl some if you are a tight stitcher, if so you can block it before you start the side.

If you want the dog bed  bigger continue to follow the pattern adding increase stitches.


R : 21 - Sl st in the next st, then turn, stitching the opposite direction, 1 dc in each sc around, join to the 1st dc with a sl st, ch 2

R : 22 - 1 dc in each dc, until 20 dc are left, turn, leaving the last 20 dc un-worked. leaving a opening for the front of the dog bed.

R : 23 -  Ch 2, 1 dc in each dc around, turn

R : 24 - Ch 2, * 1 dc in the next 6 dc, st the next 2 dc together ( dc dec) * , Repeat from
 * to *  around, turn

R : 25 - Repeat R : 24

R : 26 - Ch 1, 1 hdc in dc, turn

 R : 27 - 1 sc in each hdc, 1 sc in the 1st corner of the opening, sc evenly down the side of the opening, sc across bottom of opening, then back up the other side, 2 sc in the second corner, tie off and weave in end.

If no extra rounds were added, dog bed will measure approximately 20 inches.


Have fun with colors and Yarns!

An Ad Free PDF file is Now Available
 in my Ravelry Shop
 For $2.50 at This LINK

Friday, April 19, 2013

WE are on Google +


Today We started an account on 


I don't really know how to use 
it but want to learn,
So all help, advise and thoughts
are appreciated.

We are also on


So "Like, pin and Tweet"
Us!


Maximo and Rosie Say get back to work!!!
(I do not know why the pic is sideways!!!)


Thursday, April 18, 2013

Round Dog Mat Crochet Pattern

Round Dog Rug Crochet Pattern
By Sara Sach of Posh Pooch Designs


We has redesigned, retested and updated This Crochet Pattern.
And Used a new yarn as well.
Bernat Maker Yarn Fiesta Multicolor
72% Cotton and 28 % Nylon
 It is a Bulky (5) and we stitched up the Rug using 2 strands so it a sturdy rug for using outside, as well as, inside.
I hope you will love the new design of the Rug.
 It's Maximo and Rosie Approved.

Round Dog Mat Crochet Pattern
Please, Add This Crochet pattern to Your Ravelry Favorites

Skill level : Easy

Materials:
Hook Size: N/ 9.00MM
Yarn- Bernat Maker (6) 12 oz.
Big Yarn Needle

Stitches:
Chain (ch)
Slip Stitch (sl st)
Single Crochet (sc)
Double crochet (dc)
Skip (sp)
Space (sp)

Size: 24 inches across

Notes:
Rug is stitched holding 2 strands of yarn together
Ch3 Counts as a dc
Rounds are joined to the ch3 with a slst

R: 1 - Ch5, join in a Circle, ch 3, 11 dc in the circle, join, ch 3 (12 dc)

R: 2 - 1dc in the same st as the ch3, 2 dc in each dc around, join, ch 3 (24 dc)

R: 3 -1dc in the same st as the ch3, 2 dc in each dc around, join, ch 3 (48 dc)

R: 4 - 1dc in the same st as the ch3, *1 dc in the next 3 dc, 2 dc in the next dc*
Repeat From * to * around, join, ch 3. (61 dc)

R: 5 - 1 dc in the next 2 dc, *ch2, sk 1 dc, 1 dc in the next 3 dc*
Repeat From * to * around, join, ch 3 (46 dc, 32 chs)

R: 6 - 1 dc in the next 2 dc, *3dc in the ch 2 sp, 1 dc in the next 3 dc*
Repeat From * To * around, join, ch 3 (101 dc)

R: 7 - 1 dc in the next 4 dc, *ch 2, sk 1 dc, 1 dc in the next 5 dc*
Repeat From * to * around, join, ch 3 (86 dc, 32 ch)

R: 8 - 1 dc in the next 4 dc, *3dc in the ch 2 sp, 1 dc in the next 5 dc*
Repeat From * To * around, join, ch 3 (134 dc)

R: 9 -1 dc in the next 6 dc, *ch 2, sk 1 dc, 1 dc in the next 7 dc*
Repeat From * to * around, join, ch 3 (128 dc, 32 chs)

R: 10 -1 dc in the next 6 dc, *3dc in the ch 2 sp, 1 dc in the next 7 dc*
Repeat From * To * around, join, ch 3 (196 dc)


R: 11 - Trim:
1 dc, ch1, 2 dc in the same st as the ch 3,
*sk2 dc, sc in the next dc, sk 2 dc, 2dc, ch1, 2dc in the next dc*
Repeat From * to around, join, tie off weave in your ends.


Monday, April 15, 2013

Dewey The Chihuahua

This morning, I received an Email From a Sweet lady 
who had purchased many of my patterns.

here is that email: 


DEWEY

"Dear Sara, 
            ...I have a couple pictures of my little guy to share with you. He was amazing and much loved. He touched so many people and inspired them to always look for possibilities. He was well known for his many hats and sweaters - many of them from your designs, which I credited to you. (In fact, I am making another football hat right now for a friend's dog.)
I only had him for about 15 months, but I will treasure every minute of that time. I also have another pooch now - a little girl rescue - a chihuahua fox terrier named Penny. She is being clicker trained now and will ultimately (hopefully) become a geriatric therapy dog. She is a joy.
THANK YOU for your fun and wonderful patterns. They have brought so many happy hours of therapeutic crochet to me and many countless hours of joy to my residents, who just loved seeing what Dewey would be wearing next.
Thanks again.
Mary Bastian "


here is an article about Dewey as well.
This just made my day!!!!


Friday, April 12, 2013

Quick and Easy Granola Bars

I am on the look out for Quick and Easy Snacks
 that are healthy and taste good.

After Searching Pinterest, Googling and 
experimenting, 
I came up with this great recipe.
I bought this Granola at Sprouts.
Its Coconut, Blueberry Banana.

Ingredients:
1 Cup of the Granola
2 very ripe bananas

Peel and smash the bananas, 
mix in the granola.
press into a cake pan, 
and bake for 10 minutes at 350 degrees.

Take out of the oven and 
cut while still warm.
You can eat them warm, 
or let them cool.
Either way, they are
YUMMY!

OK, back to designing Dog Clothes.


Please let me know 
if you tried the recipe!
I love them!

Saturday, April 6, 2013

Gardening 2013

In an attempt to make a 
"New Healthier Me",
I have decided to start my garden.
I planted
 kale,
Kale is a Super Cancer fighter!!!!
Then I planted 
a Assortment of 
lettuce seeds.
Some 
Spinach Seeds,
And lastly, Some 
Cilantro seeds, 
I also plan to plant some tomatoes, 
cucumbers and 
sweet mini pepper plants.
But, Its too early for them.
I Know 
real exciting stuff!
But .....
Watch them grow!


Tuesday, April 2, 2013

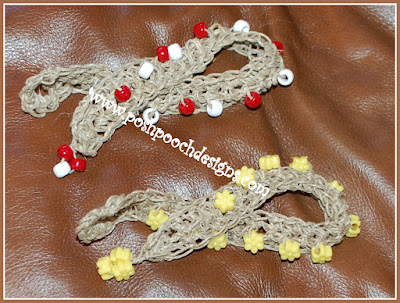
Hemp Beaded Dog Collar Crochet Pattern

Hemp Beaded Dog Collar 
Crochet Pattern
By Sara Sach of
 Posh Pooch Designs
Rosie Bell And Maximo look Springy
 in her new Collar!
The is a Wonderful and Easy Beginner project, 
for Summer.
This Collar can easily made into a necklace or bracelet for you.
Measure and make it at the length you want or need.
This pattern can be stitched in Jute/ hemp, or Worsted Weight (4) yarn, or Cotton yarn.
And Whatever Beads you choose:
Glass, Wooden, plastic or polymer clay.

See The Video On my Youtube Crochet
Channel At This LINK

Hemp Dog Collar Crochet Pattern By Sara Sach
Please add this Crochet Pattern to Your Ravelry Favorites.

Skill : Easy

Materials:
Hook- H / 5.00MM
Hemp - about 1 oz
Beads - 15 or more
Tape Measure
Yarn needle

Stitches:
Chain (ch)
Single Crochet (sc)
Slip Stitch ( sl st)

Size: Adjustable - 3 chs = 1 inch + 1 ch

Getting Started:
First thing you need to do is measure your dog's neck.
Or your wrist or length for a necklace for you.

Pattern :

R: 1 - Lace the beads onto the hemp, and pull them forward.  Ch 37,

( for a 12 inch neck. add or subtract 3 chs per inch + 1 ch. 
If you added or subtracted length you will need 
to adjust the amount of beads, as well.)

1 sc in the 2nd ch from the hook, and in each ch, ch 1 turn. (36 sc)

R: 2 - 1 sc in the first 3 sc,  * push 1 bead  toward the hook,
 1 sc in the next 3 sc,
Repeat From * across row. Continue Until there are only 3 sc left,
 1 sc in the last 3 sc, ch 1 turn. if there are left over beads just push them forward
and you can remove them at the end of the project.

R: 3 - 1 sc in each sc, Ch1.
Place the ends together and st 3 slsts across both ends, tie off weave in the ends.


Optional -Toggle Button :

R: 3 - 1 sc in each sc, attach ch to the opposite corner of this end to 
form a loop for the button hole. 5 sc on the button hole loop, 
tie off and weave in your ends.

Lace 3 of the pony beads onto a 10 inch piece of the hemp. 
Push them tight and tie a knot. Attach them to opposite send of the Collar,
 tying securely. 
 If your button hole is too big, and the toggle slips through, 
sew up the button hole to make it smaller.

Have fun!