Saturday, September 28, 2019

How I Dyed Yarn With Coffee...It was so fun! | Posh Pooch Designs

How I Dyed Yarn With Coffee...
It was so fun!
 Sara Sach of  Posh Pooch Designs


Someone told me about yarn that was dyed with coffee.
It sounded amazing to combine the 2 things I enjoy, 
or should I say love. 
"Yarn And Coffee".
So I did!

What I Used:
100% Cotton Yarn - 3 Skeins
I want to dye them 3 different shades.
Yarn Bee Cotton XXL 100% Cotton (5) 
- White 3.5 oz. 50 yards each

Any yarn that is 100% Animal Fiber or Cotton will work.
Acrylic or Acrylic Blends will not work.

A Huge Pot of Folders Dark Coffee (12 cups)
Salt - just a pinch
A Pot Of Boiling Water - About 3 cups
I use this to thin out the coffee.
A Plastic Strainer
A hand held Potato Masher and Wooden Spoon
3 Large Plastic Bowls
3 Plastic Hangers

Here is What I Did:

1.Made the Coffee - really strong - 
with a pinch of table salt.

Got the pot of water on the stove boiling.

Made my self a Cup of coffee to sip on.
YUMMY!


2. I poured 3 cups of Coffee in the 1st bowl, 
2 Cups of Coffee, and 1 cup of boiling water
 in the 2nd bowl, and 
1 cup of Coffee and 2 Cups of boiling water
 in the 3rd bowl.

Be careful it is very hot!


I am hoping to get 3 shades of the Yarn.

3. I removed the yarn wrappers, 
loosened up the balls of yarn, and carefully put a
 ball of Yarn in each bowl.
Using my potato masher, I gently pushed the yarn down
 to help it soak up the coffee.
I flipped over the ball very carefully as not to burn myself.
I again pushed down the yarn, and repeated this until the yarn was fully saturated with the coffee. 

4. I let it set and soak:
 3 hours for lightest one,
 6 hours for the middle one, 
9 hours for the darkest one.

5. I put the strainer in the sink and rinsed the ball
 until the water ran clear. 
 This will take about 10 minutes.

If using Wool yarn... do not agitate the yarn, or it will felt.

If the color is not dark enough, you can repeat Steps 1 - 5
until it's the shade you want.

6. After  this,I squeezed out the excess water,
And  I rolled the ball in long loops, and hung
 it on a hanger, on my back deck, to dry.

Rosie is watching guard, making sure the Birds
 don't steal the yarn for nests.

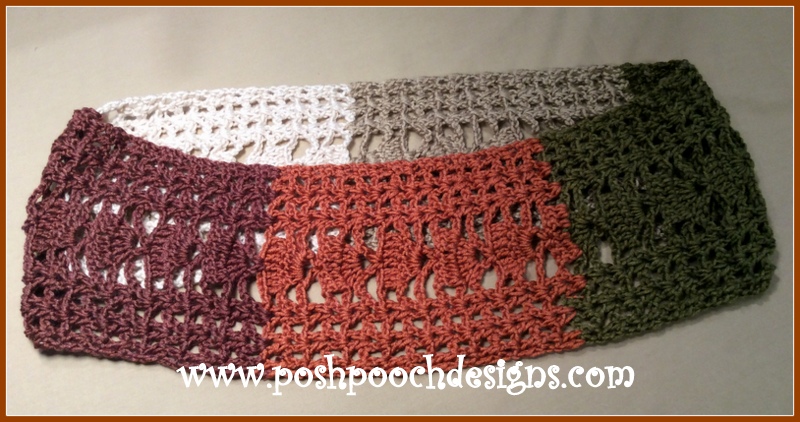
7. After The yard is dry, I Rolled it into cakes.
they are not as dark as I wanted, 
but I do really like how they turned out.

I am going to make a Bread Basket for 
Holiday Celebrations.
I will let you know how it turned out.


This really was fun, and I have some 
thin Cotton I want to try dying with tea.

I have a friend who told me she soaks in coffee 
once a week for all over even tan. 
She always has a lovely tan,  so I may have to try it. 


Wednesday, September 25, 2019

Hoot The Owl Washcloth and Pot Holder Crochet Pattern | Posh Pooch Designs


Hoot The Owl Washcloth
 and Pot Holder Crochet Pattern
  By Sara Sach of Posh Pooch Designs


Hoots The Owl can be a Washcloth, 
Pot Holder or a Decoration.
Make him in the colors to match your kitchen.
Or maybe in Holiday colors.

Remember: If you are going to use this a
 Pot Holder or hot pad, 
make it with cotton yarn, as Acrylic yarn can burn.
If it's a decoration, acrylic yarn is fine.

See The Video on my Youtube Crochet
 Channel At This LINK


Hoot The Owl Washcloth and Pot Holder 
Please add this crochet pattern to your Ravelry Favorites

Skill: Easy

Materials:
Crochet Hook I / 5.50 MM
Yarn- Cotton (4) Acrylic will work if you prefer
                             (2 oz total) (Main Color- MC, Color 2 –c2, 9
                             small amount of yellow, small amount of brown
Yarn Needle

Stitches:
Chain (ch)
Slip Stitch (slst)
Single Crochet (sc)
Half Double crochet (hdc)
Double crochet (dc)
Change To ( chgto)
Space (sp)
Stitch (st)
Skip (sk)

Size: 8 X 9 inches

Notes:
Ch3 Counts as a dc
Rows are joined with slst to the ch3

R: 1 – With MC,  Ch5, join in a circle, ch 3, 11 dc in the Circle, join, ch 3 (12 dc)

R: 2 – 1 Dc in the same st as the ch3, 2 dc in each dc around, join.
slt in the next dc (24 dc)

R: 3 – Chgto C2, slst between the next 2 dc, ch 3, 2dc in the same sp,
*ch2, sk the next 3 dc, 3 dc between the next 2 dc*
Repeat From * to * 6 More times, join, sl st in the next 2 dc, slst in ch 2 sp, ch 3
(8 sets of 3 dc, ch2)

R: 4 – 1 dc in the same sp as the ch 3, ch2, 2 dc in the 2nd dc of the next 3dc set,
*ch2, 2 dc in the next ch 2 sp, ch2, 2 dc in the 2nd dc of the next 3dc set*
Repeat From * to * 6 more times, join, slst in the next dc, slst in the next ch2 sp.
(16 sets of 2dc, ch2)

R: 5 – Chgto to MC, ch3, 2dc n the same ch2 sp, ch 2,
*3dc in the next ch2 sp, ch 2*
Repeat From * to * 14 more times, join, ch 3
(16 sets of 3dc, ch2)

R: 6 – Forming the Owl Head –
1 dc in the next sts, 2 dc in the next st,
*1 dc in the next 2 sts, 2 dc in the next st*
Repeat From * to * 4  for times, Turn, ch 3
(24 dc)

R: 7 – 1 dc in each dc, turn, ch 3 (24 dc)

R: 8 – Repeat R: 7, ch1

R: 9 – Do Not Turn, st 6 sc down the 1st side of the owl head,

Working around the Owl Body, 1 sc in each ch2 sp, 1 sc in each dc,
Work 6 sc up the 2nd side of the owl head, 3 sc in the corner,

1 sc in each dc across the top of the how head, 3 sc in the corner,
join to the 1st sc with a slst, ch1

R: 10 – slst in the 6 sts down the side of the owl head,
*4 dc in the 1st sc in the ch2 sp, sc in the sc in the 2nd dc of the next set of 3 dc*
Repeat From * to * 11 more times, till you reach the 2nd side of the owl head,
 join, tie off (13 shell sts)

Eyes:  Make 2
R: 11 – With Pupil Color, Ch 5, join in a circle, ch3, 9 dc in the circle join. (10 dc)

R: 12 – Chgto C2, ch2, 1 hdc in the same st as the ch2, 2 hdc in each dc, join,
Tie off leaving a 12 inch tail of yarn for sewing on owl. (20 hdc)

Beak:
R: 14 - With beak color, Ch 4, 3 dc in the 4th ch from the hook, turn, ch 1(4 dc)

R: 15 -1 sc in each dc, tie off, leaving a 12 inch tail of yarn for sewing on owl. (4 sc)

Place the beak and eyes on the owl as shown in picture and sew in place.

An Ad Free PDF File is Available
 For $3.50 In my Ravelry Shop
At This LINK


Tuesday, September 24, 2019

COFFEE AND CROCHET WITH SARA (30) Do I Really Need Stitch Markers?

COFFEE AND CROCHET WITH SARA (30) 
"Do I Really Need Stitch Markers?"
With Sara Sach of Posh Pooch Designs

🍁🍁🍁🍁🍁🍁🍁🍁🍁🍁🍁🍁🍁🍁🍁🍁🍁🍁🍁🍁🍁🍁🍁🍁🍁🍁🍁🍁🍁


You don't have to have them, 
but they will make your life a lot easier.

What's a Stitch marker?

It is, basically, something to make a stitch with.

It can be a purchased "Stitch Maker", or anything
 used to mark a stitch.

How Do I use Them?

You attach them to the stitch you want to mark.
To keep track of chains, mark every 20 chains, 
or mark the 1st stitch of a row when stitching in
 the round.
If you have a lot of repeat rows, mark every 
20 rows or so.

What if I Don't have any?

 There are many options to Stitch markers, 
besides an actual "Stitch Marker". 
 A paperclip, safety pin, 
or even a different color of yarn can be
 a stitch marker.

See The Video on my Youtube Crochet
 Channel At This LINK


🍁🍁🍁🍁🍁🍁🍁🍁🍁🍁🍁🍁🍁🍁🍁🍁🍁🍁🍁🍁🍁🍁🍁🍁🍁🍁🍁🍁🍁

What's Happening This Week at

Essential Boot Cuffs
Crochet Pattern and Video - LINK


Pumpkin Washcloth, Doily and Hot Pad
Crochet Pattern and Video - LINK


Bamboo Lace Cowl And Scarf
 Crochet Pattern and Video - LINK


Thanks For Stopping by!


See Y'all Next Week! 


Monday, September 23, 2019

Bamboo Lace Cowl Crochet Pattern | Posh Pooch Designs

Bamboo Lace Cowl And Scarf
Crochet Pattern
By Sara Sach of Posh Pooch Designs


I used Pantone Bamboo Yarn For this crochet pattern.
The Yarn is made By Yarnspirations.
The Color way is Cherry Cheesecake.
It is 60% Acrylic, 20 % Nylon, 
and 20% Viscose made from Bamboo.
It is machine washable and dryable
Each hank has 3.5 oz


The Bamboo Pantone yarn is very soft and silky.
It has a beautiful sheen, with lovely drape. 
It's perfect this Lace Cowl and Scarf.

See The Video on my Youtube Crochet
 Channel At This LINK


Bamboo Lace Scarf or Cowl Crochet Pattern 
Please Add This Crochet Pattern to Your Ravelry Favorites

Skill: Easy

Materials:
Crochet Hook – H / 5.00MM
Yarn – Med (4) I used Caron/ Pantone bamboo- Cranberry Meadow (3.5 oz.)
            1 Hank for Cowl, 2 Hanks For Scarf
Yarn needle

Stitches:
Chain (ch)
Slip Stitch (slst)
Single Crochet (sc)
Double Crochet (dc)
Skip (sk)
Space (sp)

Size: 7 w. X 40 L cowl, Scarf 80 L Inches
2 Rows = 1 inch (Cowl 80 Rows, Scarf 160 Rows)

Notes:
Ch3 Counts as a DC
If Using The Pantone yarn, roll your yarn into 5 balls For Cowl,
10 balls for scarf.
When one runs out, join the next one in.

How To Use Pantone Yarns: LINK

Pattern:

R: 1 – Ch 27, 1 dc in the 4th ch from the hook, 1st 3 chs count as a dc,
Dc in the next ch, ch2, sk 2 chs, dc, ch1, dc in the next ch, ch2
Sk 2 chs, dc, ch1, dc in the next ch, ch4, sk 4 chs,
dc, ch3, dc in the next ch, ch4, sk 4 chs,
dc, ch1, dc, in the next ch, ch2, sk 2
dc, ch1, dc in the next ch, ch2, sk 2, 1 dc in the last 2 chs, turn, ch 3.

R: 2 – 1 dc in the next dc, ch2, dc, ch1, dc in the ch1 sp, ch2,
Dc, ch1, dc in the next ch1 sp, ch 3,
5 dc in the ch 3 sp, ch3,
Dc, ch1, dc in the next ch1 sp, ch2,
Dc, ch1, dc in the next ch1 sp, ch2, 1 dc in the last 2 dc, turn, ch 3

R: 3 - 1 dc in the next dc, ch2, dc, ch1, dc in the ch1 sp, ch2,
Dc, ch1, dc in the next ch1 sp, ch 2,
2 dc in the next dc, 1 dc in the next 3 dc, 2 dc in the next dc, ch2,
Dc, ch1, dc in the next ch1 sp, ch2,
Dc, ch1, dc in the next ch1 sp, ch2, 1 dc in the last 2 dc, turn, ch 3

R: 4 - 1 dc in the next dc, ch2, dc, ch1, dc in the ch1 sp, ch2,
Dc, ch1, dc in the next ch1 sp, ch 4,
Dc, ch3, dc in the 4th dc, ch 4,
Dc, ch1, dc in the next ch1 sp, ch2,
Dc, ch1, dc in the next ch1 sp, ch2, 1 dc in the last 2 dc, turn, ch 3

R: 5 – 80 (160) Continue to Repeat R: 2 – R: 4

Cowl - Place the ends together, slst closed, tie off weave in your ends.

Scarf - tie off weave in your ends.


An Ad Free PDF File is Available 
For $3.50 In my Ravelry Shop
 At This LINK


Wear the Cowl long,


or Wrap it around for a shorter 
and warmer Cowl

Thursday, September 19, 2019

Acorn Crochet Pattern Collection | Posh Pooch Designs

Acorn Crochet Pattern Collection 
By Sara Sach of| Posh Pooch Designs

🍂🍂🍂🍂🍂🍂🍂🍂🍂🍂🍂🍂🍂🍂🍂🍂🍂🍂🍂🍂🍂🍂🍂

I have put together a Crochet Pattern Round up
 of Free Acorn Crochet Patterns.
All These Crochet Patterns are designed By different designers. 
 I Know you will love them. 
Please, let them know you love their patterns, 
and say a quick thank you.


Click the NAME of the Crochet Pattern you
 want to see.
 It is the LINK to where the free 
crochet pattern is located.

By Sara Sach of Posh Pooch Designs

By Elisabeth Spivey

 By Divine Debris

By Alexandra Richards

By Cylinda D.Mathews

By Kathy Lashley

by Divine Debris

By Erica Fedor

By Ashley Leither

By Nadia Faud

Bonus Pattern: Little Acorn Applique - LINK


Please Pop over To My 
Youtube Crochet Channel
At This LINK

You will find Crochet Pattern Tutorials,
Live Videos, Give Aways and 
Lots of Yarnie Fun!


Hope to See ya There!

Wednesday, September 18, 2019

Pumpkin Washcloth, Doily And Hot Pad Crochet Pattern | Posh Pooch Designs


Pumpkin Washcloth, Doily And Hot Pad Crochet Pattern
By Sara Sach of  Posh Pooch Designs

This Pumpkin Pattern can be used as a 
Washcloth, Doily or Hot Pad.

Remember:
 If you going to use it as a Hot Pad/ Pot Holder
 use Cotton Yarn only.
If you are going to Use it as a Doily,
Any yarn is fine.

Light Variegated Orange - Premier Cotton Yarn
Bright orange - Peaches and Cream Cotton Yarn
Rust- Red heart Super Saver Yarn/ Acrylic


See The Video On my Youtube Crochet
 Channel At This LINK


Pumpkin Washcloth, Doily and Pot Holder Crochet Pattern

Please Add This Crochet Pattern to Your Ravelry Favorites

Skill: Easy

Materials:
Crochet Hook – H/5.00 MM
Yarn- Cotton –peaches and cream – orange, small amount of green for stem and curl.
           Med (4) For Doily or decoration 2 oz.
Yarn Needle

Stitches:
Chain (ch)
Slip Stitch (slst)
Single Crochet (sc)
Double Crochet (dc)
Skip (sk)
Space (sp)


Notes:
Ch3 Counts as dc
Rounds are joined with a slst to the ch3
Ch 4 Counts as a dc, ch1

R: 1 – Ch 5, join in a circle, ch3, 9 dc, join, ch 3
(10dc)

R: 2 – Dc in the same st as the ch3, 2 dc in each dc, join, ch4
(20dc)

R: 3 – *dc, ch1 in the next dc*
Repeat From * to * around, join, ch3
(20dc, 20 ch1 = 40 sts)

R: 4 – 1 dc in the same st as ch3,
*1 dc in the ch1 sp, 2 dc in the dc* Repeat From * to * around, join
(60 sts)

R: 5- Ch5 (counts as dc, ch2) *sk 1 st, dc in the next st, ch 2*
Repeat from * to * join, ch 3 (90 sts)
Do not worry is R: 5 is a little ripply, it will flatten out after the R: 6.

R: 6 – *2 dc in the next ch2 sp, 1 dc in the next dc*
Repeat from * to * around, join, ch1 (90 dc)

R: 7 – 1 sc in each dc around, join, 
Hanger is options: ch 8, join to the 1st ch, 
tie off weave in your ends. (90 sc)


Curl and Stem:
Ch 10, 3 hdc in the 2nd ch from the hook, 3 hdc in each ch across, 
(27 hdc) do not tie off,
Ch 5, 1 slst in the 2nd ch from the hook, and in the next 3 chs to form a stem, 
tie off and sew on.
Now it's all ready to use or give.

An Ad Free PDF is Available in my 
Ravelry Shop For $3.50 at This LINK