Saturday, October 18, 2014

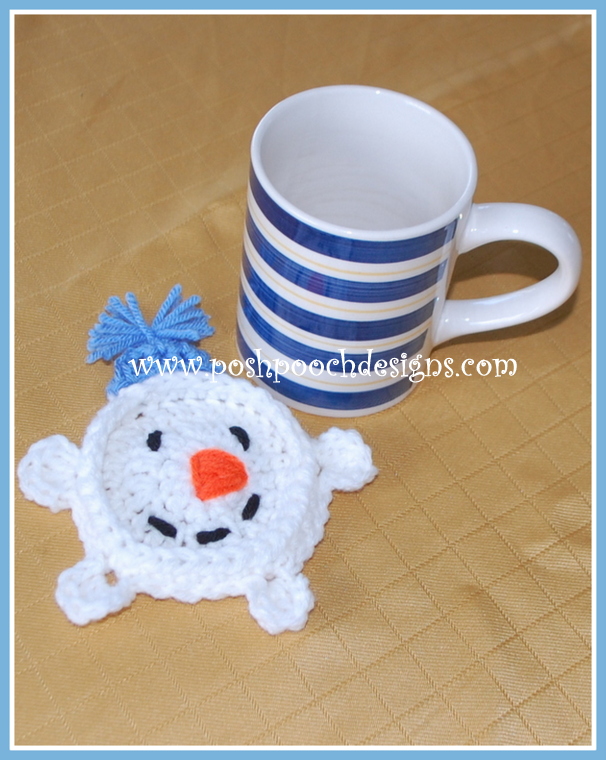
Snowman Mug Coaster Crochet Pattern

Snowman Mug Coaster Crochet Pattern
By Sara Sach of Posh Pooch Designs

THIS CROCHET PATTERN HAS BEEN RETESTED AND UPDATED WITH LOTS 
OF PICS, AND A BRAND NEW VIDEO 
AT THIS LINK


This is so Cute!
I Love how it turned out.
I love snow and snowmen!
I wanted a mug coaster that had a edge, 
so the mug would stop sliding off the coaster.

An Ad Free PDF FILE is now Available
 For $2.50 in my Ravelry Shop
 At This LINK
Now, I need to fresh cup of coffee!


Thursday, October 16, 2014

Pumpkin Patch - The Truth about Dogs and Pumpkin


What is the Truth About Dog's 
And Pumpkin?

 Pumpkin is VERY Good For Dogs, 
cats, goats, and most pets, 
But
not with sugar and spices, 
So no pies, cookies or lattes.
Save those for you!

Why Is Pumpkin Good For Our Pets?

1. It is a great source of Fiber and helps to regulate their,
 um, ya know. Keeps their "tootsie rolls" consistent.

2. Pumpkin has great nutritional value.
vitamins A, C, and E, alpha and beta carotene,
 lutein, magnesium, potassium, iron and Zinc.


3. Giving your dog or pet, pumpkin with every meal
 is beneficial in helping your dog lose or maintain weight. 


What Kind of Pumpkin Is Best?

Fresh is always best, so go pick a few pumpkins,
 and chop them up, seeds and all. 
and start feeding them to your pet.

You can also dehydrate the pieces. 
And use them as treats. My dogs love those.

Fresh pumpkin is not always available, 
so canned pumpkin is great, too.

Maximo picked his pumpkin out!

What I do.

I give my Dogs, 1 table spoon of 
canned pumpkin with every meal.
I watch for sales this time of year,
 and stock up.
Rosie's pumpkin is much bigger.

Tuesday, October 14, 2014

Red Heart's New Grande Yarn Review and A Free Crochet Pattern

Red Heart's New Grande Yarn Review 
and A Free Crochet Pattern


Red Heart Yarn has new Grande Yarn!

This yarn is completely different
 from the Old Grande Yarn.
There are nine different colors, all solids.
 I chose the Foggy Grey.

It is super bulky like the old Grande, 
But it is also Super thick and light at the same time!
The new Grande is beautiful with a wonder sheen to it.

When I began to Crochet With it, 
It was so easy to work with that it didn't even feel
like a bulky yarn.
It was light and airy.
I searched on line for a few crochet patterns
 but found only 1 crochet pattern.
I did not care for it, so I designed one of my own.

I wanted to show how pretty the yarn is, 
and how easy the yarn is work with.
And it is not heavy to wear.
I decided on designing an infinity scarf, because,
 I seem to always loose scarves that are not attached.


Foggy Grande Infinity Scarf Crochet Pattern
 By Sara Sach

Skill - Easy

Materials:
Hook -P
Yarn -2 skeins of Red Heart NEW Grande (6)
( I used the Foggy Grey and it takes all of both skeins )
1 Big Fun Button
Yarn Needle with a big eye

Stitched_ Chain (ch)
Single Crochet (sc)
sk - skip
blo - back loops only

Scarf measures - 6 inches wide X 48 inches around

Ch 103, join in a circle being careful not to twist the ch.
The number of stitches will be the same through out the pattern.
Ch 1 at the beginning of each round counts as your first st.

R : 1 - 1 sc on the 2nd ch from the hook,
* ch 1, sk the next ch, 1 sc in the next ch*
Repeat from * to * around, join,

R : 2 - ch 1, Working in the blo, 
*sk the next st, 1 sc in the next st, ch 1*
Repeat From * to *, join

R : 3-7  - Repeat R : 2, join and tie off.

Bow -
R : 1 - Ch 19, 1 sc on the 2nd ch from the hook,
* ch 1, sk the next ch, 1 sc in the next ch*
Repeat from * to * around,
ch1,(ch1 does not count as  st) turn

R : 2 -  Working in the blo, 
*sk the next st, 1 sc in the next st, ch 1*
Repeat From * to *, ch1, turn

R : 3-6 - Repeat R ; 2, tie off and weave in ends.

With a 24 inch strand of matching yarn,
 tie around the center of the bow and cinch it in tight. 
Winding around  till  all of the yarn is wound around, 
weave in your ends.

With matching yarn sew on a fun button, then sew on scarf.
By stitching this Scarf in rounds, 
you get a nice striping effect, 
but if you prefer not to have the striping effect, 
you make  the back side of the scarf the outside. 

I also think this is a great scarf for guys, 
just leave off the bow and 
you have a comfy warm scarf,
that anyone would wear. 

Monday, October 13, 2014

Max's Antler Crochet Pattern From the Grinch

The Grinch has long Been one of my 
Favorite Christmas Movies.
The original Grinch. The Cartoon.
But I always felt so sad for Max,
 The little Dog.
I Thought it would be fun to make a little 
photo prop that resembled the 
Antler that Max wore.
Max's Antler 
Crochet Pattern By Sara Sach
Please, Add This Crochet pattern to Your
Ravelry Favorites

Although this pattern is intended for the Pooches, 
Cats, bunnies,goats and any other pet 
would look adorable in this! 

What a perfect pet photo prop!

Skill: Easy

Materials -
Hook- G
Yarn -Small Amount of Worsted Weight (4) Beige, Red and Black
I used Red Heart Super Saver
Yarn needle for weaving in ends

Stitches -
Chain ( ch)
Slip Stitch  ( sl st)
Double Crochet ( dc)

This Pattern is designed for small dogs,
 I have given an explanation on how to size it for larger dogs.

Gauge -10 chs = 3 inches


The Top
With red yarn ch 81

25 ch  (1st tie), 10 chs (ear hole), 10 chs (top between the ears),
 10 chs (ear hole), 25 chs (for tie), + 1 ch as a turning ch.= 81 chs.

To make the Top part larger , add chs where needed.
It is a good idea to measure your dog's head between the ears for a good fit.

Turn, 1 sl st in the 2nd ch, and in the next 24 chs, ch 10, skip the next 10 chs,
Join to the next ch with a dc, 1 dc in the next 9 chs, ch 10, skip the next 10 chs,
join to the next ch with a sl st, 1 sl in the next 24 chs, tie off and weave in your ends.


The Antler -
With the Beige Yarn, ch 33

1 sl in the 2nd ch from the hook, 1 sl st in the 2 chs,
st tog the next 2 sl sts,  st tog the next 2 sl st,
1 sl st  in the *13 chs,

ch 6, turn, 1 sl st in the 2nd ch, and in the next 4, join to ch
sl st in the next 7 chs,

ch 6, turn, 1 sl st in the 2nd ch, and in the next 4, join to ch
sl st in the last 5 chs, tie off and weave in your ends.

Place antler in the center of the top and
tie on with the 12 in strand of black yarn.
Tie securely with a bow.


To make the antler longer for larger sizes, simply add more chs, and
add more sl st at the *. This will make the antler longer.

Optional Pipe Cleaner - You can crochet over a
 pipe cleaner/ Chenille Stem  with 33 sc, in place of the 33,
 or larger if adding chs, in  place of the 33 chs.
 This will give you a stiffer antler that is also pose able.

When I was taking these photos, 
my battery died.
Rosie just sat there waiting on me 
to change batteries.
This is the face she had when I returned.
She is such a good little model, 
But I think she was ready for her pay -
a cookie.


Friday, October 10, 2014

Cable Stitch Square hat with Pom Poms Crochet Pattern

Cable Stitch Square Hat With Pom Poms
Crochet Pattern By Sara Sach of
 Posh Pooch Designs

I have been working on this hat for a couple on months.
I have had so many orders that I am just now getting to
 releasing it. Although this hat looks hard, it is really
 quite easy. I took some pictures to help you with the 
cable section. Once you see how it is done, 
I think you will think it is easy, also.

I designed the construction of the hat a little different
 then I have ever done before, but I think it worked great
 for the cable stitch pattern. The hat is made in a long 
rectangle then sewn closed.

Cable Stitch  Square Hat with Pom poms Crochet Pattern
By Sara Sach
Please, add this Crochet Pattern to your Ravelry Favorites

Skill - intermediate

Materials -
Hook H / 5.00MM
Yarn -4 oz of Super soft (4)
I used  Lion Brand Yarn pound of Love - pink

Stitches -
Chain ( ch)
Slip Stitch ( sl st)
Single Crochet (sc)
Double Crochet (dc)
Front Post Double Crochet (fpdc)
Back Post Double Crochet (bpdc)
Front post Triple Crochet ( fptr)

Gauge 14 sc+16 rows=4

Sizes - Adult (20 inches)- youth ( child 18 inches)
The adult size will be the first number and the child size is 2nd number

Note: ch1 at the end of rows, is a turning ch, and does not count as a stitch.

Ch 39 for Adult  (33 for child)

R : 1 - 1 dc in the 2nd ch from the hook, and in each stitch across, ch 1 turn
(38, 32dc) Your number of stitches will not change through the project

R : 2 - 1 dc in the 1st st, *1 fp dc in the next st, 1 dc in the next st*,
Repeat from * to * across, ch 1 turn

R : 3  -1 dc in the 1st st, *1 bp dc in the next st, 1 dc in the next st*,
Repeat from * to * across, ch 1 turn


R : 4 - 1 dc in the next 8 (5) sts, 1 fpdc in the 2 sts, 1dc in the next 2 sts, 
1 fpdc in the next 2 sts, 1 dc in the next 2 sts, 1 fpdc in the next 6 sts, 
1 dc in the next 2 sts, , 1 fpdc in the next 2 sts, 1 dc in the next 2 sts, 
1 fpdc in the 2 sts, 1 dc in the next 8 (5) sts, ch 1 turn

Stitch Pattern Explanation : o=dc, l = fpdc
oooooooolloolloolllllloolloolloooooooo - Adult
      ooooolloolloolllllloolloollooooo - Child

R : 5 -1 dc in the next 8 (5) sts, 1 bpdc in the 2 sts, 1dc in the next 2 sts, 
1 bpdc in the next 2 sts, 1 dc in the next 2 sts, 1 bpdc in the next 6 sts, 
1 dc in the next 2 sts, , 1 bpdc in the next 2 sts, 1 dc in the next 2 sts, 
1 bpdc in the 2 sts, 1 dc in the next 8 (5) sts, ch 1 turn

R : 6 - Repeat R : 4

R : 7 - Repeat R: 5

R : 8 -1 dc in the next 8 (5) sts, 1 fpdc in the 2 sts, 1dc in the next 2 sts, 
1 fpdc in the next 2 sts, 1 dc in the next 2 sts,

skip the next 3 fpdc,

fptr in the next 3 sts,

then cross back

 and fptr in the 3 skipped sts

1 dc in the next 2 sts, , 1 fpdc in the next 2 sts, 1 dc in the next 2 sts,
1 fpdc in the 2 sts, 1 dc in the next 8 (5) sts, ch 1 turn

R : 9 -1 dc in the next 8 (5) sts, 1 bpdc in the 2 sts, 1dc in the next 2 sts, 
1 bpdc in the next 2 sts, 1 dc in the next 2 sts, 1 bpdc in the next 6 sts, 
1 dc in the next 2 sts, , 1 bpdc in the next 2 sts, 1 dc in the next 2 sts, 
1 bpdc in the 2 sts, 1 dc in the next 8 (5) sts, ch 1 turn

R : 10-45(36) -Repeat R : 4-9 5 times For Adult, 4 times for child

R : 46 ( 37) 1 dc in each stitch across, ch 1 turn
(38, 32dc)

R : 47(38) - 1 dc in the 1st st, *1 fp dc in the next st, 1 dc in the next st*,
Repeat from * to * across, ch 1 turn

R : 48(39)  -1 dc in the 1st st, *1 bp dc in the next st, 1 dc in the next st*,
Repeat from * to * across, tie off and weave in your end.

Fold Hat in half, Wrong side out. Sl St  down each side to sew the sides closed, 
Secure tightly and flip over to the right side.

 R : 49(40) Sc around the brim of the hat. 
This will insure that the sides of the hat do not come apart.

Pom pom - Wrap the yarn  around your 4 finger 30 times. 
With a 12 inch piece of yarn slip it through the loops and tie securely. 
Trim pom poms evenly.

Using the tie of the pompoms attach one to each corner of the hat.

 I did this test hat in pink, but wouldn't it be fun in 
some bright colors or variegated yarn?

An Ad Free PDF file is now Available
in my Ravelry Shop At This LINK
For $4.50

If you make one or even a bunch,
Feel free to post a picture to my face book page

Wednesday, October 8, 2014

Dog Bath Buddy - Doggie Puppet Crochet Pattern

Dog Bath Buddy Crochet Pattern
By Sara Sach of
Posh Pooch Designs
This was really fun to design.
I actually designed this Crochet pattern about 6 years ago,
I decided  to update the crochet pattern.
We Re-tested, Updated and Re-edited the Pattern
It is a lot of fun to make, and play with.
It can be a bath buddy mitt for the kids to play with
 in the tub,or a puppet for out of the tub playtime.
I have designed the puppet in basic colors,
but it would be fun to see it made in  different colors.

Isn't It cute?

See The Video on my Youtube Crochet
 Channel At This LINK


Dog Bath Buddy Crochet Pattern By Sara Sach
Please, Add This Crochet Pattern to Your Ravelry Favorites
Skill Level - Easy

Materials:
Hook - H / 5.00 MM
Yarn - Cotton Yarn / Peaches and Cream
            (White - C1, Blue -C2, Beige - C3, Red - C4)
Yarn needle

Stitches used:
Chain  (ch)
Slip Stitch (slst)
Double Crochet (dc)   
Half Double Crochet (hdc)
Change to ( chgto)
Together (tog)

Mitt Pattern: 6 X 4 

Notes:
You will work the body of the buddy from the bottom up.
Ch3 Counts as a dc
Ch2 Counts as a hdc
When changing colors, ch 3 after the color 3
Rounds are joined with a Slst to the Ch3

R:1 - With C1, ch 30, join in a circle, ch 3 
1 dc in each ch, join, and ch 3 (30 dc)

R: 2 - R: 3 -  1 dc in each dc, join, (30 dc)

R: 4 - Chgto C2, Ch3, 1 dc in each dc around, join, ch 3 (30 dc)

R: 5 - R: 6 - 1 dc in each dc around, join, (30 hdc)

R: 7 - Chgto C1, ch 3, 1 dc in each dc around, join ch 3 (30dc)

R: 8 - We will begin decreasing on this round -
1 dc in the next 2 dc *dc tog the next 2 dc, 1 dc in the next 3 dc*
Repeat From * to * around,  join ch 3 (24 sts)

R: 9 - 1 dc in the first st, *st tog the next 2 dc, 1 dc in the next 2dc*
 Repeat From * to * around,  join, ch 3 join, ch3 (18 sts)

R: 10 - *st tog the next 2 dc, 1 dc in the next dc* 
Repeat From * to * around,  join ch 3, join, ch 2 (12 sts)

R: 11 -  *Dc tog the next 2 dc*
Repeat From * to * around,  join.
Weave the tail in around the top of the mitt, 
and draw in to gather the top closed, tie tight, and fasten off. (8 sts)

Arms -  Make 2

R: 1 - With C1, ch 10, 1 dc in the  4th ch from hook,
1 dc in each ch, ch3, turn. (8dcs)

R: 2 - 1 dc in each dc, turn (8 dc)

R: 3 -  Chgto C2,  ch 3, 1 dc in each dc, ch 3, turn ( 8dc)

R: 4 -  1 dc, in each dc, , tie off leaving a 12 inch tail of yarn.
Weave in your ends.(8dc)

Fold the arm in half, meeting the sides together,
Sew the top of the blue sleeve closed.
Place on side of  buddy, and sew on.

Snout -
With C3, ch 5, join in a circle.
Ch 3, 9 dc in the circle, join and tie off leaving a 12 in tail of yarn.
place on the front of the face and sew in place with til of yarn.

With Black yarn add French knots for eyes and nose and embroider on mouth.

Ears: Make 2
R:1 - With C3, Ch 9, 1 hdc in the 2nd ch from the hook,
1 hdc in each ch across, turn, ch1 (8hdc)

R: 2 - 1 hdc in the next 7 chs, 3 hdc in the last ch, join, tie off. weave in your ends.
place on top of head and sew in place.
Bow - ch 25, tie off. knot both ends and attache to the Bath Buddy


An Ad Free PDF FILE is now Available
For $3.50 in my Ravelry Shop
 At This LINK

Wouldn't This fun to make 
for Christmas presents?
Or
Birthday Presents?

Candy Corn ideas for Halloween

What is your favorite 
Halloween Treat?
Mine is Candy corn 
with peanuts, 
mixed together!
Oh, add some M andM's
 and you have a
 "spooktacular" treat!

Here are some 
 fun Candy Corn
Ideas!
Below the picture, 
is the link 
where you can find 
the Crochet design, 
and the designer's Name.

By Calleigh's Clips and Crochet Creations

By Posh Pooch Designs

3.Candy Corn Crochet Pattern
By Kara Gunza

By Liz McQueen

By Lion Brand Yarn

By Claire Jones

By Crochet Memories

By Cylinda Mathews

By Carrie Carpenter

By Posh Pooch Designs

Here is another Halloween 
Candy Corn Round up!
by Rebekah's Treasures
with more fun ideas!
I hope you will
have some fun, 
and Get a little 
"Corny"!!!