Wednesday, May 11, 2016

Marigold Dog Collar Crochet Pattern and Video | Posh Pooch Designs

The Marigold Dog collar is a fun Summer Collar.

Perfect for picnics and Summer parties.
When we think of summer flowers, 
marigolds are one of the first flowers we think of.
This is a slip on Collar, no buttons or 
Velcro to mess with.
It fits perfectly over your pooches regular collar.
The Marigolds hang on the front of the Collar.
This pattern is easily adjusted for any 
size Dog, Cat or pet.

We have made a Video to help you stitch one up.

You can see this Video on my Youtube Channel at this LINK


Marigold Collar for Dogs, Cats and All Size Pets
Crochet Pattern By Sara Sach
Please, add this pattern to your Ravelry Favorites

Skill: Easy

Materials:
Crochet Hook - H
Yarn - Small Amount of Worsted Weight (4)
            C1 - Orange, C2 - Yellow
Tape measure to measure your pet's neck

Stitches:
Chain (ch)
Double Crochet (dc)
Half Double Crochet (hdc)
Slip Stitch (slst)
Change (chg)

Size: Small Dog (10-12 inch neck)
But easy to adjust to any size dog or pet.

Gauge: 3chs= 1 inch

R: 1 - With C1, Ch 45, join in a circle, do not twist.

R: 2 - 1 hdc in each ch, join, ch 2, Counts as a hdc.  (45hdc)

R: 3 - Repeat R : 2

R: 4 - Chg to C2 -1 sl st in the 1st 15 hdc.

**ch 6, 2 dc in the 3rd ch from the hook, ch3, sl st in the same ch
ch3, 2dc, ch 3 in the same ch,
next ch3, 2dc, ch 3 in the same ch 3 more times,
 (5 petals of the clover made)
sl st in the 3 remaining chs**

The Purple Collar is made with only 4 petals per flower.

1sl st in the next 4 hdc, Repeat From ** to **
Then, 1 sl st in the next 4 hdc, Repeat From ** to **
Then, again 1 sl st in the next 4 hdc, Repeat From ** to **
1 sl st in the last 15 hdc, join and tie off, weave in your ends.
(4 Marigolds made)

Rosie is ready for Summer Fun!

Friday, May 6, 2016

The Ladder Headband Crochet Pattern and Video | Posh Pooch Designs

The Ladder Headband/ Ear Warmer
Free Crochet Pattern and Video
By Sara Sach of
 Posh Pooch Designs
I call it Both a headband and an Ear Warmer because it is wider then a traditional headband, but not quite as wide as an ear warmer, so it the best of both designs.
It's a Quick and Easy pattern, but looks classy When wearing it.
 Just takes about two ounces of any kind 
of Worsted Weight (4) yarn you have on hand.
The headband is stitched using 2 strands of yarn,
and I show you how to do that in the video.
If you want you could also use 1 strand of Chunky (5) yarn.
So there are so many possibilities for color and texture.
Then there is the buttons!

See The New Video on my Youtube Crochet 
Channel At This LINK


Ladder Headband Crochet Pattern By Sara Sach
 Please add this Crochet Pattern to Your Ravelry Favorites


Skill: Super Easy

Materials:
Crochet Hook - J / 6.00MM
Yarn - Any Worsted Weight (4) about 2 oz.
             (grey and purple Chic Sheep, Red heart Colorscapes, or Red heart Unforgetable 
2 or 3 Decorative Buttons
Yarn Needle

Stitches:
Chain (ch)
Single Crochet (sc)
Double Crochet (dc)
Foundation Double Crochet (fdc)
Skip (sk)
Slip Stitch (slst)

Size:  Youth - Adult 20-22 inch head)

Gauge: 2 FDC = 1 inch

Pattern Notes:
The Headband is stitched by holding 2 strands of yarn together.
Ch 3 at ends of rows counts as the 1st dc of the next row.
Ch 1 at ends of rows, does not count as a st.

R: 1 - FDC 50, ch3 turn. (50dc)

R: 2 - 1 dc in each dc across, ch3 turn. (50dc)

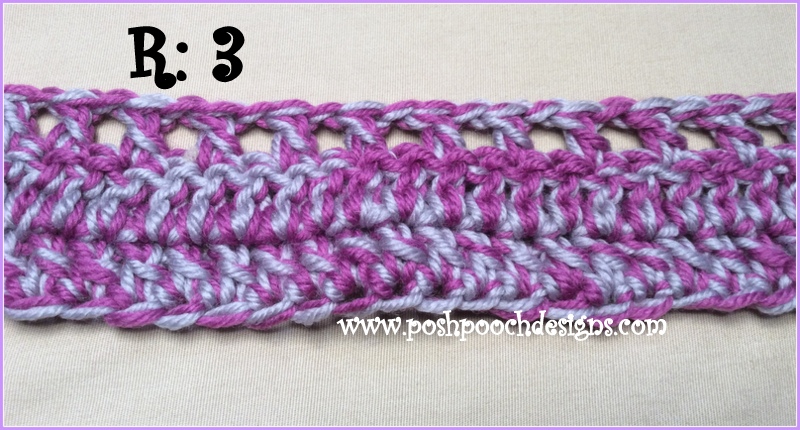
R: 3 - 1 dc in the 1st 2 dc, *ch1, sk next dc, 1 dc in the next dc*
Repeat From * to * across row, 1 dc in the last 2 dc, ch3, turn. (50 sts)

R: 4 - 1 dc in each dc, and in each ch1 space across, ch3, turn. (50dc)

R: 5 - 1 dc in each dc across, turn, ch1,

Working down the end of the headband,
st 10 sc, ( 2 sc in the end of each row), ch 1 turn ( 10sc)

R: 6 - 1 sc in each sc, ch1, turn. (10sc)

R: 7 - R: 10 -Repeat R: 6, Do not tie off.


Place the 2 ends of the Head band together, and sl st them together,
tie off, weave in your ends.

Sew your buttons in the  sc section of the Headband.
I like the way it looks like an over lap without actually overlapping the ends.

So You see there are so many ways to crochet this 
super easy headband!
Different yarn and colors, Buttons and more.
Have Fun!

An Ad Free PDF FILE is now Available
For $2.50 in my Ravelry Shop
At This LINK

Thursday, May 5, 2016

Is "Gauge" Important in Crochet? | Posh Pooch Designs

When I first began learning to crochet,
 I had no idea what gauge was.
After I learned a few stitches, and techniques,
 I realized it is important, even in Crochet.


"Crochet Gauge is the number of stitches across per inch, 

and the number of Rows down per inch,

 when stitching a swatch, to check for tension." 


Usually the Yarn label will indicate the Swatch to be

Stitched in Single Crochet Stitches (sc). 


Here is one I photographed from a yarn label.


On This Yarn Label


9 Single Crochet Stitches across, for 12 Rows
will equal a 4 x 4 inch square swatch,

or a 10 x 10 centimeter square.


But Why is this information important?


You can see this Video on my Youtube Channel at this LINK

1. It gives you an indication of how you crochet and what your tension is.
 If your swatch is too small, you stitch tightly, 
and if your swatch is too big you crochet loosely. 
Therefore you will want adjust your tension and to try to match the
 gauge indicated by the yarn.


Do you know that your emotions

 can effect your gauge?

If you are upset, tired, happy, sad, worried, excited
 or stressed your tension can change. 
So take that into account when gauge swatching.

2. When you are following a pattern, where gauge is important,
you want to match the gauge of the pattern, or your item will not
 be the same size as the pattern states.
Designers, like me, do not always want you to use the hook size 
suggested by the Yarn label.


There are times gauge is not important.

For instance I do not care if my coaster is a little big, 
or my Crochet flower is a little small.
Also, there will be times a designer will state it is not important.
Some open stitches, and items are really hard to set a gauge, and usually a finished measurement will be given.

3. It is important to use the Crochet Hook indicated by the designer
 of the pattern you are using, If you want your item to turn out the same.
I also measure as I go, and not wait till the time is finished.

Here are 3 swatches I stitched with 

3 different yarns and 3 different Crochet Hooks.

10 single Crochet Stitches for 10 Rows.
(10 sc X 10 R)


Just as an example of how important it is to use
 the Hook indicated by the designer for a Pattern,
 for best results.

Pin Cushion Coffee Cup Crochet Pattern LINK
 - another Blog About Tension
Watch Your Gauge and 
get rid of your Tension!

Thursday, April 28, 2016

Basic Tools For Leaning to Crochet | Posh Pooch Designs

I get this Question on a weekly basis, 
"What tools do I need to learn to Crochet?"
It can be very expensive if you purchase all the
 "things" you think you need.
But really you only need a few tools.
There are only 6 tools that you will need, 
When learning to Crochet


Video Chat - What tools you need to learn to Crochet
See This Video on my Youtube Channel at this LINK


1. Crochet Hooks - 
There are a lot of different types and sizes of 
Crochet Hooks.
I think when you first start, just pic up a few sizes of inexpensive hooks to see if you will like them.
Then you can try different kinds as you feel 
more confident.

2. Tape Measure:
 Some type of measuring tape or ruler to help you
 measure your items. This will help you with sizing and 
gauge.

3. Stitch Markers:
Stitch markers are a great help in marking corners, 
rows and such. There are several types. 
Some are plastic, some are metal,
and some are decorative. 

4. Yarn Needles:
You will need a Yarn Needle or Tapestry Needle 
for weaving in your ends, and sewing pieces together, 
and sewing on buttons.
There are several sizes, use one that fits the yarn 
you are using.
You will find them made of metal or plastic. 

5. Scissors:
You will Always want a pair of scissors with you.
You never know when you will need to cut out a knot.
You do not have to get an expensive pair. 
I like to buy a few pairs of child's school scissors 
when they are on sale in the Fall.

6. Yarn:
You definitely need Yarn! I suggest when you are
 first starting to purchase some inexpensive yarn 
and practice your stitches. Then when you feel more
 confident, splurge on some expensive yarn.
I hope this has answered your Question.
Know Go Check out all my
And make something fun!

Tuesday, April 26, 2016

Zoey's Scottish Beret | Posh Pooch Designs

My Grand Daughter, Zoey, needed a Scottish Beret.
Her Church was having a missions Conference 
and the children were doing a Missions Program.
Each Child was dressing up to represent 
all the different countries. 
She was dressing up like a little Scottish Girl
"A Bonnie Lassie".
Her mom asked me to make her a Scottish Beret.
So you know I did.
The Crochet Pattern I used was
Isabella's Fireside Girl's Beret
By Crochet Dynamite 
You can find the link for the Free pattern HERE

The only changes I made was making the bow a 
little smaller and adding the little 'thingy" on the top.

It is an easy well written pattern.
So if you need or want to make a child's beret
 this is a great pattern.
Zoey loved her beret and the program went well.

Monday, April 25, 2016

Dolly and Me Whimsical Capes | Posh Pooch Designs

Dolly and Me Whimsical Capes 
Crochet Pattern
By Sara Sach of
 Posh Pooch Designs
One for Dolly and one For Me
I wrote the pattern,
 the Whimsical Cape Shawl For Ladies
You can find this Free pattern Here

And Was asked if I had one for 
little girls and their American Girl Dolls.
 I didn't so I wrote one.

I have made a video To explain the 
Foundation Double Crochet and 
the V Stitched used in these Patterns.
See This Video on my Youtube Channel at this LINK

Dolly and Me Whimsical Cape Shawl 
Crochet Pattern by Sara Sach
 Please, Add this pattern to your Ravelry Favorites


Skill: Easy

Materials:
Crochet Hook: I
Yarn: Bulky yarn (5) 3-4 oz. Child’s Cape, 1 oz. Doll’s Cape
           I used Lion Brand Tweed Stripes/ Popsicle

Stitches:
Chain (ch)
Single Crochet (sc)
Slip Stitch (slst)
Double Crochet (dc)
Foundation Double Crochet (FDC)
Skip (sk)
Space (sp)

Sizes: Doll – 18 inch Doll (American Girl Doll)
            Girl - S – 3-5 year old – 20 inches), M-6-8 year old (24 inches)
Pattern written in Small with Medium in parenthesis.

Girl Cape Pattern:
Gauge: 4 dc = 1 inch
Each row is approximately = 1/2 inch

Notes: ch3 counts as the 1st Dc on the next row.

R: 1 - FDC 63 (66) Turn, ch 3

R: 2 – 1 dc in the same st as ch 3, *ch3, sk 2 dc, dc, ch1, dc in the next dc*
Repeat From * to * across row, ch 3 turn.

R: 3 – 1 dc in the same dc as the ch3, *ch3, dc, ch1,
dc in the ch1 space between the next 2 dc*
Repeat From * to * across row, Turn, ch 3

R: 4 – R: 15 – Repeat R: 3.
Only ch 1 at the end of R: 15

R: 16 – Trim -1 sc in each st and in each ch around, tie off and weave in your ends.

Sew a Button to top right side. No buttonholes are needed, as the space between
 the 1st 2 dc are perfect for the buttonholes.


Doll Cape Pattern:
Notes: ch2 counts as the 1st hdc on the next row.

R: 1 - FDC 33, Turn, ch 2

R: 2 – 1 hdc in the same st as ch 2, *ch2, sk 2 dc, hdc, ch1, hdc in the next dc*
Repeat From * to * across row, ch 3 turn.

R: 3 – 1 hdc in the same hdc as the ch2, *ch2, hdc, ch1,
hdc in the ch1 space between the next 2 hdc*
Repeat From * to * across row, Turn, ch 3

R: 4 – R: 6 – Repeat R: 3.
Only ch 1 at the end of R: 6

R: 7 – Trim - 1 sc in each st and in each ch around, tie off and weave in your ends.

Sew a Button to top right side. No buttonholes are needed, as the space between
 the 1st 2 hdc are perfect for the buttonholes.

 An Instant Download PDF File, 
containing all 3 Crochet Patterns, 
The Ladies, Child's and Doll's 
Whimsical Cape Shawl Crochet Patterns,
 is available in my Ravelry shop at This Link:

Friday, April 22, 2016

How To Read Yarn Labels | Posh Pooch Designs

You are walking a long in your favorite 
yarn store and see a luscious ball or skein of yarn.

 You pick up the yarn and look at the label.
Um... What?
What does all this mean?
Even to a person who has worked with yarns for years, 
all these symbols can be very confusing.
And "information" you are looking for,
 can be lost in all the 'information".

Yarn companies try to keep to the Standards 
for symbols. And Although it may seem like
 they are trying to be tricky,
 they really are not.
They are actually trying to give you as much 
information as possible on a small piece of paper.

See This Video on my Youtube Channel at This LINK

Ok... let us Get Started.
We will be referencing the Yarn above for today's Blog.
 It is Red Heart Steller - Nova

1. The Yarn Weight -  This Skein  is a Super Bulky 6.

All Yarns are classified into different yarn weights.
This refers to the yarn's strand thickness.

       0. Lace
             1. Super fine –Sock, Fingering
             2. Fine –Baby, Sport Weight
             3. Light  - Light Worsted Weight, DK Weight
             4. Worsted Weight, Afghan
             5. Bulky – Chunky weight, Rug yarns
             6. Super Bulky – Blanket, Roving
                 Although most yarns are put in these categories, 
                 there is still " wiggle" room between thicknesses.


                                                1             2              3 
2. Knitting Symbol – 
   Needle 10 US/ 6 mm
   A Swatch of 10 sts wide by 14 rows = 4 x 4 inch swatch (10 X 10 centimeters)

  3. Crochet Symbol –
    K -10.5 / 6.5 mm
   A Swatch 9 single crochets wide and 12 rows = 4 x 4 inch swatch (10 X 10 centimeters)

So those make sense, What about those 5 square symbols beneath those?

They are Care Instructions - For the yarn and as well as,
 items made from the yarn.


                                1      2       3      4        5
1.  Washing
2. Drying
4. Ironing
5. Bleaching
6. Dry Cleaning

Red Heart Yarn uses the Garment Standards for Laundry Care and so do most other yarn companies.
Here is a link to garment standards of textile symbols : LINK


For this Skein it reads: 
Machine Wash, Cold, Gentle Cycle, Dry Flat

 Next you will find What the yarn is made of.
This yarn is: 99% Acrylic, 1% Metallic

The amount of yarn per Skein is given in 
ounces, grams and yards.
For This Skein it is 8 oz. 224 grams/ 160 yds. 

Lastly,  if your skein has a dye lot, it will be listed 
near the Bar code sticker.  
As you can see This Yarn is Lot 23529
I hope this answered all your questions
 about reading yarn labels.