Showing posts with label Crochet Frankenstein. Show all posts

Wednesday, October 9, 2019

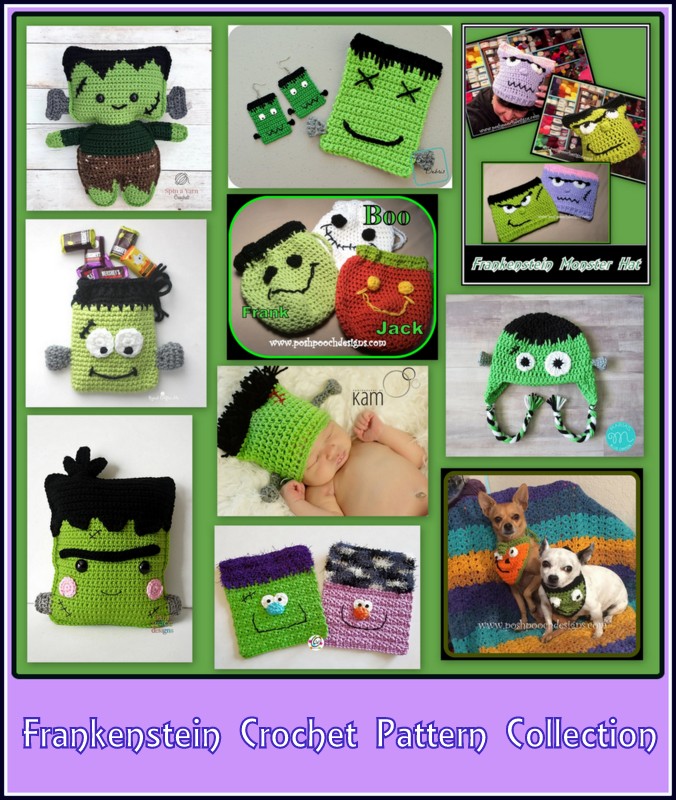
Frankenstein Monster Crochet Pattern Collection | Posh Pooch Designs

Frankenstein Monster
Crochet Pattern Collection
 By Sara Sach of Posh Pooch Designs

I have put together A Crochet Pattern Round
 of 10 Frankenstein Monster Patterns.

These Crochet Pattern are designed by
 different Designers.
 Please, Let them know you like the pattern
 and
 maybe give them a thank you.


Click The Name of the Pattern you Wish to see.
It is the Link To where the Free Crochet Pattern
 is located.

by Spin A Yarn

By Divine Debris

Sara Sach of Posh Pooch Designs

By Repeat Crafter Me

By Sara Sach of Posh Pooch Designs

By Maria's Blue Canyon

By Sweet Potato 3

By 3amgracedesigns

By Snappy Tots

by Sara Sach of Posh Pooch Designs


Pop Over To My Youtube Crochet Channel
 At This LINK


You will fin Crochet Pattern Tutorials,
Live Videos. Give Aways And


Lots of Yarnie Fun!

Monday, October 7, 2019

Frankenstein Monster Hat Crochet Pattern | Posh Pooch Designs

Frankenstein Monster Hat 
Crochet Pattern 
By Sara Sach of  Posh Pooch Designs


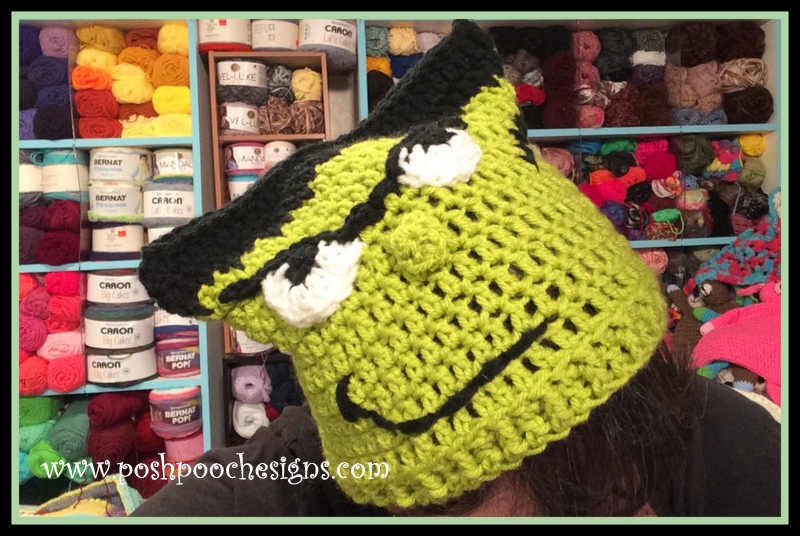
I designed the original Frankenstein Monster Hat 
in typical green. It is Super Cute. And, I also love his eyes.

I made the next one purple
And I Love It, too.


I wanted the crochet pattern is very easy and
 quick to stitch up. And it is.
Crochet This Hat with any Medium (4) Yarn.
Maybe make it striped.

See The Video on my Youtube Crochet
Channel At This LINK


Frankenstein Monster Hat Crochet Pattern
Please Add The Crochet Pattern To Your Ravelry Favorites 

Skill: Easy

Materials:
Crochet Hook – I/ 5.50 MM
Yarn- Med WW (4) I used Red heart Super saver Green- Main color (MC) - 3 oz.
                                   Black Yarn (C2) – 1 oz., Small Amount of White
Yarn Needle

Stitches:
Chain (ch)
Single Crochet (sc)
Double Crochet (dc)
Slip Stitch (slst)
Front Post Double Crochet (FPDC)
Back Loop Only (blo)
Foundation Double crochet (FDC)
Change to (chgto)

Size: Youth to Adult - 20 -22 inches
3 FDC = 1 inch

Notes:
Ch 3 Counts as a dc
Rounds are joined to the ch 3 with a slst

R: 1 – With MC, FDC 60, join in a circle, ch 3 (60 FDC)
Do not worry abut the Opening, where we joined.
 We will Close That later.

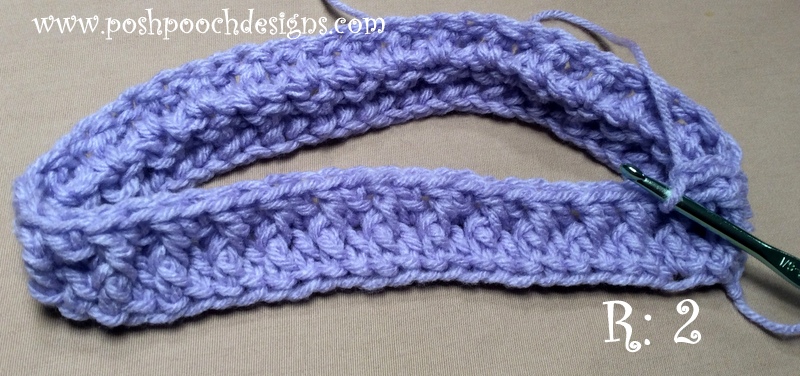
R: 2 – *FPDC in the next st, dc in the next st*
Repeat From * to * around, join, ch 3 (30 fpdc, 30 dc)

R: 3 – BLO, 1 dc in each dc, join, ch 3 (60 dc)

R: 4 – 1 dc in each dc, join, ch 3 (60 dc)

R: 5 – R: 12 – Repeat R: 4 do Not ch 3 after R: 12

R: 13- Chgto C2, ch3, 1 dc in the next dc,
*dc in the center of the dc in the row below, 1 dc in the next 2 dc*
Repeat Crochet * to * around, join, ch 3. (60 dc)

R: 14 – 1 dc in each dc, join, do not ch3, do not tie off.
(60 dc)
Lay hat flat, slst across the top of the hat to close it.
Tie off and weave in your end.

Closing The opening: thread the tail of yarn onto your needle,
and stitch closed the opening, weave in securely.

Eyes: Make 2
 R: 15 - With Black, ch 3, 8 sc in the 2nd ch from the hook,
Join in a circle, (8 sc)

R: 16 – Chgto White Yarn, leave Black yarn still attached,
ch3, 1 dc in the same st as ch3,
2 dc in next 4 dc around, tie off leaving a 12 inch tail of yarn.
(10 dc)

R: 17 – Change back to Black yarn,
4, slst in the 2nd ch from the hook, 1 sl st in the next 2 chs,
2 slst in the side of the 1st dc (white part of the eye),
1 sl st in the next 3 sts (black center of the eye),
 2 slst in the side of the next dc (white part of the eye)
Ch 3, tie off leaving a 12 in tail of yarn.
(10 slsts, ch 3)

Place eyes on the front of the hat, and sew in place with the tails of yarn.
Use the white tail of yarn to sew the white part of the eye,
and the Black tail of yarn to sew the eye brow.
The Placement of the Eyes is up to you.
The Green one is a Little scary, But the Purple one is cute.

Nose:
With MN, Ch 3, 10 sc in the 2nd ch from the hook, join,
 tie off leaving a 10 in tail of yarn. (10sc)
Place nose on the front center of the hat and sew in place.


With Black yarn and Needle, stitch smile and scar
on the front of the hat as shown in the picture.

Will you make your hat green or
 try some other fun yarn color?

An Ad Free PDF File is Available
For $4.50 in my Ravelry Shop 
At This LINK

Wednesday, October 18, 2017

Pumpkin and Frankenstein Bandannas for your Dogs and Pets | Posh Pooch Designs


Pumpkin and Frankenstein Bandannas 
for ANY Size Dogs and Pets 
By Sara Sach of
 Posh Pooch Designs
The Pattern is the same for either color.
You just change the details for the look you want!

I designed a fun Candy Corn Bandanna, 
Find this Free Crochet Pattern and Video  HERE
 I  received a few questions asking  if I had a pumpkin
 and Frankenstein one as well. I did not, 
So I designed some cute and easy ones.
This Pattern comes in 2 sizes, but is super easy to
 adjust to any size!

See The Video on my Youtube Channel
 at This LINK

Pumpkin and Frankenstein Bandannas for your Dogs
and Pets Crochet Pattern by Sara Sach
Please add this Pattern to Your Ravelry Favorites

Skill: Easy
Materials:
Yarn Needle
Tape measure
Crochet Hook – H/ 5.0MM
Yarn – Worsted Weight (4) – Red Heart Super Saver
             C1- Orange or Green C2- Green or Black
             Small amount of black for faces
Stitches:
Chain (ch)
Single Crochet (sc)
Double Crochet (dc)
Change to (Chgto)

Size:   XS – 8 -10 inch neck
             S – 11-12 inch
Notes:
Measure your dog’s neck with the tape measure.
Ch 3 at ends of rows counts as a dc.
Ch3 after the color change, when changing colors

Pattern:
R: 1 – With C1, Ch 4, 4 dc in the 4th ch from the hook, 
ch 3, turn (5dc)

R: 2 – 1 dc in the same st as the ch3, 1 dc in the next 3 dc, 
2 dc in the last dc, Ch3, turn, (7dc)

R: 3 - 1 dc in the same st as the ch3, 1 dc in the next 5 dc, 
2 dc in the last dc, Ch3, turn, (9dc)

R: 4 - 1 dc in the same st as the ch3, 1 dc in the next 7 dc, 
2 dc in the last dc, Ch3, turn, (11dc)

R: 5 - 1 dc in the same st as the ch3, 1 dc in each dc, 
2 dc in the last dc, Ch3, turn, (13dc)

R: 6 – Repeat R: 5 (15dc)

R: 7 – Repeat R: 5 (S- 17dc)

Skip To R: 10 For XS

R: 8 –  Repeat R: 5 (S- 19 dc)

R : 9 -  Repeat R : 5, Do not ch 3turn (S – 21dc)

R: 10 – Chgto C2 - Ch3, Repeat R: 5 ch1,
(XS – 15dc, S – 23dc) Do not Tie off.

Repeat R:10  to make the bandanna bigger.

R: 11 – Trim –  Evenly sc down the side of the bandanna, 
3 sc in the point, sc evenly up the other side of the bandanna. 
Do not tie off.

R: 12 - Ties - Ch - XS -20, S-25, sl st in each dc across top of bandanna,
Ch  - XS -19, S-24, ch 2, turn

If you want your ties longer, add more chs.

R: 13 – 1 sc in 2nd ch from hook, and in each ch and st across, tie off. 
Weave in your ends.
Eyes: Make 2 for each bandanna
With C1, ch 4, 9 dc in the 4th ch from the hook, join to top of ch 3,
 tie off leaving a 12 inch tail of yarn. Sew onto front of bandanna.

With Black yarn make a French not in the center of each eye and 
embroider on a smile.

For Frank - Add the Scar and Smile - Use black yarn and 
embroider on face.

For Pumpkin - Add the Stem and Curl

Ch 10, 3 sc in the 2nd ch from the hook, 3 sc in the next 5 chs, 
1 sc in the last 3 chs, tie off. Sew onto front of pumpkin bandanna.

Use black yarn and embroider on smile and Nose.
I really love those cute buggy eyes on these. Makes them look so silly.