Showing posts with label Youtube videos. Show all posts

Monday, May 29, 2023

Picnic Ponytail Headband Crochet Pattern | Posh Pooch Designs

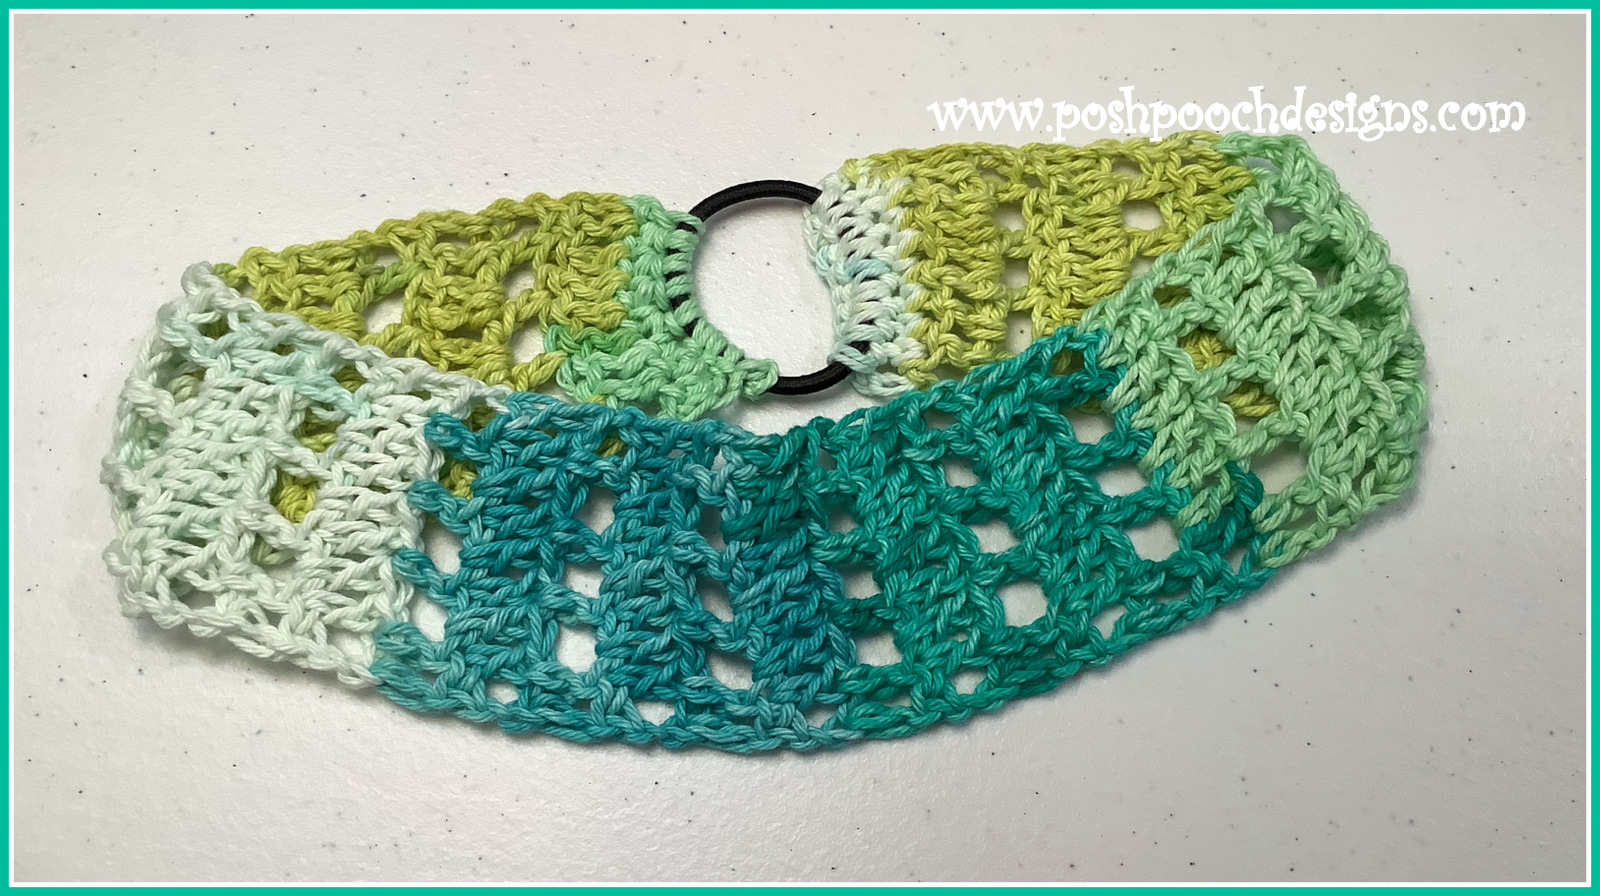
 Picnic Ponytail Headband 
Crochet Pattern 
By Sara Sach of Posh Pooch Designs


It's That Time of Year When School is out, 
And we Want To be out side going to the park, 
having picnics, barbeques and just have fun.
 The Picnic Pony tail headband it the perfect accessory.
 Make one to match all your summer outfits. 
You will look super cute and your hair, 
whether short or long will be out of your face. 


If Your hair is Short The elastic band is just the elastic
 that holds the headband on your head. 
If your hair is long, you can slide your ponytail or
 braid through the elastic band.


This is also a great yarn stash buster. Use up all those left
 over yarns from your yarn stash and make a bunch
 of these. Like I said, One to make all your Summer
 clothes. Although these headband are 
perfect anytime of year.


See The Video On My Crochet Youtube
 Channel At This LINK


Picnic Ponytail Headband Crochet Pattern

Please Add This Crochet Pattern To Your Ravelry Favorites

Skill: Easy
 
Materials:
Crochet hook – H / 5.00 MM
Yarn – Med (4) Cotton 1 oz.   Peaches And Crème Stripy, greens
Elastic Ponytail Band
Yarn Needle
  
Stitches:
Chain (ch)
Slip Stitch (slst)
Single Crochet (sc)
Double Crochet (dc)
Skip (sk)
Space (sp)
 
Size: 2.5 X 20 Inches
fits a 22-24 inch head - very stretchy!
2 Rows = 1 inch
 
Notes:
Ch1 Does not Count as a st
Ch3 Counts as a dc

Pattern:
 
R: 1 – slst onto the Elastic band, 9 sc on the band, turn, ch1 (9sc)


R: 2- 1 sc in each sc, turn, ch 3 (9sc)


R: 3 – Dc in each sc, turn, ch3 (9dc)


R: 4 – Dc in the next dc, ch1, sk the next dc,
Dc in the next dc, ch1, sk the next dc,
DC in the next dc, ch1, sk the next dc, 1 dc in the last 2 dc,
Turn, ch3 (6dc, 3 ch3)
 
R: 5 – Dc in each dc and Ch1 sp, turn, ch3 (9dc)


R: 6 - Dc in the next dc, ch1, sk the next dc,
Dc in the next dc, ch1, sk the next dc,
DC in the next dc, ch1, sk the next dc, 1 dc in the last 2 dc,
Turn, ch3 (6dc, 3 ch3)


R: 7 - Dc in each dc and Ch1 sp, turn, ch3 (9dc)


R: 8 - R: 38 - Repeat R: 6 - R: 7 Alternating Rows
Ch1 After The Last R: 7

Make sure to measure to make sure it fits.


R: 39 - 1 sc in each dc, turn, ch1 (9sc)


R: 40 - Working over the Elastic,
 being careful not to twist the headband,
1 sc in each sc, tie off, weave in your ends. 


An AD Free PDF File Is Available
 In My Ravelry Shop At This LINK
 For $3.50


Now You are ready for any outing, Picnic or summer get together.

Monday, April 3, 2023

Easter Egg Pillow Crochet Pattern | Posh Pooch Designs

  Easter Egg Pillow 
Crochet Pattern 
By Sara Sach of Posh Pooch Designs


The Easter Egg Pillow is so soft and squishy!
 It is super easy and quick to stitch up.
Just grab some super bulky (6) yarn and your
 9 mm hook, and your on your way.
 Oh, and some polyfiberfil to stuff it with.
I chose to make mine 3 different spring colors,
 You can use whatever colors you like.

Everyone will love it.
Leave it as a regular Easter Egg or 
add a face for a fun and silly look.


They are perfect For Easter and spring decorating,
 and perfect as gifts, also. Set them out and everyone will
 want to hug and squeeze them.


I used Bernat Baby Blanket in the Dappled Ombre,
 pink, yellow and purple. Any Super Bulky (6) yarn
 can be used. You Might even have some in Your yarn stash.

See The Video On My Crochet Youtube 
Channel At This LINK


Easter Egg Pillow Crochet Pattern 

Please Add This Crochet Pattern To Your Ravelry Favorites
 
Skill: Easy
 
Materials:
Crochet Hook: N / 9.00 MM
Yarn – Super Bulky (6) Bernat Baby Blanket, Dappled Ombre (8 oz. total)
                C1 - Purple, C2 - Pink, C3 - yellow
Stuffing – 10 - 12 oz. polyfiberfil
Yarn Needle
Optional For Face - 2 Safety eyes, Black yarn For Smile
 
Stitches:
Chain (ch)
Single Crochet (sc)
Half Double Crochet (hdc)
Half Double Crochet V st (hdc Vst)
Double crochet (dc)
Change to (chgto)
Double Crochet Together (dctog)
Space (sp)
Skip (sk)
 
 
Size: 14 X 12 Inches
 
Notes:
Ch 3 at beginning of rows counts as a Dc.
When Changing colors, Ch1 /ch2 /ch3 after the Color change.
 
Pattern:
Make 2 – A Front and A Back
 
R: 1 – With C1, Ch 17, 1 dc in the 4th ch from the hook,
 1 dc in each ch across, Turn, Ch3 (15 dc)


R: 2 – 1 dc in the same st as the ch 3, 1 dc in the next 13 dc,
 2 dc in the last dc, Turn, ch 3 (17 dc)


R: 3 - 1 dc in the same st as the ch 3, 1 dc in the next 15 dc, 
2 dc in the last dc, Turn, ch 3 (19 dc)


R: 4 – 1 dc in the next dc, 1dc in each dc across, turn, ch3 (19 dc)

R: 5 – 1 dc in the next dc, 1dc in each dc across, turn (19 dc)


R: 6 – Chgto C2, (do not tie off C1)
Ch2, 1 hdc in the next dc, sk the next dc,
*hdc, ch1, hdc in the next dc, sk the next dc*
Repeat From * to * 6 more times,
1 hdc in the last 2 dc (2dc, 7 hdc V sts, 2dc)


R: 7 – Chgto to C3 (do not tie off C2)
Ch2, 1 hdc in the next hdc, ch1,
*hdc VST in the ch1 sp of the next V st, ch1*
Repeat From * To * 6 more times,
1 hdc in the last 2 hdc (2dc, 7 hdc Vst, 2dc)


R: 8 – Repeat R: 7


R: 9 – Chgto C2, Repeat R: 7
 
R: 10 – Chgto C3, Repeat R: 7


R: 11 - Chgto C1, Tie off C2, And C3
Ch1, dctog 1 2 hdc, 1 dc in each the hdc of the V sts,
Dctog the last 2 hdc, ch1 (16 dc)


R: 12 – Ch1, Dctog the 1st 2 dc, 1 dc in the next 12 dc, 
dctog the last 2 dc, turn (14 dc)
 
R: 13 – Ch1, Dctog the 1st 2 dc, 1 dc in the next 10 dc, 
dctog the last 2 dc, turn (12 dc)


R: 14 – Ch1, Dctog the 1st 2 dc, 1 dc in the next 8 dc, 
dctog the last 2 dc, turn (10 dc)
 
 Repeat R: 1 – R: 14, Leave yarn attached on the 2nd egg.

If adding eyes and smile do so at this time.


Place The 2 eggs together, right sides facing out.
Sc them together, leaving a 5 inch opening,
Stuff with polyfiberfil and sc the opening closed.
Tie off and weave in the ends.


They are so squishy and soft you won't be
 able to resist squeezing them!


An Ad Free PDF file is Available
In My Ravelry Shop At This LINK
 For $4.50


Friday, March 24, 2023

FRIDAY FUN DAY - Wild Flower Washcloth Crochet Pattern | Posh Pooch Designs

FRIDAY FUN DAY! 
Wild Flower Washcloth
 Crochet Pattern 
 By Sara Sach of Posh Pooch Designs


Add  a touch of Spring to your bathroom, kitchen
or anywhere in your home with The Wildflower Washcloth.
It is precious, sweet and can also be used a doily 
for a vase of flowers, a candle or maybe a candy dish.


This Washcloth is made using cotton Medium 4 yarns.
It stitches up pretty quick, and once you make one,
 you will just have to make a bunch more.
The Washcloth does not have to be made in cotton yarns,
 Acrylic will due nicely, but I prefer cotton.

See The Video On My Crochet Youtube 
Channel At This LINK


Wild Flower Washcloth Crochet Pattern

Please Add This Crochet Pattern To Your Ravelry Favorites
 
Skill: Easy
 
Materials:
Crochet hook – H / 5.00 MM
Yarn – Med (4) Cotton – 3 colors of choice-
             C1- 1 oz, C2, 1.5 oz., C3 - .5 oz.
Yarn Needle
 
Stitches:
Chain (ch)
Slip Stitch (slst)
Single Crochet (sc)
 Double Crochet (dc)
Skip (sk)
Space (sp)
Change to (chgto)
 
Size: 10 Inches
 
Notes:
Ch3 Counts as a dc
Ch1 Does not count as a st
Rounds are joined to the ch3 with a slst,
            unless otherwise stated
 
Pattern:
 
R: 1 – With C1, Ch 5, join in a circle, ch3, 11 dc in the circle,
 join, ch 3 (12 dc)


R: 2 – DC in the same st as the ch3, 2 dc in each dc,
 join, ch 1 (24 dc)

 
R: 3 – *Sc in the next 3 dc, 2 sc in the next dc*
Repeat from * to * around, join to the 1st sc with a slst, (30 sc)


R: 4 – Chgto C2, ch3, 1 dc in the next 4 sc, ch1,
*1 dc in the next 5 dc, ch1*
Repeat From * to * 4 more times, join, ch 3
(6 groups of 5dc, ch1)


R: 5 – Dc in the Same st as the ch3, 1 dc in the next 3 dc,
2 dc in the next dc, ch1
*sk the ch1 sp, 2 dc in the next dc, 1 dc in the next 3 dc, 
2 dc in the next dc, ch1*
Repeat From * to * 4 more times, join, ch 3
(6 sets of 7 dc, ch1)


R: 6 - Dc in the Same st as the ch3, 1 dc in the next 5 dc,
2 dc in the next dc, ch1
*sk the ch1 sp, 2 dc in the next dc, 1 dc in the next 5 dc, 
2 dc in the next dc, ch1*
Repeat From * to * 4 more times, join, ch 3
(6 sets of 9 dc, ch1)


R: 7 - Dc in the Same st as the ch3, 1 dc in the next 7 dc,
2 dc in the next dc, ch1
*sk the ch1 sp, 2 dc in the next dc, 1 dc in the next 7 dc, 
2 dc in the next dc, ch1*
Repeat From * to * 4 more times, join, ch 1
(6 sets of 11 dc, ch1)


R: 8 – *Sc in the next 2 dc, hdc in the next 2 dc, 2 dc in the next 3 dc,
Hdc in the next 2 dc, sc in the next 2 dc, ch 1, sk the ch1 sp*
Repeat from * to * 5 more times, join to the 1st sc with a slst, ch1
(6 sets of 2dc, 2hdc, 6dc, 2hdc, 2sc, ch1)


R: 9 – *Sc in the next 5 sts, 2 sc in the next 4 sts,
sc in the next 5 sts, sc in the ch1 sp*
Repeat from * to * 5 more times, join to the sc with a slst
(6 sets of 19 sc)

R: 10 – Chgto C3, ch1, sc in the 1st sc, ch1, sk the next sc,
*sc in the next sc, ch1, sk the next sc*
Repeat From * to * around, join to the 1st sc with a slst,
Tie off and weave in your ends.


How To Block: Blocking is not always needed. 
 It helps give the project a more crisp appearance.

Pin, Spritz and let it dry

1. Pin in place on a blocking board.

2. Spritz with water, do not soak, just damp.

3. Let it dry.

An Ad Free PDF file is Available
In My Ravelry Shop At This LINK
For $3.50