Showing posts with label birthday. Show all posts

Friday, March 10, 2023

FRIDAY FUN DAY! Cupcake Bandana And Bunting Crochet Pattern | Posh Pooch Designs

 FRIDAY FUN DAY! 
Cupcake Bandana And Bunting
 Crochet Pattern 
By Sara Sach of Posh Pooch Designs
And Healthy Cupcake For Your Dogs!
Link For The Recipe below The Pattern


It's Friday Fun Day and We Are celebrating 
Max And Rosie's Birthday.


The Cupcake Bandana is designed to fit dogs with
 6 to 12 inch necks if crocheted according to the pattern.
It is easily adjusted to larger size dogs buy adding more
 rows after the cupcake design is made.
It also makes a fun bunting and decoration
 for Birthday parties.


I designed the Bandanna to be made all in one piece, 
so there no need to sew on a applique. It looks a little
 complicated, but once you see how it's done,
 it is quite easy.

See The Video On My Crochet Youtube
 Channel At This LINK


Cupcake Bandana And Bunting Crochet Pattern

Please Add This Crochet Pattern To Your Raverly Favorites
 
Skill: Easy To Moderate
 
Materials:
Crochet Hook – H / 5.00 mm
Yarn – Med (4)  .5 oz. of 3 colors –
               I Love This Yarn / Hobby lobby – 
               C1 – Fruit Salad, C2 – pink, C3 – yellow
               Small Amount of red for the cherry.
Yarn Needle
 
Stitches:
Chain (ch)
Slip Stitch (slst)
Single Crochet (sc)
Double Crochet (dc)
Front post Double crochet (FPDC)
Back post Double Crochet (BPDC)
Front Post Triple Crochet (FPTR)
Skip (sk)
Space (sp)
 
Special Stitch - 6Trtog FP over 6 sts –
2 wraps on the hook, Yo, go in the FP of next dc, pull up a loop,
Go through 2 loops, yo go through next 2 loop, leave loops on the hook*
Repeat From * to * in the next 5 sts,
You will have 6 unfinished TR FP, yo, go through all loops
 
Size: 6 Inch Triangle,
Fits 6 - 12 inch dog necks
Add More Rows for larger dogs
Measure your dog’s neck and adjust accordingly
 
Notes:
Ch 3 counts as dc
 
Pattern:

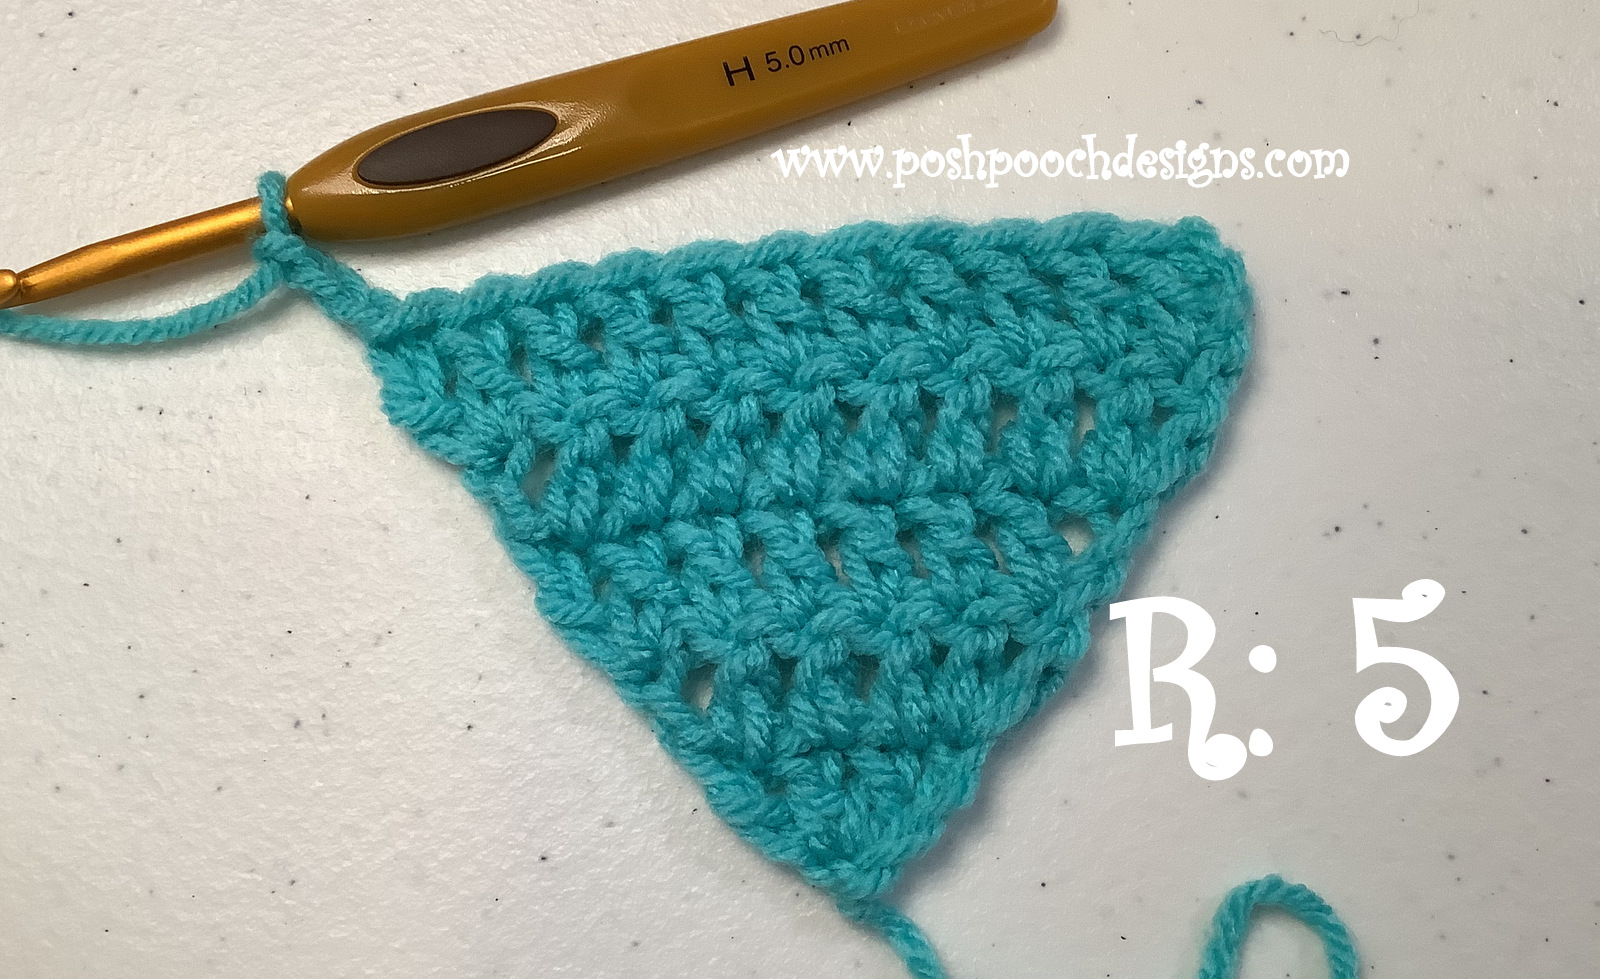
R: 1 – With C1, Ch 4, 3 dc in the 4th ch from the hook,
Turn, ch 3 (4 dc)

R: 2 – Dc the same st as the ch3, 1 dc in the next 2 dc, 2 dc in the last dc,
Turn, ch 3 (6 dc)

R: 3 - Dc the same st as the ch3, 1 dc in the next 4 dc, 2 dc in the last dc,
Turn, ch 3 (8 dc)
 
R: 4 - Dc the same st as the ch3, 1 dc in the next 6 dc, 
2 dc in the last dc,
Turn, ch 3 (10 dc)
 
R: 5 - Dc the same st as the ch3, 1 dc in the next 8 dc, 
2 dc in the last dc,
Turn, ch 3 (12 dc)

R: 6 - Dc the same st as the ch3, 1 dc in the next 3 dc,
Chgto C2, FPDC in the next 4 dc,
Chgto C1, leave C2 attached,
1 dc in the next 3 dc, 2 dc in the last dc,
Turn, ch 3 (5 dc, 4 FPDC, 5 dc)


R: 7 - Dc the same st as the ch3, 1 dc in the next 4 dc,
Chgto C2, BPDC in the next 4 FPDC,
Chgto C1, tie off C2,
1 dc in the next 4 dc, 2 dc in the last dc,
Turn, ch 3 (6 dc, 4 BPDC, 6 dc)


R: 8 - Dc the same st as the ch3, 1 dc in the next 5 dc,
Chgto C3, (6Trtog FP over 6 sts) Explained above
Start With the previous dc 1 row down, the 4 BPDC, and the next dc,
Chgto C1, dc in the top last dc where we stitched the last FPTR,
1 DC in the next 4 dc, 2 dc in the last dc, Turn, Ch3
(7 dc, 6FPTR, 7dc)


R: 9 – 1 dc in the next 7 dc, dc in the top of 6Trtog FP,
1 dc in the next 8 dc, turn. (17 dc)


If a larger Bandanna is need, Continuing stitching
 rows of Dc, increasing at the beginning
 and ending of each row, until desires size.
 
R: 10 – Chgto To C2, 
sc evenly across the top of the bandanna, 
2 sc in the 1st corner,
Sc evenly down the side of the bandanna,
 at the point st a sc, ch1, sc, Evenly sc up the other side, 2 sc in the corner, 
join to the 1st sc with a slst
 

R: 11 – Chgto to C3, 
sc evenly across the top of the bandanna, 
 *sc in the next sc, ch3, sk the next sc*
Repeat From * to * Down the side up the other side of the bandanna,
And up the other side, 
ch 25, dc, slst in the 2nd ch from the hook, 
  slst in each ch back to the bandana, 


If making a Bunting, leave of the ties and st a ch the length
 needed for the size bunting you are making.

Slst in each sc across the top of the bandanna, ch 25, 
dc, slst in the 2nd ch from the hook,
Slst  in each ch, join to the top of the bandan
na, 
tie off weave in Your ends.

Cherry – Thread the needle With a 12 inch strand of red yarn.

Stitch French knot in the top center of the cupcake.


An Ad Free PDF file is Available
In My Raverly Shop At This LINK
For $2.50


I Found A Recipe For 
Single Serving Dog Cupcakes
At This LINK
From Katrina's Kitchen
They are made with Pumpkin, Peanut butter,
Oats, Eggs and Baking Powder.

Mashed Potato Frosting
and dog cookies.

The Dog's Loved Them


Monday, February 6, 2023

Cupcake Stitch Cowl Crochet Pattern | Posh Pooch Designs

 Cupcake Stitch Cowl
 Crochet Pattern
 By Sara Sach of Posh Pooch Designs
  

The Cupcake Cowl is Warm And Sweet.
It is an intermediate Crochet Pattern Because of the
 Special Stitch. But once you learn that,
 "It's a piece of cake, or should I say "cupcake". 

It's a fun stitch pattern to learn and can be used for
 lots of different applications. I think it's perfect for
 this warm and cute cowl.

I wanted the cupcakes to look like they had sprinkle
 frosting on them. I think they do, and are adorable.
And The Pompoms add the cherry to the top of the this
 "plate of Cupcakes". 
Anybody of any age will love to wear this cowl.

See The Video On My Crochet Youtube
 Channel At This LINK


Cupcake Stitch Cowl Crochet Pattern

Please Add This Crochet Pattern To Your Ravelry Favorites
 
Skill: Intermediate
 
Materials:
Crochet hook – I / 5.5 mm
Yarn – Med (4) C1 - I Love This yarn / Fruit Salad 3.5 oz.
                           C2 - Crafters Secret / Hot Rose – 3.5 oz.
Yarn needle
 
Stitches:
Chain (ch)
Slip Stitch (slst)
Double Crochet (dc)
Foundation Double Crochet (FDC)
Shell Stitch (shst) 4 dc in the same st
Change to (chgto)
 
Special Stitch: 4 Double Crochet Cluster –
 (4 DCCL) (Stitching 4 DC Together)
*YO, pull up a loop in the next dc, yo pull through the 1 st 2 loops*
Repeat From * to * 3 More times,
You will have 4 unfinished dc, and 1 loop on your hook,
YO, pull through all 5 loops.
 
Size:
27 inches around X 8 inches Tall
3 chs = 1 inch
3 rows = 2 inches
Multiples: Repeats of 3 FDC + 2
 
Notes:
Ch3 counts as a dc
When Changing Colors Do Not Cut yarn,
           trail yarn up the inside of the cowl
 
Pattern:

R: 1 – With C1, 71 FDC, join in a circle with a slst (71 FDC)

Use your needle and Tail of yarn and Close The Gap
where we joined.

R: 2 – Chgto C2, leave C1 Attached,
Ch3, 3 dc in the same st as the ch3, sk 2 FDC,
*4 dc in the next FDC, sk 2 FDC*
Repeat from * to * around, join to the ch3 with a slst.
(23 shsts)


R: 3 – Chgto C1, leave C2 attached, ch2,
YO, pull up a loop in the next dc, yo pull through the 1 st 2 loops*
Repeat From * to * 2 More times,
You will have 3 unfinished dc, and 1 ch2 loop on your hook,
YO, pull through all 4 loops, ch 2
 
*4DCCL in the next set of 4 dc, ch 2*
Repeat From * to * around, join to the ch2 with a slst,
Slst in the next ch2 sp. (23 DCCL)


R: 4 – Chgto C2, leave C1, attached, ch3, 3 dc in the ch2 sp,
*4 dc in the next ch2 sp*
Repeat from * to* around, join to the ch3 with a slst
(23 shst)


R: 5 – Repeat R: 3


R: 6 – R: 11 - Repeat R: 4 – R: 5 – Alternating every other Row
Add Rows in increments of 2 if a taller cowl is desired.


R: 12 – Chgto to C2, ch3, 2 dc in the 1st ch 2 sp,
3 dc in each ch2 sp and 1 dc in the top of each DCCL around,
 join to the ch3 with a slst, tie off and weave in your ends. 


Tie – With C1, Ch 100 , lace it through R: 12
Add a pompom to each end of the tie.
 
With C2, Use a Pompom Maker, or another method,
 make 2 pompoms and attach one to each end of the tie.


An Ad Free PDF File is Now Available
In My Raverly Shop At This LINK
for $4.50


Friday, February 12, 2021

Cupcake Pillow Crochet Pattern | Posh Pooch Designs

 Cupcake Pillow Crochet Pattern 
By Sara Sach of Posh Pooch Designs
🎈🎈🎈🎈🎈🎈🎈🎈🎈🎈🎈🎈🎈🎈🎈🎈


I Am So Excited Because It's My
🎈BIRTHDAY!🎈
 I have new fun Crochet Pattern
 just for you. And What better way to
 celebrate that Cupcakes!


This Cupcake Pillow is perfect for
 Birthday fun, also for fun anytime.
They are super quick to stitch up, so
 make one for everyone in an
 assortment of cupcake "flavors".
You can even add a face if you want too.

See The Video on my Crochet Youtube
 Channel At This LINK


Cupcake Pillow Crochet Pattern
Please Add This Crochet Patter to Your Raverly Favorites
 
Skill: Easy to Moderate
 
Materials:
Crochet Hook – K / 6.5 mm
Yarn – Bulky (5) I used Eco- Cozy / loops And Thread - 
        but any Bulky 5 can be used for this project
            C1 – Light Fleck Pink 5.29 oz
            C2 – Light Taupe Fleck 5.29 oz.
            C3 – Red heart Super Saver (med 4) – red .5 Oz.  – For pompom
Yarn Needle
Stuffing – Polyfiberfil  8 oz.
 
Stitches:
Chain (ch)
Single Crochet (sc)
Double Crochet (dc)
Front Post Double Crochet (fpdc)
Back Post Double Crochet (bpdc)
Front Loop Only (FLO)
Back Loop Only (BLO)
Shell Stitch (shst) 4 dc in the same st
Skip (sk)
Change to (chgto)
 
Size: 12 X 12 inches
 
Notes:
Ch 3 counts as dc
 
Pattern: Make 2
R: 1 – With C1, Ch 5, join, in a circle, ch 3, 6 dc in the circle, turn, ch 3
(7dc)
 

R: 2 – 2 dc in each dc, turn, ch 3 (14 dc)

R: 3 – *2 dc in the next dc, 1 dc in the next dc*
Repeat from * to * across, turn, ch 2 (21dc)
 

R: 4 – 1 dc in the next dc, *2 dc in the next dc, 1 dc in the next 2 dc*
Repeat From * to * across, turn, ch 3 (28 dc)
 

R: 5 - 1 dc in the next 2 dc, *2 dc in the next dc, 1 dc in the next 3 dc*
Repeat From * to * across, turn, ch 3 (35 dc)
 

R: 6 - 1 dc in the next 3 dc, *2 dc in the next dc, 1 dc in the next 4 dc*
Repeat From * to * across, turn, ch 3 (42 dc)
 

R: 7 – 1 dc in the next 4 dc, *2 dc in the next dc, 1 dc in the next 5 dc*
Repeat From * to * across, turn, ch 3 (49 dc)
 

R: 8 - 1 dc in the next 5 dc, *2 dc in the next dc, 1 dc in the next 6 dc*
Repeat From * to * across, ch1 (56 dc)
 

R: 9 – Turn Working across the edge of the ½ circle, 
Evenly crochet 30 sc across, Turn, ch 1 (30sc)
 

R: 10 – BLO of R: 9, *sc in the 1st sc, 
*sk the next sc, shst in the next sc, sk the next sc, sc in the next sc*
Repeat From * to * across, sc in the last sc (7 shsts)
 

R: 11- Chgto C2, turn, BLO of R: 9, 1 dc in each dc across, 2 dc in the last st,
 turn, ch3 (31 dc)
 

R: 12 – 1 dc in the 1st 2 dc, *BPDC in the next dc, dc in the next*
Repeat From * to * across, 1 dc in the last dc (14 BPDC + 17 DC = 31 sts)
 

R: 13 - 1 dc in the 1st 2 dc, *FPDC in the next dc, dc in the next*
Repeat From * to * across, 1 dc in the last dc (14 FPDC + 17 DC = 31 sts)


R: 14 –Repeat R: 12
 
R: 15 – Repeat R: 13
 
R: 16 - Repeat R: 12
 
R: 17 - Repeat R: 13, tie off weave in your ends.
 

 Make 2 Cupcakes, leave the yarn on the 2nd cupcake attached.


Place the 2 cupcakes together, right sides out.
We Will be stitching the 2 cupcakes together:

Sc up the side till your reach the cupcake portion,

Chgto C1, sc around the top of the cupcake, 
Chto C2, sc even down the side, 
Stuff pillow, sc across the bottom stitching it closed.
 
Pom Pom Cherry On Top – 
With C3, Make a pom pom and attach to the top of the cupcake.


And Ad Free PDF Is Available in my 
Raverly Shop At This LINK
 For $3.50


Wednesday, February 12, 2014

Birthday Dog Hat Crochet Pattern -

Well, Its my Birthday, 
so I decided to celebrate by giving you a gift!
This hat fits the kitty cats, too!
Birthday Dog Hat Crochet Pattern


See The Video on my Youtube Channel 
at This LINK


Birthday Dog Hat Crochet Pattern By Sara Sach
Please add this pattern to your Ravelry Favorites

Skill: Easy

Materials:
Hook -H
Tape Measure
Yarn Needle
Yarn - Hobby Lobby's I Love This yarn royal Blue -C1, Lime Green C2, Red C3
           Any Worsted Weight (4) Yarn

Stitches:
Chain (ch)
Single Crochet (sc)
Slip Stitch ( sl st)
Double Crochet (dc)
Half Double Crochet  (hdc)
Skip (sk)

Hat Pattern : Getting Started-
 The first thing you need to do is measure your dog's head according to the picture.
measure loosely, accounting for thickness of hair.
To make the hat larger you can either go up a hook size or two.
or you add additional chs to the ear hole chains.

Size: Pattern worked as written,  will fit approximately a 8-15 lb dog.

Notes: 
Ch 3 at the end of each row  counts as dc.
rows are joined with a slst.

Hat - Starting at the top of the hat.
R: 1 - With C1, Ch 4, 4 dc in the 4th ch from the hook, join with a sl st, ch 3. (5dc)

R: 2 - *1 dc in the next st, 2 dc in the next st, repeat from *, join ch 3 (7dc)
  .
R: 3 - Repeat pattern From R: 2 (10dc)

R: 4 - *1 dc in the next 3 sts, 2 dc in the st,, repeat from * around, join, ch 3 (12dc)

R: 5 - Repeat  R: 4 (15dc)

R: 6 - Repeat R: 4 (18dc)

R: 7 - Repeat R: 4 (22dc)

R: 8 - Repeat R: 4 (27dc)

R: 9 - Forming the ear holes,
1dc in the 1st 2 dc,
ch15, sk the next 6 dc, 1 dc in the next 9dc,
ch15, sk the next 6 dc, 1 dc in the next 3 dc,
 join to top of ch3, ch3
3+ch15(-6)+9+ch15(-6)+3
 30 chs + 15 dc = 45 sts

R: 10 - 1 dc in each st and in each ch around hat brim, join, ch 3(45dc)

R: 11 - 1 sc in each dc for flat edge party hat.

R: 12 - Ruffle Edge party hat -
Change to C-2,
(2 dc, ch 1), in each dc around hat brim, to form the ruffle edge,
tie off and weave in the end.
Brim will sit a little ruffly,

Ties: make 2
With C3, Ch 25, 1 dc in the end of the ch, turn and sl st back up the ch,
 attach tie to the hat, at the center of the ear hole on the underside of the hat brim.

Pom poms:  Make 3, one in each color.
With C2 wrap yarn around your 3 middle fingers about 25 times.
With a piece of yarn, lace it through the loops and tie securely.
Trim the loops evenly and  attach the one pompom to the top
of the Hat and the other 2 to the front of the hat.

I think Maximo is done celebrating!