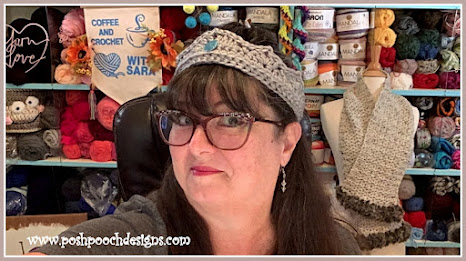
Crown Headband Crochet Pattern
Friday Fun Day
Friday Fun Day
With Sara Sach of Posh Pooch Designs
Hello, My Yarnie Subjects
I Am The Yarn Queen
LOL!
I am sure that most of you have heard The Queen
Of England, Elizabeth II,
Elizabeth Alexandra Mary Windsor,
passed away after 70 years on the throne.
She was an amazing person, And there will never
be another like her.
I thought in honor of her magnificent life, it would
be lovely to make crown in her memory.
I chose to use a grey color yarn, Caron Simply Soft,
because it resembles silver and has a very shiny tone to it.
Every little girl has dreamed of being a princess or queen,
living in a castle and wearing a shiny crown.
Don't leave the guys out, I am sure they also would love
to be a prince, or king, with many servants, as well.
The Crown Crochet Pattern is very simple and easy.
And it is easy to adjust to any size, so anyone of any
size head can be have a Crown.
So My Yarnie Subjects, grab your yarn and hook
and lets make some crowns, and Kings and
Queens for the day!
See The Crochet Pattern On my Youtube
Crochet Pattern At This LINK
Crown Headband Crochet Pattern
Please Add This Crochet Pattern To Your Ravelry Favorites
Skill: Easy
Materials:
Crochet Hook – I / 5. 5 mm
Yarn: Med (4) Simply Soft / Grey
Yarn Needle
Stitches:
Slip Stitches (slst)
Chain (ch)
Single Crochet (sc)
Double Crochet (dc)
Triple Crochet (tr)
Back Loop Only (blo)
Skip (sk)
Space (sp)
Foundation Half Double Crochet (FDHDC)
Size: fits 22 – 24 inch head
3 HDHDC = 1 inch
Adjust the pattern by adding or subtracting FDHDC
Notes:
Crochet Hook – I / 5. 5 mm
Yarn: Med (4) Simply Soft / Grey
Yarn Needle
Slip Stitches (slst)
Chain (ch)
Single Crochet (sc)
Double Crochet (dc)
Triple Crochet (tr)
Back Loop Only (blo)
Skip (sk)
Space (sp)
Foundation Half Double Crochet (FDHDC)
3 HDHDC = 1 inch
Adjust the pattern by adding or subtracting FDHDC
Pattern is stitched using 2 strands of yarn
Ch 1 does not count as a st
Pattern:
R: 1 - Holding 2 strands of yarn together,
Ch 1 does not count as a st
60
FDHDC, join in a circle, ch1
Be careful not to twist the chain. (60 FDHDC)
Be careful not to twist the chain. (60 FDHDC)
Remember To Close The gap - thread the tail of yarn onto your needle
and stitch it closed, weave in the end.
2dc, ch2, 2dc in the next hdc,
sk 2 hdc, sc in the next hdc,
2dc, ch2, 2dc in the next hdc,
sk 2 hdc, sc in the next hdc,
2 tr in the next hdc, 2 dc in the next hdc,
Sk 1 hdc, sc in the next hdc,
2dc, ch2, 2dc in the next hdc,
sk 2 hdc, sc in the next hdc,
2dc, ch2, 2dc in the next hdc,
sk 2 hdc, sc in the next hdc,
The Seam Will not be even,
Especially if you added or subtracted sts at the beginning for sizing.
R: 4 – slst in
the 1st hdc, slst in each st,
Slst, ch 1, slst in the 1st ch2 sp,
*slst in
each st,
Slst, ch 2, slst in the next ch2 sp*
Repeat From
* to * 3 More times,
Slst in the rest of the sc, join to the 1st slst,
Slst, ch 1, slst in the 1st ch2 sp,
Slst, ch 2, slst in the next ch2 sp*
Slst in the rest of the sc, join to the 1st slst,
tie off and weave in Your
ends.
Now Embellish as you wish bead, gems, stones, buttons.
An Ad Free PDF file Is Now Available
In My Ravelry Shop At This LINK
for $ 2.50


No comments:
Post a Comment