Friday, July 21, 2023

Drawstring Trinket Bag Crochet Pattern | Posh Pooch Designs

 Drawstring Trinket Bag 
Crochet Pattern 
By Sara Sach Of  Posh Pooch Designs


The Green And Blue Bag is stitched up using Premier Cotton
 Sprout Med (4) colorway Island Breeze. The Pink bag is 
stitched up with Peaches and Cream Stripy Med (4)
Colorway Energetic pink.

This wonderful and useful little bag measure about 9 inches
 tall and 18 inches around. The perfect size for when you
 only want to take along your wallet, phone and few other items.


I added the key chains and charms just for fun.
Add some that fit your personality.

It was a request for a friend going on a cruise and was
 looking for one just like this size. She loves it. YAY!
I love it also.

I think it's great for any time you don't ant to bring your
 whole bag or purse along, just essential items. 
 It' is also a perfect for a lunch tote. 

See The Video On My Crochet Youtube Channel At This LINK


Drawstring Trinket Bag Crochet Pattern

Please Add This Crochet Pattern To Your Ravelry Favorites
 
Skill: Easy
 
Materials:
Crochet - H / 5 MM
Yarn- Med (4) Cotton / Premier Cotton Sprouts 3 oz.
Yarn needle
Key Chain Clip/ Charms of Choice
 
Stitches:
Chain (ch)
Slip Stitch (slst)
Single Crochet (sc)
 Double Crochet (dc)
Back Loop Only (BLO)
Front Post Double Crochet (FPDC)
 
Size: 9 Tall X 18 inches around
 
Notes:
Ch1 does not counts as a st
Ch3 counts as a dc
Rounds are join to the ch3 with a slst
 
Pattern:

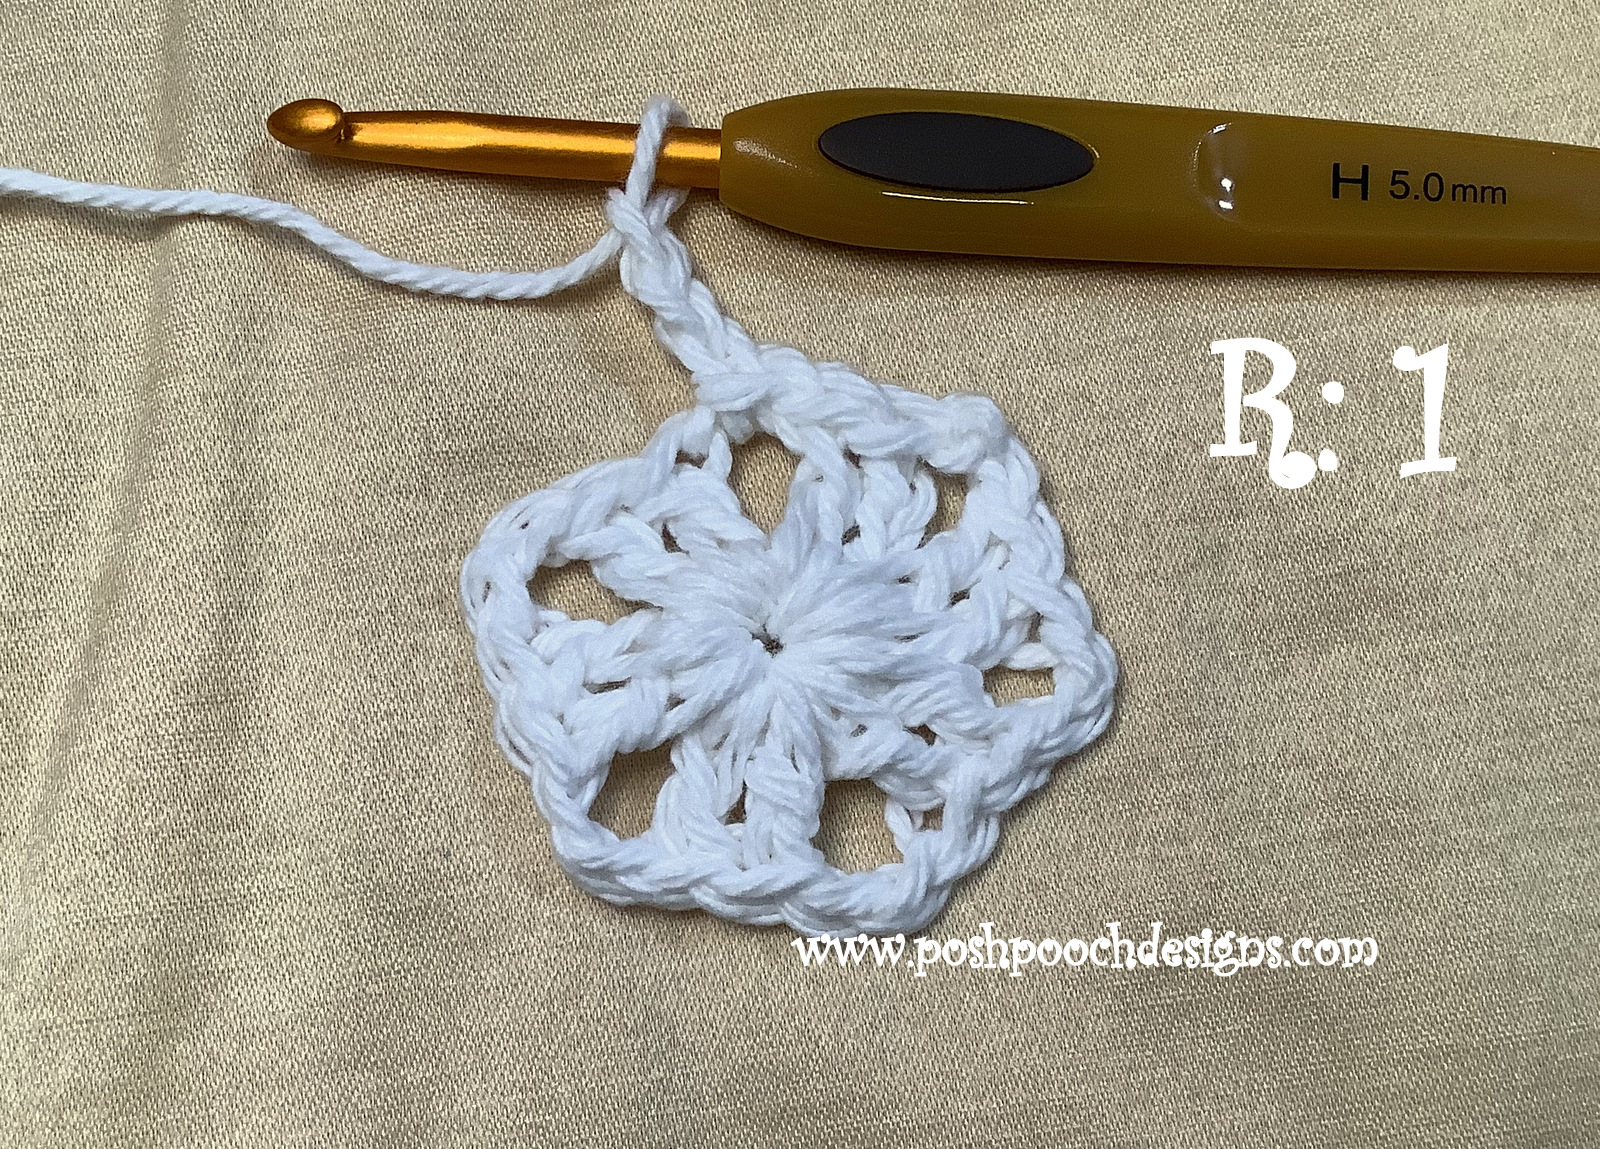
 R: 1 – Ch5, join in a circle, ch3, 9 dc, join, ch 3 (10dc)


R: 2- 1 dc in the same st as the ch3,
2 dc in each dc around, join, ch 3 (20 dc)


R: 3 - 1 dc in the same st as the ch3,
2 dc in each dc around, join, ch 3 (40 dc)


R: 4 – BLO, 1 dc in each dc around, join, ch 3 (40 dc BLO)


R: 5 - 1 dc in each dc around, join, ch 3 (40 dc)


R: 6 – 1 dc in the next dc,
*1 dc FPDC in the Next 2 dc, 1 dc in the next 2 dc*
Repeat From * to * around, join, ch3 (20 dc FPDC, 20 dc)


R: 7 - 1 dc in the next dc,
*1 dc FPDC in the Next 2 dc FPDC, 1 dc in the next 2 dc*
Repeat From * to * around, join, ch3 (20 dc FPDC, 20 dc)


R: 8 – R: 20 – Repeat R: 7
Ch1 after R: 20
 

R: 21 - 1 sc in each st around, join, ch 1 (40 sc)


R: 22 - 1 sc in each st around, join, tie off,
Weave in the ends. (40 sc)


Drawstring – Ch 60, tie off both ends.
Weave in every 2 stitches of R: 20, tie the ends together.
 
Add your choice of key chain and charms for a personal touch.


An Ad Free PDF file is Available
In My Ravelry Shop At This LINK
For $3.50


Tuesday, July 18, 2023

Coffee and Crochet Podcast - Premier Puzzle Yarn Review | Posh Pooch Designs

Coffee and Crochet Podcast
Premier Puzzle Yarn Review
With Sara Sach of Posh Pooch Designs

Premier Puzzle Yarn
100 % Acrylic Yarn - Bulky (5) 
7 oz. / 328 yds.
35 colorways
Machine wash-cold-permanent press,
 tumble dry-normal-low
Tested against 35 Harmful substances.


Soft, washable, bulky (5)weight acrylic in spectacular
 colors – that’s Puzzle! Each ball is made with 
4 coordinating colors that combine to create 
ever-changing, softly blended stripes. 
Puzzle is a beautiful choice for sweaters and
 blankets for everyone in the family. With versatile
 color combinations, you’ll have a hard time 
choosing a favorite.
Craft comfortably knowing that this yarn is
 safe for everyone! It has passed the highest standard,
 suitable for direct contact with the most sensitive skin,
 even babies and small children.

See The Video On My Crochet
Youtube Channel At This LINK


What's New This Week At


Snowflake Coasters 
Crochet Pattern And Video - LINK


Snowflake Ornaments
Crochet Pattern And Video - LINK


Scrap Happy Lawn Chair Blanket 
 Crochet Pattern And Video - LINK

Thanks For Stopping By!


Monday, July 17, 2023

Scrap Happy Lawn Chair Blanket Crochet Pattern | Posh Pooch Designs

 Scrap Happy Lawn Chair Blanket
Crochet Pattern
 By Sara Sach of Posh Pooch Designs


I have 2 vinyl lawn chairs on my front porch. 
I love them, but when it's hot, they get sticky,
and no one wants to sit in them. 
I decided they need to be covered and designed 
some fun chair blankets for them. I Love how 
the first one stitched up and now I need to make
 another one for the other chair.
It also makes a nice beach or pool side blanket.
Just roll it up and take it with you.

They are easy to crochet with this simple pattern.
It is a 2 row repeat that you can easily adjust the length
 and width for any size chair. 
 Want it wider just add more beginning chains.
Want it longer, just add more rows.


The Lawn Chair Blanket works up quickly using
 2 strands of Any Med (4) yarn. It's the perfect
 yarn stash busting project. I chose to use up my Acrylic
 yarn left overs, so it's washable if it
 get sweaty or stinky. Cotton (4) yarn will work also.

See The Video On My Crochet Youtube
 Channel At This Link


Scrap Happy Lawn Chair Blanket Crochet Pattern

Please Add This Crochet Pattern To Your Ravelry Favorites
 
Skill: Easy
 
Materials:
Crochet Hook - J / 6.0 mm
Yarn – Med (4) Acrylic – Assorted colorways -20 oz.
Yarn Needle
 
Stitches:
Chain (ch)
Slip Stitch (slst)
Single Crochet (sc)
Double Crochet (dc)
 
Size: 20 X 60 Inches
3 chs = 2 inches
2 Rows = 1 inch
 
Notes:
Ch1 Does Not Count as a st
Ch3 Counts as a dc
Pattern is stitched holding 2 strands of med (4) yarn together
 
Pattern:
 
R: 1 - Holding 2 strands of yarn together, loosely ch 48 chs,
Dc in the 4th ch from the hook, dc in each ch across, Turn, ch 3
(46 dc)


R: 2 – 1 dc in the Next 6 dc, ch 9, slst in the top of the dc,


1 dc in the next 32 dc, ch9, slst in the top of the dc,
1 dc in the last 7 dc, turn, ch1 (46 dc, 2 ch 9)


R: 3 – 1 sc in each dc across, turn ch 3 (46sc)


R: 4 - 1 dc in the Next 6 dc, ch 9, slst in the top of the dc,
1 dc in the next 32 dc, ch9, slst in the top of the dc,
1 dc in the last 7 dc, turn, ch1 (46 dc, 2 ch 9)


Loop the loop through the loops from the previous dc row
 
R: 5 - 1 sc in each dc across, turn ch 3 (46sc)


R: 6 - 1 dc in the Next 6 dc, ch 9, slst in the top of the dc,
1 dc in the next 32 dc, ch9, slst in the top of the dc,
1 dc in the last 7 dc, turn, ch1 (46 dc, 2 ch 9)


R: 7 – R: 121 – Continue to repeat R: 5 And R: 6
Alternating every other row.
If you add or subtract rows, make sure you end up on a sc row.


Loop the loop through the loops from the previous dc rows
 
R: 122 – *Ch 20, sc in the 2nd ch from the hook, sc in each ch back
Down the ch, slst in the 1st sc*
Repeat From * to *, this will give you 2 ties in the 1st corner,


Ch 3, Dc in the next 5 sc, Dc in the next 2 dc stitching through the ch9 loop, 
 Dc across, Dc in the next 2 dc stitching through the ch9 loop, 
1 dc in the last 6 dc, 
Repeat From * to * 2 more times, for 2 ties on the other corner,
Tie off, weave in your ends. 


An Ad Free PDF files Is Available 
In My Ravelry Shop At This LINK
For $4.50


Friday, July 14, 2023

Snowflake Crochet Pattern Collection | Posh Pooch Designs

 Snowflake Crochet Pattern Collection

By Sara Sach Of Posh Pooch Designs

I Love Snow!
I Love Snowflakes.


 I Love how each Snowflake is different than another.
The Air Gets Colder, which means  
The Holidays are coming, and snow will also, 
hopefully, be coming as well.

The Snowflake Crochet Pattern Collection is 
6 Snowflake Crochet Patterns designed by me.
 Each pattern is a written pattern, with photos and
 a Video Tutorial, as well.
*********************************

Click The NAME of The Crochet Pattern
 you Wish to see.
 It is The LINK To where the 
pattern is located.

*********************************
Crochet Pattern And Video

Crochet Pattern And Video

Crochet Pattern And Video

Crochet Pattern And Video

Crochet Pattern And Video

Crochet Pattern And Video

Please Pop On Over To My
 Crochet Youtube Channel At This LINK


You will find Lots
Crochet Pattern Tutorials, Video Podcasts
 Give Aways, And Lots of Yarnie Fun!

Snowflake Ornaments Crochet Pattern And How To Stiffen Them | Posh Pooch Designs

 Snowflake Ornaments Crochet Pattern
 And How To Stiffen Them
 With Sara Sach of Posh Pooch Designs


This lovely Snowflake is designed to be a Christmas
 And Holiday ornament, measuring 6 X 6 inches
One it stiffened up for hanging, we add a ribbon hanger
 with beads for a fun touch.
The Snowflakes stitch up pretty quick and you can
 make sever in one sitting. 
They will look wonderful hanging on your Christmas tree,
 stockings, the mantel and any place you would like to 
hang them for all your festive occasions.


There are 3 Ways of Stiffening Your Snowflake
 For Hanging up.

1. Glitter Spray -  Go outside, Lay the snowflake on a paper towel.
Spry the back of the Snowflake let it dry. Turn it over and 
spray the front.
When it's dry add a hanger.

2. Glitter Glue - Lay the snowflake on a paper towel.
Mix equal parts of Glue and water. 
With a paint brush, paint the back of the snowflake.
When it's dry, turn it over and paint the front.
When it's dry add a hanger.

3. White School Glue - Mix equal amounts of white school glue and water
 in a bowl. Dip the snowflake in the mixture, until it's covered.
Lay on a paper towel to dry or paper plate. Pat out some of
 the moisture. You will need to turn it a few times as it's 
drying to keep it from sticking to the paper towel.
You can sprinkle with glitter while the glue is wet
 for a glitter effect.

I have used all three methods and love #1 the best. It
is the quickest to apply and dry, and least messy.
Plus it adds glitter and stiffen at the same time.


See The Video On Crochet Youtube 
Channel At This LINK


Snowflake Ornaments Crochet Pattern

Please Add This Crochet Pattern To Your Raverly Favorites
 
Skill: Easy
 
Materials:
Crochet Hook – H / 5.00 MM
Yarn – Med (4) Cotton / White 1.5 oz/ Premier Just Cotton
Yarn Needle
 
Stitches:
Chain (ch)
Slip Stitch (slst)
Single Crochet (sc)
Double Crochet (dc)
Space (sp) Skip (sk)
Picot Stitch (pcst)
 
Size: 6 X 6 Inches
 
Notes:
Ch1 Does not count as a dc
Ch3 counts as dc
 
Pattern:
 
R: 1 – With C1, Ch 5 join in a circle,
Ch3, dc, ch2 in the circle,
*2dc, ch2*
Repeat From * to * 4 more times, join to the ch3 with a slst,
Slst in the next 2 dc, slst in the ch 3 sp
(6 sets of 2dc, ch2)


R: 2 – Ch3, dc, ch2, 2dc in the ch2 sp, ch1
*2dc, ch2, 2dc, ch1 in the next ch2 sp*
Repeat From * to * 4 more times
Join to the ch3 with a slst,
Slst in the next 2 dc, slst in the ch 3 sp
(6 sets of 2dc, ch2, 2dc, ch1)


R: 3 - Ch3, dc, ch2, ch1, sc in the ch1 sp, ch1
*2dc, ch2, dc, ch1 in the next ch2 sp, ch1, sc in the ch1 sp, ch1*
Repeat From * to * 4 more ties, join to the ch3 with a slst,
Slst in the next 2 dc, slst in the ch 3 sp
 (6 sets of 2dc, ch2, 2dc, ch1, sc, ch1)


R: 4 – Ch3, dc, pcst, 2dc in the 1st ch2 sp, ch2,
Sc, pcst, sc in the sc, ch2,
* 2 dc, pcst, 2dc in the 1st ch2 sp, ch2,
Sc, pcst, sc in the sc, ch2*
Repeat from * to * 4 more times,
Join to the ch3 with a slst, tie off and weave in your ends.
(6 sets of 2dc, pcst, 2dc, ch2, sc, pcst, sc, ch2)


Beaded Hanger:  Add a Piece of ribbon or hard, 
add  some beads of Your choosing, tie a knot at the top
and trim with scissors. 


Stiffen the Snowflake with one of the methods described above.


An Ad Free PDF File Is Available
In My Ravelry Shop At This LINK
 For $3.50