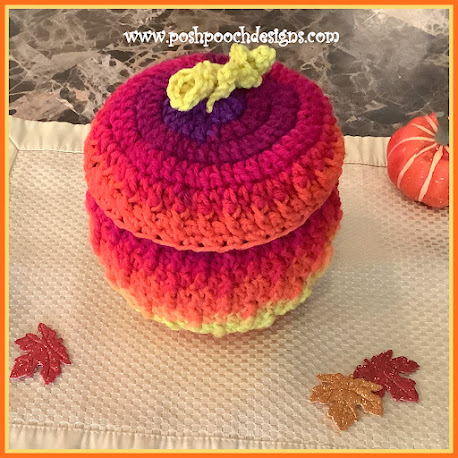
Pumpkin Bowl With Lid
Crochet Pattern
By Sara Sach of Posh Pooch Designs
IT'S FRIDAY FUNDAY!
I have a fun and elegant crochet pattern to share
with you.
It's a Pumpkin bowl With lid.
It is a so versatile that can de used for lots
of things. fill it with goodies, nuts, and candy.
It can also be used for a tea light.
Would also make a lovely center piece for
Halloween Through Thanksgiving.
May be add a flower arrangement or Fresh flowers.
Just so many fun possibilities.
Use it with or Without the lid, both ways make a wonderful addition to Your Fall decorations and festivities.
If You want to put unwrapped goodies or candy inside,
put a coffee filter in first. This will keep it clean and
not get it sticky.
See The Video On My Crochet Youtube
Channel At This LINK
Pumpkin Bowl With Lid Crochet Pattern
Please Add This Crochet Pattern To Your Ravelry Favorites
Skill: Easy
Materials:
Crochet hook – H / 5 mm.
Yarn – Med (4) Premier Sweet Roll Vivid/Lava Lamp / 3.5 oz.
Bowl – Glass / Plastic - 5.6 inches tall / 18 inches around
Crochet hook – H / 5 mm.
Yarn – Med (4) Premier Sweet Roll Vivid/Lava Lamp / 3.5 oz.
Bowl – Glass / Plastic - 5.6 inches tall / 18 inches around
Thin Ribbon - 1/4 inch thick, 18 inches long
Yarn Needle
Stitches:
Chain (ch)
Slip Stitch (slst)
Single Crochet (sc)
Double Crochet (dc)
Front Post Double Crochet (FPDC)
Yarn Needle
Chain (ch)
Slip Stitch (slst)
Single Crochet (sc)
Double Crochet (dc)
Front Post Double Crochet (FPDC)
Single Crochet Together (sctog) decrease
Size: 6 inches tall / 20 inches
around
Notes:
Demo is stitched with gold med (4) Acrylic yarn
Ch1 Does not count as a st
Ch3 Counts as a dc
Pattern:
R: 1 – Pumpkin Bowl – Ch 5, join in a
circle, ch3, 9 dc in the circle,
Join to the ch3 with a slst, ch 3 (10 dc)
Ch1 Does not count as a st
Ch3 Counts as a dc
Join to the ch3 with a slst, ch 3 (10 dc)
Join to the ch3 with a slst, ch3 (20 dc)
Join to the ch3 with a slst, ch3 (40 dc)
*1 dc in the next 3 dc, 2 dc in the next dc*
Repeat From * to * around,
Jon to the ch3 with a slst, ch 3 (50 dc)
*1 dc in the next 4 dc, 2 dc in the next dc*
Repeat From * to * around,
Jon to the ch3 with a slst, ch 3 (60 dc)
*1 dc in the next 3 dc, FPDC in the next dc*
Repeat From * to * around,
Jon to the ch3 with a slst, ch 3 (15 FPDC, 45 dc)
*1 dc in the next 3 dc, FPDC in the next dc*
Repeat From * to * around, 1 dc in the last 2 dc,
Jon to the ch3 with a slst, ch 3 (15 FPDC, 45 dc)
R: 14 – 1 sc in the 1st st,
*sctog the
next 2 sts, 1 sc in the next st*
Repeat From
* to * around, join to the 1st sc with a slst,
Tie off
weave in the ends. (45 sc)
Lace the ribbon through R: 13,
Slide the bowl in the pumpkin and tie a bow.
Repeat R: 1 – R: 6
Ch1 after R: 6
Start with a 8 inch tail of yarn,
Ch 7, slst in the 2nd ch from the hook, sc in the next ch,
Dc in the next 2 chs, sc in the next ch, slst in the last ch,
Turn working down the other side of the ch
Slst, sc, 3 dc, sc, slst, join to the 1st slst
Ch 6, sc in the 2nd ch, 1 sc in the next 5sc,
join the same slst as the leaf
Ch 10, sc, ch1, sc in each of the chs, tie off weave in the end.
Use the beginning tail of yarn to attach to the top of the pumpkin.
An Ad Free PDF File is Available
In My Ravelry Shop At This LINK
For $ 3.50


No comments:
Post a Comment