Friday, October 29, 2021

Friday Fun With Sara – Turkey Butt Crochet Pattern | Posh Pooch Designs

 Friday Fun With Sara – 
Turkey Butt Crochet Pattern
  With Sara Sach Of Posh Pooch Designs


It's  time for a little fun, which I think we all can use.
Today On Friday Fun With Sara we made Turkey Butts!
You read That right, Turkey Butts.


They are big enough to use as a coaster or 
add a magnet and put them on your refrigerator.
Make one for every guest who comes for Thanksgiving
 Dinner, as a reminder of how much fun they had 
at your get together. Or just make them for fun!
Everyone will get a good laugh out of them,
Especially when they see how fun a silly they are. 


These silly Turkeys are quick, easy and a great way to
 use of some left over yarns. You do not have to make 
them in traditional colors, just have some fun and 
see what fun Turkeys you make.


See The Video On my Crochet Youtube Channel At This LINK


Friday Fun With Sara –
 Turkey Butt Coaster And Magnets Crochet Pattern
 
Skill: Easy
 
Materials:
Crochet Hook H / 5.00 MM
Yarn – Med (4) Acrylic – Small amount of 
              White – C1, Light Brown – C2,
              Variegated - C3, Yellow – C4
Yarn Needle
Magnets
Glue - E 6000 or Hot Glue
Stitch Marker
 
Stitches:
Chain (ch)
Slip stitch (slst)
Single Crochet (sc)
Double Crochet (dc)
Triple Crochet (tr)
Change to (chgto)
 
Size: 3.5 X 5 inches
 
Notes:
Turkey Body is stitched in the round, no joining
 
Pattern:
 
R: 1 –With C1, ch2, 6 sc in the 2nd ch from the hook (6 sc)
 
R: 2 – Chgto C2, 2sc in each sc, (12 sc)
 
R: 3 – 2 Sc in each sc (24 sc)
 
R: 4 – 1 sc in next 3 sc, 1 sc in the next sc,
Repeat around, slst in the next 2 sc (30 sc)

R: 5 - 1 sc in next 4 sc, 1 sc in the next sc,
Repeat around,  (36 sc, 2 slst)
 
Tail Feathers - Chgto C3,
ch2, hdc in the 1st sc, ch2, slst in the same sc, slst in the next sc,
ch3, dc in the same sc, ch3, slst in the same sc, slst in the next sc,
ch4, tr in the same sc, ch4, slst in the same sc, slst in the next sc,
ch3, dc in the same sc, ch3, slst in the same sc, slst in the next sc,
ch2, hdc in the 1st sc, ch2, slst in the same sc, slst in the next sc,
tie off weave in your ends.
 
Turkey Feet – Count down 15 sc from the last tail feather on the left, Join C4,
*Ch 6, slst in the 2nd ch from the hook, slst in the next ch,
Ch 3, slst in the 2nd and 3rd ch,
Ch3, slst in the 2nd and 3rd ch,
Slst in the last 3 chs of the beginning ch,*
Slst in the next sc, and repeat from * to *
Join to the same sc, tie off and weave in your ends.
 
Attach a magnet to the back of the Turkey but with your choice of Glue.


If your Turkey Butt is not laying flat, or not round enough.
you can dampen it and lay it out to dry. or pit it to a blocking board. 

See You next Friday For Friday Fun With Sara


Wednesday, October 27, 2021

Stadium Cushion Seat Crochet Pattern | Posh Pooch Designs

 Stadium Cushion Seat Crochet Pattern
By Sara Sach Of  Posh Pooch Designs


Want to make something fun and useful with
 those left over or scratchy yarns?

This Stadium Cushion Seat Is just the perfect thing.
The Crochet Pattern is Stitched up holding 2 strands of
 Medium (4) Weight yarn together and a L / 8.00 MM
 Crochet hook. That means it's going to work
 up super quick. You will be so surprised how easy it is to Stitch up


It's the best thing for when you are a mom and dad 
on the go. Always heading  to all those sports
 games, Swim meets, races, choir and band practices,
 and more. No more sore bum from sitting on on hard
 metal chair and bleachers. Stitch up a couple of these
 Stadium Cushion Seats and keep them in your car, 
 and you will always be ready.


These make great gifts, as well. Stitch them up in
 their school or favorite sports team colors.

See The Video on my Crochet Youtube
 Channel At This LINK


Stadium Cushion Seat Crochet Pattern By Sara Sach

Please Add This Crochet Pattrn To Your RavelryFavorites

Skill: Easy
 
Materials:
Crochet Hook – L / 8.00 MM
Yarn- Med (4) Acrylic 3.5 oz. of 2 colors – (total 7 oz.)
12 X 12 Foam Cushion
Yarn needle
 
Stitches:
Chain (ch)
Single Crochet (sc)
Double Crochet (dc)
Change to (chgto)
 
Size: 14 X 14 inches
2 Chs = 1 inch
1 Row = 1 inch
 
Notes:
Seat is stitched holding 2 strands of yarn together
Ch 3 counts as a dc
When changing colors, ch 3 after the color change
 
Pattern: Make 2  - 12 X 12 inch squares

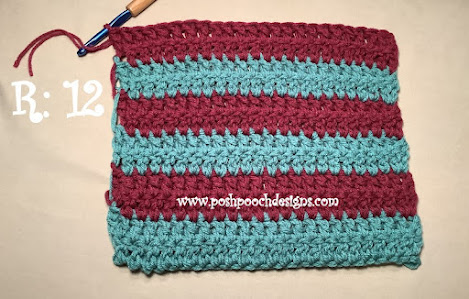
R: 1 – With C1, Ch 26, dc in the 4th ch from the hook, 
and in each ch across, turn, ch 3 (24 dc)


R: 2 – 1 dc in each dc across, turn (24 dc)


R: 3 – Chgto C2, ch3, 1 dc in each dc across, turn, ch 3 (24 dc)


R: 4 – 1 dc in each dc, turn (24 dc)


R: 5 – R: 12 – Continue to Repeat R: 4, alternating colors every 2 rows.


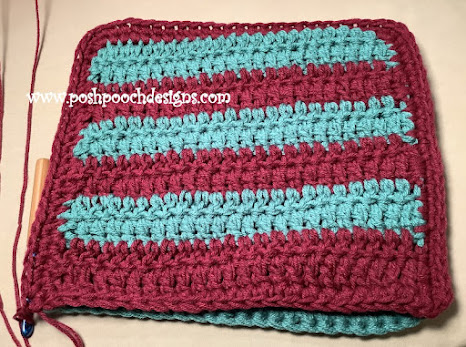
R: 13 - Sc evenly around, placing 2 sc in each of the corners, 
Tie off weave in your ends.

Remember to make 2 squares
Do not tie off on the 2nd square 

 
Place the 2 squares together, right side out.
Ch1, evenly sc around 3 sides,


Slide the Foam Cushion inside, and sc the last side closed.


Loop Handle -
Ch 20, join to the last sc,
Sc 22 time around the handle, join to the next sc,
 tie off and weave in your ends.


An Ad Free PDF File is Available
In My Ravelry Shop At This Link
For $3.50


Tuesday, October 26, 2021

COFFEE AND CROCHET WITH SARA PODCAST - Navigating Youtube For A Great Crochet Experience | Posh Pooch Designs

 COFFEE AND CROCHET WITH SARA PODCAST
Navigating Youtube For A Great
 Crochet Experience
With Sara Sach Of Posh Pooch Designs


See The Video on my Crochet Youtube
 Channel At This LINK


Getting Ready For Our Crochet Along - Cranberry And Ivy Christmas Tree Skirt 


How To Navigate Youtube For A Great Experience 
By Answering 6 Questions

1. Where are your Patterns And Playlists?
Click on the youtube Channel icon, 
the Playlists are at the top.

2. Why is your Video so Quiet/ Loud?
You can control the Volume on your devise, 
laptop, phone or tablet.

3. You are going to Fast? Too Slow?
You can pause, fast forward or slow down the video.

4. Where is the Notes, Patterns Links and Description
 Box under The video?
Depending on the devise it is where it says 'see more" 
under the video, or it is the arrow at the right side.

5. How Can I find you on Social Media?
All My Links are in that description Box
Under The Video.

6. Why are There so many ads on your channel?
 Running a Youtube Channel is not free. Yes, It is free 
for you to watch, but it is expensive to run. 

We need cameras, lighting, keyboards, computers, 
monitors, mirophones, photo and video editing software.
 And we must keep them up to date with apps and 
hardware.

As well as, materials for the content of our Videos.
We  purchase yarns and supplies for Give aways, and
 pay for shipping those give aways to you.

Some people have company sponsors for yarns and
 materials, and I Do on occasion get something
 to show you and to give away.

And Than there is the time it takes to produce a Video.
There is designing, pattern writing, testing, editing and
 staging. A 25 - 30 minute Video takes about 
24 hours to produce. 

See The Video on my Crochet Youtube
 Channel At This LINK


What's New This Week At

One Hour Beanie Hat
Crochet Pattern and Video - LINK


FRIDAY FUN WITH SARA
Halloween Lollipop Toppers -
Pumpkins, Skulls And Spiders
Crochet Pattern and Video - LINK


Willow Wool Hood With 
Faux Fur Trim
 Crochet Pattern and Video LINK


Thanks For Stopping By


Hope To See You Next Week

Monday, October 25, 2021

Willow Wool Hood With Faux Fur Trim Crochet Pattern | Posh Pooch Designs

 Willow Wool Hood With Faux Fur Trim

Crochet Pattern 

By Sara Sach of Posh Pooch Designs


The Willow Wool Hood is designed using 
Willow Yarns and is a 100% Superwash Wool. I know
 many people are allergic to Wool and Wool Blends. 
I also have issues with wool, but the Superwash wool
 doesn't bother me. 

Here is an Article By Lionbrand on the difference
 between "Wool And Superwash Wool". LINK


But, you can use any Bulky (5) yarn you may have on
 hand to stitch up this Hood. It is designed for the youth
 to adult size and is made to fit loosely and comfortably.
It is designed using a K / 6.50 MM Crochet Hook.
If you desire a tighter fit, go down a crochet hook
 size or two.


See The Video On My Crochet Youtube 
Channel At This LINK


Willow Wool Hood Crochet Pattern  By Sara Sach 

Please Add This Crochet Pattern To Your Raverly Favorites
 
Skill: Easy
 
Materials:
Crochet Hook – K / 6.50 MM
Yarn – Bulky (5) C1 – Willow Daly Superwash wool 3.5 oz. / Sand
                             C2 - Willow Daly Superwash wool 3.5 oz. / Spring Blossoms                            
                             Go For Faux – 3 Oz. Grey (6) Super bulky
Yarn Needle

 
Stitches:
Chain (ch)
Single Crochet (sc)
Half Double Crochet (hdc)
Foundation Half Double Crochet (FHDC)
Change to (chgto)
Skip (sk)
Space (sp)
Stitch (st)
 
Size: Youth to Adult - 
Hood depth is 12 inches/ 24 inches across
 
Notes:
Ch 1 does not Count as a stitch.
 
Pattern:
R: 1 – 45 FHDC, turn, ch1 (45hdc)
 
I use St Markers to keep track of my Sts.

R: 2 – 2 hdc in the 1st st,
*sk the next st, 2hdc in the next st*
Repeat From * to* across,
2 hdc in the last st, turn, ch 1
(23 sets of 2hdc)


R: 3 – Chgto C2, leave C1 attached, 2 hdc in the 1st st,
2 hdc in the sp between the 1st set of 2 hdc,
*2 hdc in the sp between the next 2 sets of 2 dc*
Repeat From * to* across, 2 hdc in the last st, Turn, ch1
(24 sets of 2 hdc)


R: 4 - 2 hdc in the 1st st,
2 hdc in the sp between the 1st set of 2 hdc,
*2 hdc in the sp between the next 2 sets of 2 dc*
Repeat From * to* across, 2 hdc in the last st, Turn, ch1
(25 sets of 2 hdc)


R: 5 – Chgto C1, leave C2 attached,
2 hdc in the 1st st,
2 hdc in the sp between the 1st set of 2 hdc,
*2 hdc in the sp between the next 2 sets of 2 dc*
Repeat From * to* across, 2 hdc in the last st, Turn, ch1
(26 sets of 2 hdc)
 
R: 6 - 2 hdc in the 1st st,
2 hdc in the sp between the 1st set of 2 hdc,
*2 hdc in the sp between the next 2 sets of 2 dc*
Repeat From * to* across, 2 hdc in the last st, Turn, ch1
(27 sets of 2 hdc)


R: 7 - Chgto C2, leave C1 attached,
2 hdc in the 1st st,
2 hdc in the sp between the 1st set of 2 hdc,
*2 hdc in the sp between the next 2 sets of 2 dc*
Repeat From * to* across, 2 hdc in the last st, Turn, ch1
(28 sets of 2 hdc)
 
R: 8 - 2 hdc in the 1st st,
2 hdc in the sp between the 1st set of 2 hdc,
*2 hdc in the sp between the next 2 sets of 2 dc*
Repeat From * to* across, 2 hdc in the last st, Turn, ch1
(30 sets of 2 hdc)


R: 9 – R: 26 – Continue to repeat R: 8 - 
Increasing by 1 set of 2 hdc every row
Alternating colors every 2 rows
Tie off and weave in your ends after R: 26
 

R: 27 - Fold the hood in half, to form the hood.
Attach yarn a the top of the hood, slst back of the hood Closed,
Tie off weave in the end.


R: 28 – The Faux Fur Trim, Attach yarn to the bottom of the hood closing,
*Stitch in the sides of hdc evenly to the 1st point of the hood, (Sc, ch 1, sk 1)*
Turn working around the hood opening,
sc, ch1, sk st 1 around the hood opening working toward the second point,
Repeat from * to * up the other side of the hood, to the back of the hood.
Tie off and weave in the ends.

An Ad Free PDF File is 
Available in my
 Raverly Shop At This LINK 
For $4.50


Friday, October 22, 2021

Friday Fun With Sara - Let’s Stitch Up Some Lollipop Toppers For Halloween | Posh Pooch Designs

 Friday Fun With Sara - 
Let’s Stitch Up Some Lollipop Toppers
 For Halloween 
With Sara Sach of Posh Pooch Designs

🎃🎃🎃🎃🎃🎃🎃🎃🎃🎃🎃🎃🎃🎃🎃🎃🎃


The Lollipop Toppers are great fun to make and to give.
 And once the lollipop is eaten you have cute finger
 puppets to play with.
I Chose to make mine a Pumpkin/ Jack O' Lantern, 
Spiders and Skulls, but You can get in your left over yarn
 and come up with lots of other colors and fun designs. 

I purchased a couple bags of the tootsie Roll and
 Blow pop suckers at the Dollar Tree, and used yarns
 I already had in my Yarn stash. 
And then I stitched up a bunch while watching
 my favorite baking show!
Fun to do, and inexpensive, too!

🎃🎃🎃🎃🎃🎃🎃🎃🎃🎃🎃🎃🎃🎃🎃🎃🎃

See The Video On My Crochet Youtube
 Channel at This LINK


Friday Fun With Sara -
Let’s Stitch Up Some Lollipop Toppers For
Halloween Skulls, Pumpkins And Spiders
 
Skill: Easy
 
Materials:
Crochet Hook – H / 5.500 MM
Yarn- med (4) Acrylic – I used some from my Yarn stash
          White / Orange, small amount for face and ribbon)
Yarn Needle
Tootsie Pop or similar size suckers
 
Stitches:
Chain (ch)
Slip Stitch (slst)
Single Crochet (sc)
Half Double Crochet (hdc)
 
Size: 3 X 2.5 inches
 
Notes:
Ch1 does not counts as a hdc
 
Pattern: Make 2 For Pumpkin And Spider: 
R: 1 - Ch 5, join in a circle, 10 hdc in the circle, join, ch 1(10 hdc)
 
R: 2 – 2 hdc in each hdc, join, ch 1 (20 hdc)
 
R: 3 – 1 sc in each hdc, join, ch 1 (20 sc)
For Pumpkin And Spider: Tie off and weave in your ends.
 

 Pumpkin: Place the Front And Back together, right sides facing out,
Sc them together around, leaving a 1.5 inch opening
 to slide the Lollipop inside.
Pumpkin Stem - Join green yarn to top of the pumpkin, 
ch 4, sc in the 2nd ch and in the next 2 chs, join to the pumpkin and tie off.

Embroider face as shown in the picture using black yarn and needle.


Spider: Place the Front And Back together, right sides facing out,
We will be stitching the front and back together,
*sc in the next sc, ch 6, sc in the 2nd ch and in each ch, join to the next sc with a sc*
Repeat From * to * 2 more times, 
1 sc in the next 5 sc,
Repeat From * to * 3 More Times, sc in the next st, tie off weave in your ends. 

Embroider 2 eyes in color of choice.


Skull: Make 2
Repeat R: 1 - R: 3

R: 4 –  2hdc in the next 4 sc, tie off weave in your ends.

Place the Front And Back together, right sides facing out,
We will be stitching the front and back together, sc around 
the skulls leaving the bottom open, tie off weave in your ends.

With Black yarn Embroider on the faces as shown.


These are sun and Fun to play with,
 for kids and adults


Happy Halloween 
and Don't Eat Too Much Candy!

Wednesday, October 20, 2021

One Hour Chunky Beanie Hat Crochet Pattern | Posh Pooch Designs

 One Hour Chunky Beanie Hat 
Crochet Pattern
By Sara Sach of  Posh Pooch Designs


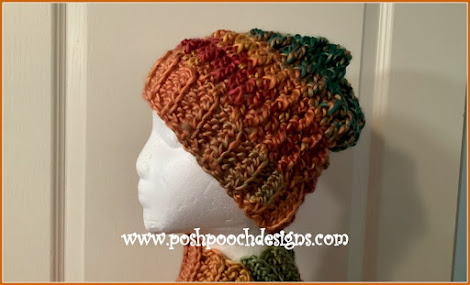
The One Hour Chunky Beanie Hat Stitches up super fast
 and is very comfy to wear. It also makes a lovely last
 minute gift for both the guys and the girls. 
I chose to make mine with Fall Colors, but this pattern 
will work with any colors, or combination of colors.


The One Hour Chunky Beanie Hat is designed to match
 The One Hour Chunky Cowl Crochet Pattern.
Make a set in an evening while watching your favorite
 show or movie. 

One Hour Chunky Cowl Crochet 
Pattern And Video - LINK

You can stitch up a bunch of both the Hat and Cowl,
 to use up left over yarns, and have them on hand for
 last minute gift and charity giving.
Both the Cowl and Hat are so comfy and cozy, and
 perfect for the winter season.


See The Video On My Crochet Youtube
Channel At This LINK


One Hour Chunky Beanie Hat Crochet Pattern 
By Sara Sach
 
Please Add This Crochet Pattern To Your Ravelry Favorites 
Skill: Easy

Materials:
Crochet Hook – K/ 6.5 MM
Yarn- Bulky (5) 3.5oz. / 150 yds. Yarn Bee/ Wildstreak/ Auburn Rust
 
Stitches:
Chain (ch)
Single Crochet (sc)
Half Double Crochet (hdc)
Double Crochet (dc)
Triple Crochet (tr)
Skip (sk)
Space (sp)
Back Loop Only (BLO)
Front Post Double Crochet (FPDC)
 
Size: 18 Inches around – It’s very roomy and stretchy
Fits a 18– 24 Inch head
 
Notes:
Ch1 Does not count as a st
Ch3 Counts as dc
 
Pattern:
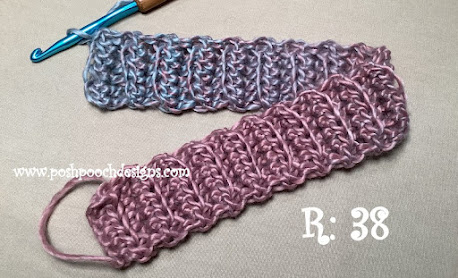
R: 1- Ch 7, 1 hdc in the 2nd ch from the hook, and in each ch, turn, Ch1
(6 hdc)
 

R: 2 – Blo, 1 hdc in each hdc, turn, ch1 (6hdc)
 

R: 3 – Blo, 1 hdc in each hdc, turn, ch1 (6hdc)
 
R: 4 - Blo, 1 hdc in each hdc, turn, ch1 (6hdc)


R: 5 - R:  38 – Continue To Repeat R: 2
 

R: 39 – Place the ends of the band together, sc them together, ch 3
 

R: 40 – Evenly dc around the top of the band, join to the ch3, ch 3
(you need 46  (dc)
 

R: 41 - *FPDC in the next dc, dc in the next dc*
Repeat From * to * around, join, ch 3
(23 FPDC, 23dc)


R: 42 – 1 dc in each st around, join, ch 3 (46dc)
 

R: 43 – R: 48 – Repeat R: 41 And R: 42 Alternating Rows.
 
Add more repeats if longer or slouchy beanie is desired.


R: 49 – *dctog the next 2 dc, 1 dc in the next dc*

Repeat from * to * around, join, tie off leaving a 12- 16 inch tail of yarn.


Turn the hat wrong side out, thread the tail of yarn onto the needle,

Gather closed the top of the hat, and tie off securely.

Flip hat right side out.


An Ad Free PDF File is Available
 in my Raverly Shop
 At This LINK
 For $ 4.50