Pot Holder and Hot pad. It is a thick pot holder because
it is stitched in Front Post Double Crochet Stitches.
Perfect For setting Hot pots and dishes on to protect our
kitchen and table surfaces.
The Hexie Pot Holder is also very pretty and will
look lovely on your dinning room table.
It has become one of my favorite style pot holders.
It also makes a nice washcloth because of the texture
of the Front Post Double Crochet Stitches
and it is the perfect size,
at 11 X 11 inches, for cleaning your face,
body, kitchen and bathroom.
See The Video On My Crochet Youtube Channel At This LINK
Hexie Pot Holder And Washcloth Crochet Pattern
Please, Add This Crochet Pattern To Your Ravelry Favorites Skill: Easy Materials: Crochet Hook
– I / 5.5 MM Yarn - med (4) Cotton 2 oz. Cotton / Peaches And Creme/stripey Yarn Needle Stitches: Chain (ch) Slip Stitch
(slst) Single Crochet
(dc) Double Crochet (dc) Front Post Double Crochet (fpdc) Skip (sk) Space (sp) Size: 11 X 11 Inches Notes: Ch3 Counts
as a dc Rounds are
joined to the ch3 with slst Pattern: R: 1 – Ch 5,
join in a circle, Ch 3, 11 dc in the circle, join, ch 3 (12 dc)
R: 2 – 3 dc
in the same st as the ch3, *sk the next
dc, 4 dc in the next dc* Repeat From
* to * 4 more times, join, ch 3 (6 sets of 4
dc)
R: 3 – 1 dc
in the same st as the ch3, fpdc in the next 2 dc, 2 dc in the next dc, *2 dc in the
next dc, fpdc in the next 2 dc, 2 dc in the next dc* Repeat From
* to * 4 more times, join, ch 3 (6 sets of
2dc, 2fpdc, 2dc)
R: 4 – 1 dc
in the same st as the ch3, fpdc in the next 4 dc, 2dc in the next dc, *2 dc in the
next dc, fpdc in the next 4 dc, 2 dc in the next dc* Repeat From
* to * 4 more times, join, ch3 (6 sets of
2dc, 4 fpdc, 2dc)
R: 5 - 1 dc
in the same st as the ch3, fpdc in the next 6 dc, 2dc in the next dc, *2 dc in the
next dc, fpdc in the next 6 dc, 2 dc in the next dc* Repeat From
* to * 4 more times, join, ch3 (6 sets of
2dc, 6 fpdc, 2dc)
R: 6 -1 dc
in the same st as the ch3, fpdc in the next 8 dc, 2dc in the next dc, *2 dc in the
next dc, fpdc in the next 8 dc, 2 dc in the next dc* Repeat From
* to * 4 more times, join, ch3 (6 sets of
2dc, 8 fpdc, 2dc)
R: 7 - 1 dc
in the same st as the ch3, fpdc in the next 10 dc, 2dc in the next dc, *2 dc in the
next dc, fpdc in the next 10 dc, 2 dc in the next dc* Repeat From
* to * 4 more times, join, ch3 (6 sets of
2dc, 10 fpdc, 2dc) R: 8 -1 dc
in the same st as the ch3, fpdc in the next 12 dc, 2dc in the next dc, *2 dc in the
next dc, fpdc in the next 12 dc, 2 dc in the next dc* Repeat From
* to * 4 more times, join, ch3 (6 sets of
2dc, 12 fpdc, 2dc) R: 9 –1 dc
in the same st as the ch3, fpdc in the next 14 dc, 2dc in the next dc, *2 dc in the
next dc, fpdc in the next 14 dc, 2 dc in the next dc* Repeat From
* to * 4 more times, join, ch3 (6 sets of
2dc, 14 fpdc, 2dc)
R: 10 – 1 sc
in each dc working all around the edge of the hot pad, join to 1 st
sc, ch 16, join back to the same sc, sc 18 around the ch6, join to the
next sc with a slst, tie off and weave in your ends.
In This
Pattern I will Show you how to stitch up the Square, And how to
join and trim the Table Runner. Skill: Easy To Moderate Materials: Crochet hook
– H / 5.00 MM Yarn- med (4)
Acrylic – 2 colors (I used I Love This Yarn Sparkle. Metallic) Yarn Needle Stitches: Chain (ch) Slip Stitch
(slst) Single
Crochet (sc) Double
Crochet (dc) Front Post
Double Crochet (fpdc) Space (sp) Change to
(chgto) Size: 6 Inch Square Notes: You will need
8 Squares to make The Firecracker Table Runner Ch4 Counts
as a dc, ch1 Ch3 Counts
as a dc How To Change Colors:
Last 2 Loops of The Dc of C2
Bring in C1
On The last 2 loops of C1
Bring back in C2
This will give you a crisp color change.
Pattern: R: 1 – With
1st color, Ch 5, join in a circle, Ch 4, *dc, ch1* in
the circle, Repeat from
* to * 6 more times, join, to the ch3 with a slst (8 sets of
dc, ch1)
R: 2 – Chgto
2nd Color, ch3, chgto to 1st color, leave both colors attached, Fpdc around
the 1st dc, ch1, *chgto to 2nd
color, dc in the next dc, Chgto 1st color, fpdc around the same dc, Chgto 2nd
color, ch1* Repeat From
* to * 6 more times, join to the 3rd ch of the ch4 with a slst. (8 sets of
dc, fpdc, ch1)
See The pic above on how to change colors
R: 3 – 1 dc
in the same st as ch3, 1 dc in the next st, Chgto to
color 1, fpdc around the fpdc, chgto 2nd color, ch1* *2 dc in the
1st dc, 1 dc in the next st, Chgto 1st
color, fpdc around the fpdc, chgto 2nd Color, ch1* Repeat From
* to * 6 more times, join to ch 3. (8 sets of 3
dc, 1 fpdc, ch1)
See The pic above on how to change colors
R: 4 – Slst to
the 2nd dc, chgto 1st color, *2dc, ch1,
in the 2nd dc, ch1, 2 dc in the next fpdc, ch1, 2 dc in the
2nd dc of the next group of 3 dc, ch1, 2dc, ch2,
2dc in the next fpdc, ch1* Repeat From
* to * 7 more times, join to the ch 3, *4 corners
and 12 groups of 2 dc)
R: 5 – Slst to the next ch1 sp, Chgto
to 2nd color, tie off 1st color, *2 dc, ch1
in the next 3 ch1 sps, 2dc, ch2, 2dc in the next corner ch2 sp* Repeat From * to * 3 More
Times,
ch1, 2 dc in the last ch1 sp, ch1, join to the ch3, and tie off. ( 4 corners
And 16 groups of 2 dc)
How I joined The Squares:
Place 2
Squares, together, Right sides Facing out. Join color
of Choice to the Corner, 2 sc in the corner,
joining the 2 squares together, *Ch2, 2 dc in
the next ch2 space* Repeat from
* to * across to the next corner, tie off, weave in the ends.
Repeat 3
More times. You will
need 4 sets of 2 Squares joined together. Place the
Squares staggering them in a stair step pattern. Repeating how
we joined the 2 squares. Trim: Join yarn of
choice, to the 1st corner, sc, ch1, sc in the corner, Sc in each
dc, and 1 sc in each ch1 sp, working around the table Runner, Place sc,
ch1, sc in each of the outside corners.
Join back to
the 1st sc, tie off, and weave in your ends.
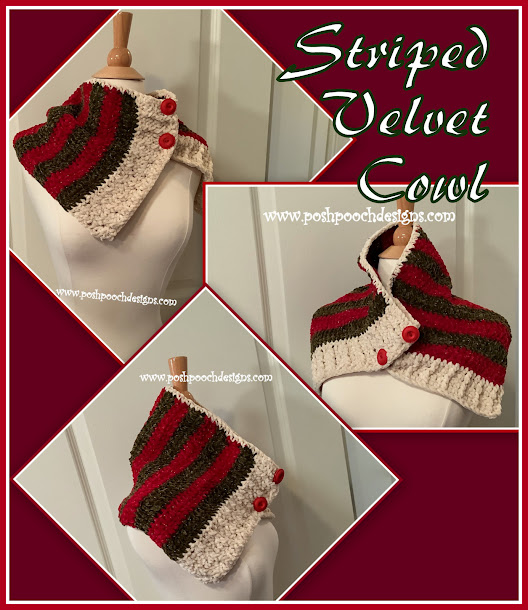
Please Add This Crochet Pattern To Your Ravelry Favorites Skill: Easy to Moderate Materials: Crochet Hook
– I / 5.5 MM Yarn –
Velvet Yarn - Med. (4) I used Yarnbee / Velvety Smooth Sparkle C1 – Ivory – 3 oz / 140 yds C2 – Olive – 3 oz. / 140 yds. C3 – Red – 3 oz. / 140 yds. Yarn needle 2 matching
buttons, 2 - 3 inches Stitches: Chain (ch) Single
Crochet (sc) Half Double
Crochet (hdc) Double
Crochet (dc) Front Post
Double CrochetOnly (FPDC) Back Post
Double Crochet (BPDC) Chang to
(chgto) Size: 12 X 28 Inches Notes: Ch counts as
dc When
Changing Colors Ch3, after the color change We will be
carrying our yarn on the striped section of the cowl. Pattern: R: 1 – With
C1, ch 31, dc in the 4th ch from the hook, 1 dc in each
ch cross, turn ch 3 (29dc)
R: 2 – Dc in
the next dc, *FPDC in the
next dc, 1 dc in the next 2 dc* Repeat From
* to * 8 more times, turn, ch 3 (9 FPDC, 20
dc)
R: 3 - Dc in
the next dc, *BPDC in the
next dc, 1 dc in the next 2 dc* Repeat From
* to * 8 more times, turn, ch 3 (9 BPDC, 20
dc)
R: 4 –
Repeat R: 2 R: 5 –
Repeat R: 3, do not ch 3
R: 6 – Chgto
C2, ch3, 1 dc in each dc across, turn, ch3 (29dc) R: 7 - 1 dc
in each dc across, turn (29dc)
R: 8 - Chgto
C3, leave C2, attached, ch3, 1 dc in
each dc across, turn, ch3 (29dc) R: 9 - 1 dc
in each dc across, turn (29dc)
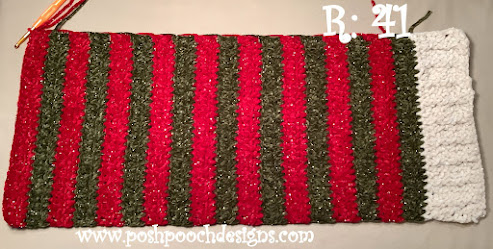
R: 10 – R:
41 – Continue to repeat R: 6 – R: 9 Alternating
Color every 2 rows
Continue to repeat if a longer Cowl/ Scarf is desired.
R: 42 –
Chgto C1, Tie off both C2, and C3, Ch3, Repeat
R: 2
This should
be the edge where we carried our yarn. Evenly sc across the edge of the cowl, tie off and weave in Your ends. Lay the cowl
with the edged together, and place your buttons. With
matching yarn securely sew them on stitching though the front and back of the cowl.