Tuesday, November 29, 2022

Coffee And Crochet Podcast - The Holiday Season Is Here And Lot's Of Yarnie Fun! | Posh Pooch Designs

 Coffee And Crochet Podcast  - 
The Holiday Season Is Here And
Lot's Of Yarnie Fun! 
With Sara Sach of Posh Pooch Designs


I Got Called A Movie Star This Week!
LOL!
I tell ya all about on today's video.

See The Video On My Crochet Youtube
 Channel At This LINK


**********************************************

This Or That Video
 To Gift Or Not To Gift Video LINK


This Video was a great discussion on
 crochet gift giving.
 and again, I love reading the comments.

🎅🎅🎅🎅🎅🎅🎅🎅🎅🎅🎅🎅🎅🎅🎅🎅🎅🎅


What's New This Week At 

Friday Fun Day-
Jingle Bell Tassel Ornaments - 
Blog And Video -  Link 


Santa And Elf  Dog Bandana/ Bandanna
We Updated The Pattern To include Sizes
From XS - XL
Crochet Pattern And Video  - LINK


Lot's of Fun Christmas And Holiday Patterns All This Month!

Monday, November 28, 2022

Santa And Elf Dog Bandana Crochet Pattern | Posh Pooch Designs

 
Santa And Elf Dog Bandana
Crochet Pattern 
By Sara Sach Of  Posh Pooch Designs

The Santa And Elf Dog Bandana is perfect For
 Christmas and Holiday photos. Everyone will love how 
cute and festive your dogs, and cats, will look. 


I designed This Crochet Pattern in October of 2015.
I was asked if it could be made in bigger sizes. So we 
retested, and updated the pattern to include 5 sizes.

Sizes:
XS – 2 – 7 lbs.

S - 8 -15 lbs.

M – 16 - 30 lbs.

L – 31 - 50 lbs.

XL – 51 – 90 Lbs.


These are approximate sizes as every dog's neck is 
different. So Measure your dogs neck to find
 which one fits Your dog best.


This Bandana is designed to be Santa Style, as well as,
 a Christmas Elf Style. It's perfect for both the boys and
 the girls. And the color choices are 
completely up to you!


I used silver plastic buckles I purchased from my local
 Hobby Lobby in the button area. There are several
 sizes to choose from.

See The Video On My Crochet Youtube
 Channel At  This LINK


Santa And Elf Bandana Dog Bandana Crochet Pattern


Please Add This Crochet Pattern To Your Raverly Favorites


Skill- Easy
 
Materials -
Crochet Hook – H/ 5.00 mm
Yarn – Med (4) 2 oz. Red or Green-C1
             Small Amount of Black-C2, White-C3 and White Fuzzy-C4
              I used I Love This yarn Sparkle Green or Red, White, and Solid Black
Buckle - Plastic, 1 to 1.5 inch. I purchased mine from Hobby Lobby.
Yarn Needle
 
Stitches and Terms:
Chain (ch)
Slip Stitch (sl st)
Single Crochet (sc)
Half Double Crochet (hdc)
Change (chg)
Together (tog)
 
Sizes: These sizes are approximates –
XS – 2 – 7 lbs. -     up to 8 inches
S - 8 -15 lbs. -           10 -12 inches
M – 16 - 30 lbs.      14 - 16 inches
L – 31 - 50 lbs.       18 - 24 inches
XL – 51 – 90 Lbs. 25 - 35 inches

Notes:
Demo is Stitched in XS Size
Ch1 Does Not count as a stitch
 
Pattern:

Sizes are XS(S, M, L, XL)
R: 1 - With C3 - Ch 36 (51, 66, 81, 96) sts
1 sc in the 2nd ch from the hook, and in each ch across, ch 1, turn
(35, 50, 65, 80, 95 sc)

 
R: 2 - 1 sc in each sc, ch 1 turn
XS, S sk to R: 4


R: 3 – M / L -Repeat R: 2 - 1 time
            XL – Repeat R: 3 - 2 Times
 
R: 4 - slst in the 1st 10 (15, 20, 25, 30) sc,
1 sc in the next 15 (20, 25, 30, 35) sts,
Leaving the last 10 (15, 20, 25, 30) sc, un-stitched, ch1, turn
 
The ties are not intended to be long, 
but just long enough to tie, 
So the ties do not hang to far down and 
Be in the way of walking, or get snagged in toe tails.


R: 5 – Chg to C1, 1 hdc in each sc, ch 1 turn 15 (20, 25, 30, 35 hdc)

R: 6 - 1 hdc in each st, ch1, turn
 
R: 7 - 1 hdc in each st, ch1, turn


R: 8 – Chg to C2, Do Not cut C1,
Repeat R: 7
 
R: 9 – Repeat R: 7


R: 10 – Chg back to C1, hdc the 1st 2 sts tog,
 1 hdc in the next 12(17, 22) hdc,
 hdc the last 2 sts tog, ch1 turn


R: 11 - hdc the 1st 2 sts tog, 1 hdc in each st across,
hdc the last 2 sts tog, ch1, turn
 
Continue to Repeat R: 11, till only 2 hdc remain,
st those 2 tog and cut yarn and weave in all your ends.


The number of rows will be different for each size.
Tie off and weave in your ends.


Trim – Attach C4 to the edge of bandanna under
The right side of the bandanna,
Sc, ch1 evenly around the whole bandanna for a fuzzy finished edge.
Do not sc around the ties or top of the bandanna.
Tie off and weave in your end.

 Buckle – Lay buckle on the center of the black stripe.

Sew in place with matching thread and yarn needle.


An Ad Free PDF File is Available
 In My Raverly Shop At This LINK
 For $ 2.50


Friday, November 25, 2022

Friday Fun Day - Jingle Bell Tassel Ornaments | Posh Pooch Designs

 Friday Fun Day
Jingle Bell  Tassel  Ornaments
With Sara Sach of Posh Pooch Designs


Hey, Yarnie Friends, Today is Friday Fun
 Day with Sara, And we are making 
Jingle Bell Tassel Ornaments.

Fun, Easy And So Pretty!


These are  great projects for everyone.
Perfect for group settings for any ages,
from kids to adults, they will love making these.
Everyone can personalize them with their favorite colors,
 ribbon choices and bead choices.
Pull out the jingle bells, beads, ribbons, and yarn 
 and have a ornament making party!

See The Video On My Crochet Youtube 
Channel At This LINK


Here is What You Need:

Med (4) Yarn - Assorted Colors
Yarn Needle
Scissors
Assorted Ribbons
Assorted Beads
Jingle Bells
A Tassel Template 

First Let's Make The Template


Measure And cut a piece of cardboard.
2 X 5 Inches

Wrap yarn around the template length wise 
for 30 - 40 wraps. The more wraps the thicker
 the tassel. Set it aside.


Cut 2 pieces of yarn about 14 -16 inches.
Fold 1 in half and thread it on the needle.
Tie a knot about 1.5 inches from the top to form a loop.
 lace on the beads.
Tie a knot under the beds.


Cut the yarn loops off the template.
Lay them between the 2 strands of yarn.
tie securely.


Fold The yarn down.
Tie the 2nd Strand of yarn around the top of the 
tassel about 1.5 inches down.
Do not cut the yarn strands yet.


Tie a bow around the tassel.
Add a button or bead if desired, to the bow.
Trim the tassel, but do not cut the 2 long pieces of yarn.
Tie the bell onto the long yarn pieces and knot securely.
You want the bell to hand at the trim line.


Hang Them on your Tree, 
or use them as decorations on
 stockings, gifts, banners and buntings.

So many ways to use them,
and make fun memories.

Tuesday, November 22, 2022

Coffee And Crochet Podcast 2023 Crochet Calendar And Yarnie Fun | Posh Pooch Designs

 Coffee And Crochet Podcast
2023 Crochet Calendar And Yarnie Fun
With Sara Sach of Posh Pooch Designs


I Am So excited About the 
2023 Crochet Calendar

 I just received 
from Herrschners Called
Herrschners Treasury of Crochet Afghans
2023 Calendar And Instruction Booklet
The also sent a Pocket Calendar.


12 different Afghans to crochet, once for each month, 
with a booklet with all the patterns from the calendar
I tell you all about it and How you can get one also.

See The Video On My Crochet Youtube
 Channel At This LINK


🍂🍂🍂🍂🍂🍂🍂🍂🍂🍂🍂🍂🍂🍂🍂🍂🍂


What's New This Week At

Turkey Lurky Pillow
 Crochet Pattern and Video - LINK


Friday Fun -
Ribbon Basket
Crochet Pattern And Video - LINK


Scrap Happy
Give Thanks Table Runner
 Crochet Pattern And Video - LINK


Thank You so Much For Stopping by!

See You All Next Week!
🍂🍂🍂🍂🍂🍂🍂🍂🍂🍂🍂🍂🍂


Happy Thanksgiving-  
Let's Celebrate Family and Friends!

Monday, November 21, 2022

Let’s Give Thanks Table Runner Crochet Pattern | Posh Pooch Designs

  The Let’s Give Thanks Table Runner Crochet Pattern
Is Our Scrap Happy Pattern For November
By Sara Sach of   Posh Pooch Designs

This Table Runner is Our November Scrap Happy Crochet
 Pattern, for our Scrap Happy Crochet A Long 2022.


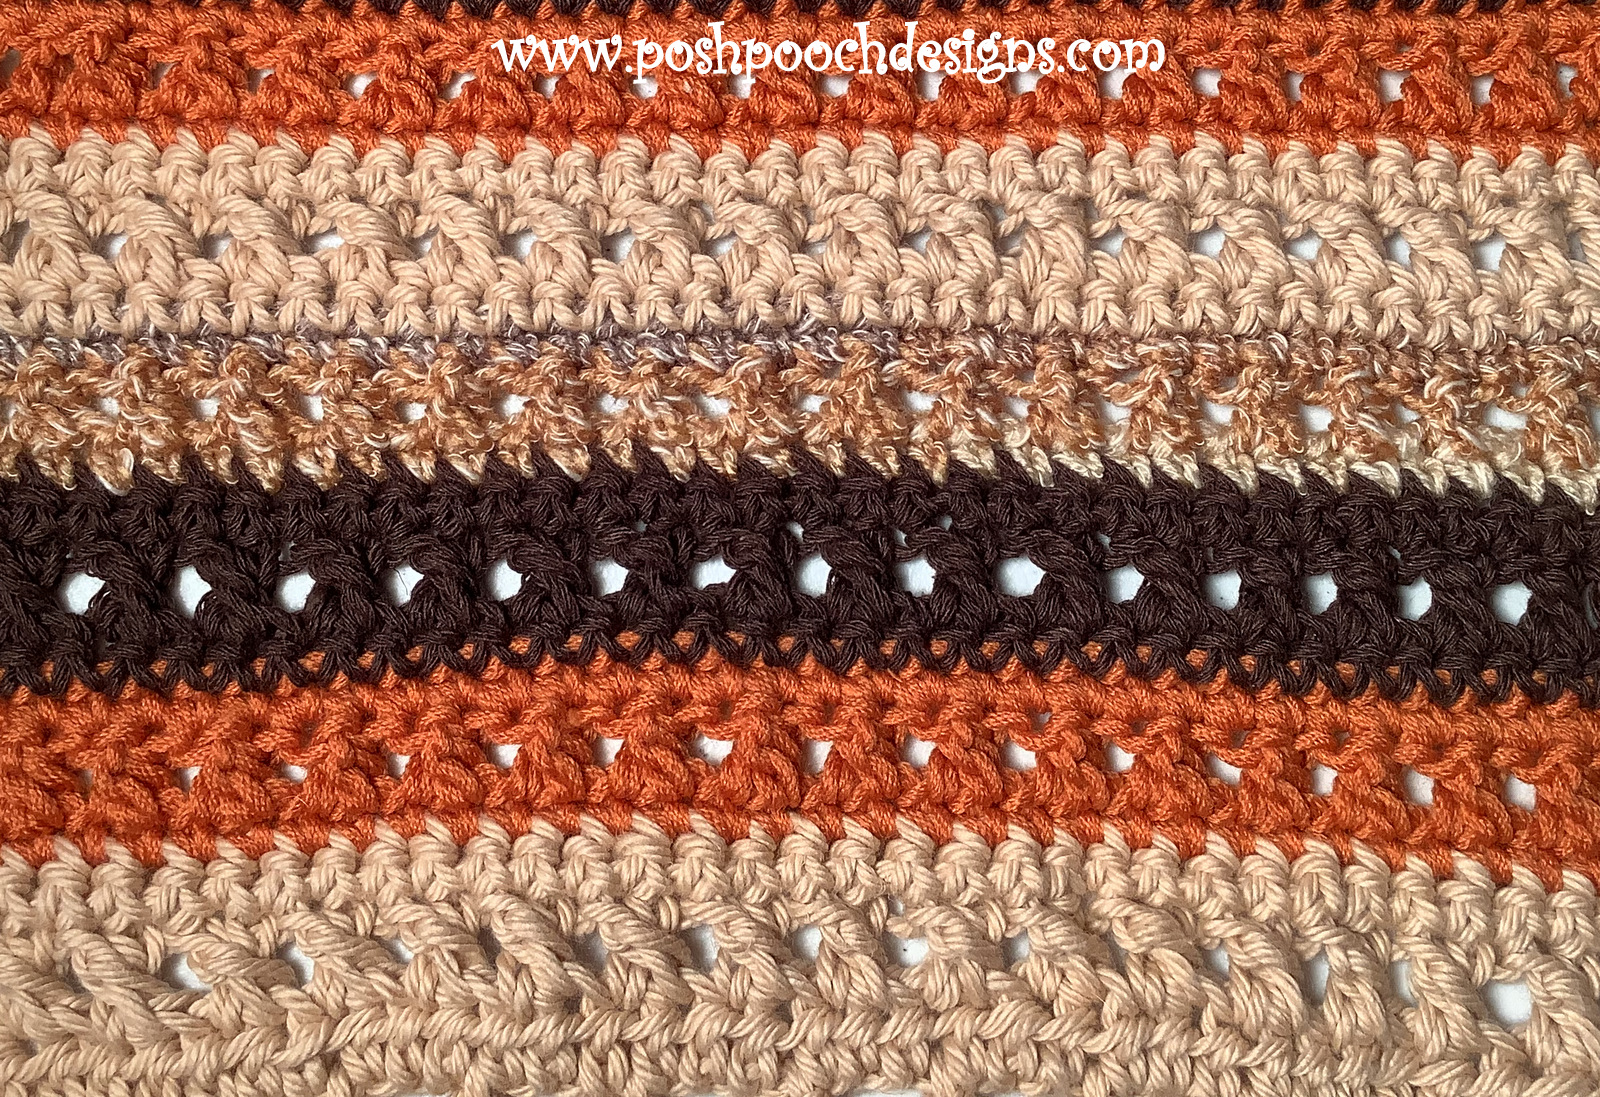
The Let's Give Thanks Table Runner is designed using
 four different colors of Cotton yarn. I chose Fall 
colors but you could choose any colors from your yarn
 stash. Even more than 3 colors, as many different 
colors as you like, or make it all in one color.


The stitch pattern is quite easy, with a 3 rows repeat.
Make it as long as needed, or shorter for short tables.
The table runner is so pretty and elegant. 
It will make any table look great. 


See The Video On My Crochet Youtube
 Channel At This LINK


Let’s Give Thanks Table Runner Crochet Pattern

Please, Add The Crochet Pattern To Your Raverly Favorites.
 
Skill: Easy
 
Materials:
Crochet Hook – H / 5.00 MM
Yarn – med (4) Cotton C1 – I Love This Cotton – Light Beige – 3 oz.
                                         C2 – I Love This cotton – Orange Rust – 3 oz.
                                         C3 – I Love This cotton – Dark Brown – 3 oz.
                                         C4 – Ice cream Cotton, brown variegated – 3 oz.
Yarn Needle
 
Stitches:
Chain (ch)
Single Crochet (sc)
Double Crochet (dc)
Skip (sk)
Space (sp)
Change to (chgto)
Special Stitch – Cross Stitch – explained in the Pattern.

Size: 10 .5 X 28 with Fringe
3 ch = 1 inch
3 rows – 1 color repeat = 1 inch
Multiples of 2 + 5
 
Notes:
Ch1 Does Not Count as a st.
Ch3 Counts as dc at the beginning of rows.
Change colors every 3 rows alternating C1, C2, C3, C4
When changing colors, ch1 after the color change
 
Pattern:
R: 1 – With C1, Ch 37, sc in the 2nd ch from the hook, 
and in each ch across, turn ch 3 (36 sc)


R: 2 – dc in the next st, *sk the next st, dc in the next st,
Cross back and Dc in the sk st*
Repeat From * to * 15 more times,
1 dc in the last 2 dc, turn, ch 1 (4 dc, 16 cross sts)


R: 3 – 1 sc in each st across, turn (36 sc)


R: 4 – Chgto C2, ch1, 1 sc in each sc across,
Turn, ch3 (36 sc)


R: 5 – Repeat R: 2

 
R: 6 – Repeat R: 3


R; 7 - Chgto C3, ch1, 1 sc in each sc across,
Turn, ch3 (36 sc)
 
R: 8 – Repeat R: 2
 
R: 9 – Repeat R: 3
 
R: 10 - Chgto C4, ch1, 1 sc in each sc across,
Turn, ch3 (36 sc)
 
R: 11 - Repeat R: 2
 
R: 12 - Repeat R: 3


R: 13 – R: 63 - Repeat R: 4 - R: 6
Changing colors every 3 rows (C1, C2, C3, C4)
 
If a longer Table runner is needed, continue to repeat until it’s the length you need.


R: 64 – Chain Fringe – *Ch 7, Dc in the 2nd ch from the hook, slst in the same ch,
Ch 7, sk 1 st, slst in the next st*


Repeat Across edge of the Table runner,
Turn working down the side of the table runner, evenly sc to the other end.


Repeat From * to across the edge of the table runner,
Turn working up the side of the table runner, join to the 1st st and tie off.


An AD Free PDF file is Available in 
My Ravelry Shop At This LINK
 For $3.50