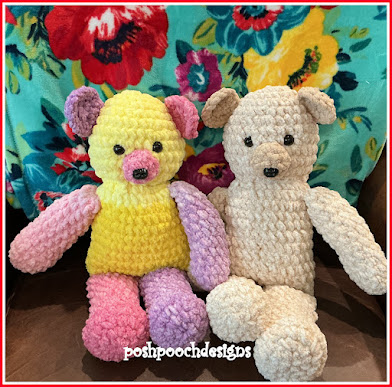
Joy Bear Crochet Pattern
Christmas In July
Crochet Along
By Sara Sach of Posh Pooch Designs
This is My Demo, I stitched using different colors,
so all the parts could be clearly seen.
I Love It in all the pastel colors.
I am using speckle beige for the Video.
🧸 It Is Finally Here 🧸
The Christmas In July Crochet Along
The Joy Bear Crochet Pattern
And Videos
🎄Christmas In July 🎄
Joy Bear
Crochet A Long
Starts Monday - July 14 - Step 1
Wednesday - July 16 - Step 2
Friday - July 18 - Step 3
Supplies List:
Crochet Hook – K/ 6.50
Yarn – Super Bulky(6) 10.5 Oz.
Bernat Blanket / Speckle Cream
Stuffing – Poly fiber fill – 6 - 8 oz.
Safety Eyes - 2 , Safety Nose
Stitch Marker
Yarn Needle
MAKE SURE YOU REFRESH
THIS PAGE EACH DAY
Joy Bear Crochet Pattern
The Materials List
Skill: Easy
Materials:
Crochet Hook – K/ 6.50 – For Bear Body, Legs, Ears, tail and snout
Yarn – Super Bulky(6) 10.5 Oz. – Bernat Blanket / Speckle Cream
Stuffing – Poly fiber fill – 6 oz - 8 oz.
Safety Eyes, nose -15mm.
Stitch marker
Yarn Needle
Stitches:
Chain (ch)
Slip Stitch (slst)
Single Crochet (sc)
2 Single Crochet together (2sctog)
Size: About 16 inches Tall
We will be starting at the top of the head
Working in the round, do not join your rounds
R: 1 - Ch 3, 6 sc in the 2nd ch from the hook,
join in a circle, ch1. (6 sc)
Mark the last sc of each row with a st marker.
R: 3 - *1 sc in the
1st sc, 2 sc in the next sc, Repeat from * around, (18 sc)
R: 4 - * 1 sc in the 1st 2
sc, 2 sc in the next sc, Repeat from * around, (24 sc)
Tie off Leaving a 24 inch
of yarn.
with needle and yarn tail.
Cut a pieces of yarn 14
inches long, Tie it around the “neck”
At R: 14 to form the head
of the bear, secure tightly with
the needle and weave in
the ends.
Step 2 - Arms and Legs
VIDEO LINK
R: 1 - Ch 3, 6sc in the
2nd ch from the hook, join in a circle. ch1 (6 sc)
Mark the last sc of each row with
a st marker.
R: 2 - 2 sc in each sc,
(12 sc)
R: 3 - 1 sc in each
sc, (12 sc)
R: 4 - R: 18 – Repeat R: 3
Leave an 18 inch tail of
yarn for sewing closed and sewing onto doll.
Stuff each Arm and sew
them closed,
Attach each arm to the
side of the bear 2 rows down from the neck.
R: 1 - Ch 3, 6sc in the
2nd ch from the hook, join in a circle. ch1 (6 sc)
Mark the last sc of each row with
a st marker.
Pic the same as R:1 - Arm
Pic the same as R:2 - Arm
R: 4 - 1 sc in each sc,
(24 sc)
R: 5 – *2sctog, 1sc in the 1st sc*
Repeat from * to * around
(16 sc)
R: 6 – 1 sc in each sc (16
sc)
R: 7 – R: 15 – Repeat R: 6
Stuff each leg and sew
them closed,
Sew onto the bear as shown
in the picture.
Step
3 – Snout, Ears, And Tail
VIDEO LINK
Snout -
R: 1 - Ch 2, 6 sc in the 2nd ch from the hook, join with a slst
to 1st sc,
to form a circle, ch 1(6sc)
R: 2
– 2 sc in each sc around, (12sc)
R: 3 – 1 sc in each sc around, slst in the next sc,
Tie off leaving a 12 inch
tail of yarn for sewing snout on.
Stuff a small amount of
stuffing in the snout,
Ch2, 8 sc in the 2nd ch from the hook, Join to the 1st sc with a slst
2
sc in each of the 8 sc, join to the 1st sc with a slst, tie off,
Leaving
a 10 inch tail of yarn. (16 sc)
Tail:
Ch 6, 1 slst in the 2nd ch
from the hook, slst in the next ch,
sc in the next 3,
tie off leaving a 10 inch tail of yarn.
Sew tail onto the back of the bear.
When The Crochet Along
Is Complete
An Ad Free PDF file is Available
In My Ravelry Shop
For $5.50


No comments:
Post a Comment