The Granny Shoulder Bag
Crochet Pattern
By Sara Sach of Posh Pooch Designs
The Granny Shoulder Bag is a new crochet pattern
release that I have been working on for sometime.
I wanted the bag to be fun, and useful.
as well as, a bag design that would use up left
over yarns from my Yarn Stash. It is designed using an
assortment of Medium (4) Acrylic yarns from
all my left over projects. Different colors, shades
and brands. It turned out exactly how I wanted it.
It is a big roomy bag and holds a lot of things,
and it is super pretty.
It is also a really easy Crochet pattern to stitch up.
It consists of 3 Granny Squares, stitched together
to form a bag or purse. And the rest of the fun
is in the cute details.
You will notice there are 2 crochet hooks listed
in the materials list.
Crochet Hooks – I / 5.500 MM - For Bag
K/ 6.50 MM - For Bag Strap
We will be holding 3 strands of yarn together to
form the bag strap so we need a larger crochet hook.
See The Video On My Crochet Youtube
Channel at This LINK
Granny Shoulder Bag Crochet Pattern
Please Add This Crochet Pattern To Your Raverly Favorites
Skill: Easy
Materials:
Crochet Hooks – I / 5.500 MM - For Bag
Crochet Hooks – I / 5.500 MM - For Bag
K/ 6.50 MM - For Bag Strap
Yarn- med (4) Acrylic Yarn- 10 oz. / 400 yds. From Your scrap yarn
Yarn Needle
2 inch Metal Rings - 3
Yarn- med (4) Acrylic Yarn- 10 oz. / 400 yds. From Your scrap yarn
Yarn Needle
2 inch Metal Rings - 3
Stitches:
Chain (ch)
Slipstitch (slst)
Single Crochet (sc)
Double Crochet (dc)
Space (sp)
Ch1 Does not count as a st
Ch3 Counts as a dc
Ch4 Counts as a dc, ch1
Rounds are joined to the ch 3 with slst
11 dc, ch1 in the circle, join, slst in the ch1 sp, ch 3
(12 sets of dc, ch1)
2dc, ch1 in each ch1 sp, join, slst to the next ch1 sp, ch3
(12 sets of 2dc, ch1)
3 dc, ch2 in each ch 1 sp, join, slst to the ch2 sp, ch 3
(12 sets of 3dc, ch2)
Ch2, 3dc in the next ch2 sp, ch 2
*3dc, ch2, 3dc in the next ch2 sp, ch2, 3dc in the next ch2 sp,
Ch2, 3dc in the next ch2 sp, ch 2*
Repeat from * to * 2 more times, join, slst to the ch2 sp, ch3
(4 sets of 3dc, ch2, 3dc, ch2 and 3dc, ch2, 3dc, ch2)
Do not worry if your square looks a little wonky - it will shape right up after R: 5
R: 5 - 2dc, ch2, 3dc in the 1st ch2 sp, ch2, 3dc in the next ch2 sps, ch 2
*3dc, ch2, 3dc in the next ch2 sp, ch2, 3dc in the next ch2 sps,Ch2, 3dc in the next ch2 sp, ch 2*
Repeat from * to * 2 more times, join, slst to the ch2 sp, ch3
R: 6 – R: 9 – Continue To Repeat R: 5 increasing every Round
R: 10 – 2
dc. Ch2, 3 dc in the corner ch2 sp,
1 dc in each
dc and ch2 sp across,
*3dc, ch2, 3dc in the next corner ch2 sp, 1 dc in each dc and ch2 sp across*
Repeat from * to * 2 more times, join, tie off and weave in your ends.
Make 3
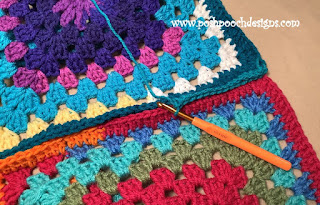
Squares, and lay them out as shown.
sc the
squares together, with the right sides facing out.
Trim: Join yarn to right top corner of the bag,
*sc around the opening of the bag, join to the 1st sc*
Repeat from * to * 1 more time, join, tie off and weave in your ends.
*3dc, ch2, 3dc in the next corner ch2 sp, 1 dc in each dc and ch2 sp across*
Repeat from * to * 2 more times, join, tie off and weave in your ends.
Trim: Join yarn to right top corner of the bag,
*sc around the opening of the bag, join to the 1st sc*
Repeat from * to * 1 more time, join, tie off and weave in your ends.
Rings: Place and stitch a ring to the top point of each side of the Bag,
The Strap is made holding 3 strands of yarn together
Ch 200, cut yarn, lace the strap through each ring and
tie them securely. This will make a double thick handle.
Ring Flap:
Join yarn to the last ring, 6 sc around the ring, turn, ch 1 (6 sc)
*1 sc in each sc, turn ch 1*
Repeat From * to * 5 More times, tie off leaving a 12 inch tail of yarn.
Sew to the inside back of the center of the bag, with needle and tail of yarn.
Weave in the ends.
Ring Fringe:
Cut 6 pieces of matching yarn 6 inches long.
Attach them to the bottom of ring.
An Ad Free PDF File is Available
in my Ravelry Shop At This LINK
For $4.50


No comments:
Post a Comment