
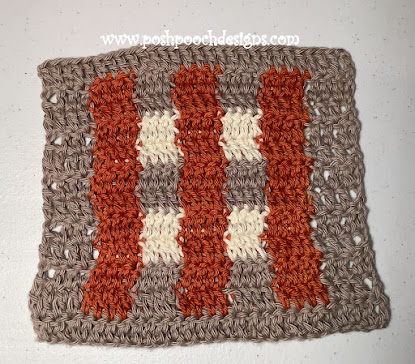
Fall Color Block Hot Pad / Pot Holder
Crochet
Pattern
By Sara Sach of Posh Pooch Designs

The Fall Color Block Hot Pad / Pot Holder is a
simple pattern to stitch up. And a very fun way to use
up yarn from your stash and make something
useful and pretty.
I designed mine using Fall Color Yarns I had
on hand, but you can stitch yours up in any colors
of Your choosing. I was going for a "retro" look.
I did each side a little different.
I really love how the colors and pattern turned out.

Make it to match your kitchen colors.
Make a few and give them as gifts. We can never
have too many pot holders.

There are pictures to shoe you how to change yarn colors
for crisp look, and is also shown on the video.
See The Video On My Crochet Youtube
Channel At This LINK
Fall Color Block Hot Pad / Pot Holder
Crochet Pattern
Please Add This Crochet Pattern To Your Ravelry Favorites
Crochet Hook – H / 5.00 mm
Yarn – Cotton Med (4) 3 colors,
C1 – Rust Orange, 2 oz. C2 – Cream, 1.5 oz. C3 – Brown 1 oz.
I used Peaches and cream / I Love This Cotton from my yarn stash
Yarn Needle
Chain (ch)
Single Crochet (sc)
Double Crochet (dc)
Change to (chgto)
Ch3 Counts as a dc
Color Choices are up to you and what you have in Your yarn stash

Don't Finish the last Dc of The group of 4

Finish the dc with the next color

Stitch over your unused yarn , trailing it across
This makes Nice Crisp Color Blocks
R: 1 – With C1, Ch 30, dc in the 4th ch from the hook,
and in each cha across,
turn Ch3 (28 dc)
turn Ch3 (28 dc)

* Chgto C2 dc in the next 4 dc, Chgto C1 dc in the next 4 dc*
Repeat From * to * 2 more times, turn, ch 3
(16 dc – C1, 12 dc - C2 + 28 dc)


Pull the yarn tails to the back of your work
R: 4 - With
C1 Dc in the next 3 dc, Chgto C2 dc in the next 4 dc,
*chgto C1, dc in the next 4 dc, Chgto C3 dc in the next 4 dc*
Repeat From * to * 1 more Time
Chgto C1 dc in the last 4 dc, turn, ch 3
(8 dc - C1, 12 dc - C2, 8 dc – C3 = 28 dc)
*chgto C1, dc in the next 4 dc, Chgto C3 dc in the next 4 dc*
Repeat From * to * 1 more Time
Chgto C1 dc in the last 4 dc, turn, ch 3
(8 dc - C1, 12 dc - C2, 8 dc – C3 = 28 dc)


Weave in the ends.
Repeat R: 1 –
R: 12

Place the 2
pieces together, right sides out.
Join C3 to
the top right corner, sc across the top stitching them together.
3 sc on the corner, evenly sc down the side, across the bottom and
up the other side, placing 3 sc in each corner,
join to the 1 st sc, ch 12 join to the same sc,
tie off and weave in your end.


3 sc on the corner, evenly sc down the side, across the bottom and
up the other side, placing 3 sc in each corner,
join to the 1 st sc, ch 12 join to the same sc,
tie off and weave in your end.

An Ad Free PDF File Is Available
In My Raverly Shop At This LINK
For $3.50

No comments:
Post a Comment