
The Gradient Glitter Shrug
Crochet Pattern
By Sara Sach of Posh Pooch Designs

The Gradient Glitter Shrug is The perfect addition to
any outfit when you want to add some glamor and sparkle,
any time of year. Wear it with a Casual look or evening
clothes. It will add a special glitter and warmth,
morning, noon or night.

A Shrug is short, cropped garment, similar to a
very short cardigan. They Have also been called a Cocoon
Sweater or Cardigan. It is designed to cover the
shoulders and upper arms. It typically has short or long
sleeves and is often made from knitted or crocheted
materials, though other fabrics like lace or chiffon
are also used.

Shrugs are a versatile layering piece,
worn over dresses, tops, or tank tops to add warmth
or a stylish element without full coverage.
Basically Any rectangle can be a shrug,
you decide the length and width.
I designed the Shrug using Premier
Gradient Glitter Anti Pilling Everyday Worsted yarn.
It is a new yarn that is long Ombre with a silver
thread running through it.

These Are The Four colors I used:
C1 -Fawn Tones – 7 oz.C2 – Royal Blue Tones – 3.5 oz.
C3 – Fern Green Tones – 3.5 oz.
C4 - Sangria Tones – 3.5 oz.

This Shrug Is Designed to work for any size need.
You can use the measurements to adjust The Pattern.
If You want it wider add more repeat rows,
if you want it longer add more beginning chains.
Keep your tape measure near and measure as you work.
The crochet pattern is basically a rectangle and
easy to adjust as needed.
Channel At This LINK
Gradient Glitter Shrug Crochet Pattern –
Please Add This Crochet Pattern To Your Raverly Favorites
Materials:
Yarn – Med (4) Acrylic - Premier Gradient Sparkle
C1 – Fawn Tones – 7 oz.
C2 – Royal Blue Tones – 3.5 oz.
C3 – Fern Green Tones – 3.5 oz.
C4 - Sangria Tones – 3.5 oz.
Yarn Needle
Tape measure
Stitches:
Single Crochet (sc)
Double Crochet (dc)
Skip (sk)
Space (sp)
Change to (chgto)
Long Triple Stitch (Ltr)Explained in the pattern
Note:
Ch3 counts as a DC
Ch 1 at end of rows does not count as a st.
Size: 24 X 40 inches With Trim
1 Row = 1 inch
Multiples – 3 + 7 FDC
Pattern -
Remember To Measure as you go for a proper fit.
Demo is 22 FDC-
Materials:
Yarn – Med (4) Acrylic - Premier Gradient Sparkle
C1 – Fawn Tones – 7 oz.
C2 – Royal Blue Tones – 3.5 oz.
C3 – Fern Green Tones – 3.5 oz.
C4 - Sangria Tones – 3.5 oz.
Yarn Needle
Tape measure
Stitches:
Single Crochet (sc)
Double Crochet (dc)
Skip (sk)
Space (sp)
Change to (chgto)
Long Triple Stitch (Ltr)Explained in the pattern
Ch3 counts as a DC
Ch 1 at end of rows does not count as a st.
Size: 24 X 40 inches With Trim
1 Row = 1 inch
Multiples – 3 + 7 FDC
Remember To Measure as you go for a proper fit.
Demo is 22 FDC-


R: 3 – Ch3 counts as a dc, 1 dc in the next 2 dc, ch1, sk the next dc,
*1dc in the next 2, ch1, sk the next dc*
Repeat From * to * across, 1 dc in the last 3 dc, turn, ch 3
(22 ch1, 48 dc)

*Ltr in the next stitching in the rows below the ch1 sp,
1 dc in the next 2 dc*
Repeat from * to * across, dc in the last 3 dc, turn, ch 3
(22 Ltr, 48dc)

R:
6 – Repeat R: 5

*1dc in the next 2, ch1, sk the next dc*
Repeat From * to * across, 1 dc in the last 3 dc, turn, ch 3
(22 ch1, 48 dc)


There are a lot of ends to weave in.

Remember to measure And add or subtract Rows For width as needed.
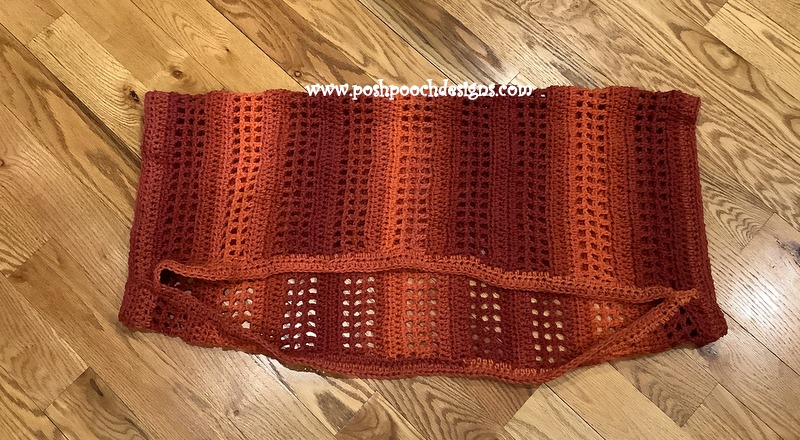
Fold
Rectangle in half,
Make sure rows are going vertically.

Sc the front and back together to form a sleeve.

Evenly sc across the shrug only stitching through the top layer,
Measure 6 inches from the other end, sc the last 6 inches
stitching the front and back together to form the other sleeve.

Turn, slst in the sc of the sleeve, evenly sc across the bottom layer,
slst in the sc of the sleeve, tie off, weave in the ends.

The Sleeve Trim:
Join yarn to the seam at the sleeve edge, ch1, sc around,
the sleeve opening, join to the 1st sc with a slst,
Tie off, weave in your end.
Repeat on the other Sleeve opening.

An Ad free PDF File Is Available
In My Ravelry Shop At This LINK
$4.50

No comments:
Post a Comment