Showing posts with label crochet rug. Show all posts

Monday, May 5, 2025

Sunflower Rug Crochet Pattern By Sara Sach

  Sunflower Rug Crochet Pattern
 By Sara Sach of Posh Pooch Designs


🌻🌻🌻🌻🌻🌻🌻🌻🌻🌻🌻🌻🌻🌻🌻🌻🌻🌻🌻🌻

I designed the sunflower rug for my "sunshine guest bathroom". It's is a 1/2 bath that is mostly used for visiting guests, and of course, the grand kids. It is decorated in sunflowers and yellow. I purchased a yellow rug, 
but it is so plain.


I wanted to make one for over a year, and when I found
 this wonderful yarn at Ollie's in the exact colors I 
wanted, I just had to get this rug designed. 
And I wanted to share it with all of you.
I am over the moon happy with how the rug turned out.
 It a perfect size at 24 X 24 inches. and looks so 
pretty in my bathroom.


I could not stop, so I also made one in purple tones.
You can stitch it up any colors your prefer, 
and use it in any room in your home. The Purple one 
is going in the laundry room.

Making the rug slip proof is a must in the bathroom, 
but if you are using it on carpet for an accent rug,
 the slip proof is not needed.

There are a couple of ways to make
 the rug slip proof.
1. Carpet tape, At Lowes or stores that sell rugs.

2. Buy a slip proof mat and attach it 
to the back of the rug.

3. Buy puff paint and put around,
 on the back of the rug. Be sure it's dry before
 putting the rug down or you will paint the floor.

4. Use Hot Glue, swirl it around
 on the back of the rug. Make sure it's dry before 
putting the rug down, or you will glue it to the floor.
The hoy Glue method is my favorite and what I will use.

You can even make it into a pillow or cushion.
 Just make two. 
Stitch them together and stuff it!
It's so easy and so pretty!
Hum, I guess the purple on is for Rosie.
Looks like I need to make me another one.


🌻🌻🌻🌻🌻🌻🌻🌻🌻🌻🌻🌻🌻🌻🌻🌻🌻🌻🌻🌻

Watch The Video On My Crochet
Youutbe Channel At This LINK


Sunflower Rug Crochet Pattern

Please Add This Crochet Pattern To Your Ravelry Favorites


Skill: Easy
 
Materials:
Crochet Hook: L/ 8 mm.
Yarn – Super Bulky (6) polyester/ Bernat Blanket / Yarnspirations
           C1 – Light Beige – 4 oz.
           C2 – Smokey Green - 2 oz.
           C2 – Golden Rays – 10 oz.
Option - Hot Glue Gun and Glue sticks – for making the back non-slippery
 
Stitches:
Chain (chain)
Single Crochet (sc)
Double Crochet (dc)
Skip (sk)
Space (sp)
Change to (chgto)
 
Size: 24 X 24 Inches
 
Notes:
A Solid Gold yarn was used for the demo
Ch1 does not count as a st
Ch3 Counts as a dc
Ch4 Counts as dc, ch1
When changing colors, ch3 after the color change.
If you are using your rug on carpet, the hot glue
                 and glue gun are not needed.
 
Pattern:
 
R: 1 – With C1, ch 5, join in a circle, ch3, 11 dc in the circle,
Join to the ch3 with a slst, ch 3 (12dc)


R: 2 – Dc in the same st s the ch3, 2 dc in each dc around,
Join to the ch3 with a slst, ch 3 (24dc)


R: 3 - Dc in the same st s the ch3, 2 dc in each dc around,
Join to the ch3 with a slst (48dc)


R: 4 – Chgto C2, tie off C1, ch3, 1 dc in the next 2 dc,
*2dc in the next dc, 1 dc in the next 3 dc*
Repeat from * to * around,
Join to the ch3 with a slst (60 dc)

 R: 5 – Chgto C3, Tie off C2, slst in the nextdc, 

Ch3, sk the next dc,
*2dc, ch1, 2dc in the sp betwen the next 2 dc
(this will be whe 2 dc are stitched on the previous row)


Sk next dc, dc in the next dc, sk the next dc*
Repeat from * to * around, join to the ch3 with a slst
(12 sets of 2dc, ch1, 2dc, and 1 dc)


R: 6 – Slst to the ch1 sp, Ch4, dc in the ch2 sp,

1 dc in the next 2 dc, dc in the next dc, 1 dc in the next 2 dc,
*dc, ch1, dc in the next ch1 sp,


1 dc in the next 2 dc, dc in the next dc, 1 dc in the next 2 dc*
Repeat from * to * around, join to the ch3 with a slst
(12 sets of dc, ch1, dc and 5 dc)

R: 7 - Slst to the ch2 sp, Ch4, dc in the ch2 sp,

1 dc in the next 2 dc, dc in the next 3 dc, 1 dc in the next 2 dc,
*dc, ch1, dc in the next ch1 sp,
1 dc in the next 2 dc, dc in the next 3dc, 1 dc in the next 2 dc*
Repeat from * to * around, join to the ch3 with a slst
(12 sets of dc, ch1, dc and 7 dc)

R: 8 – R: 10 – Repeat R: 7 increasing every row

Ch1 after R: 10


R: 11 – Sc in each dc and sc, ch1, sc in the ch1 sps around,

Join to the 1st sc with a slst, tie off.
Weave in the ends.


You may want to block your rug.
Lightly spray with water and lay out flat to dry.

 To Slip Proof Your rug, run hot glue around

The back of rug as shown in the picture.
Let the hot glue dry completely before putting down
 or you will glue it to the floor.


An AD Free PDF File Is Available 
In My Ravelry Shop At This LINK
For $4.50


Wednesday, February 23, 2022

Fish Shaped Rug And Mat Crochet Pattern | Posh Pooch Designs

 Fish Shaped Rug And Mat 
Crochet Pattern 
By Sara Sach of Posh Pooch Designs


🐟🐟🐟🐟🐟🐟🐟🐟🐟🐟🐟🐟🐟🐟🐟🐟🐟🐟


I designed this Fish Shaped Rug for my friend back in
 2013, when she has a new kitten. Now and she 
needs a new Fish Shaped Rug, because he has
 another new kitten.


So I thought it was a great time to update the 
pattern and film a brand new video. Although it's 
not one of the patterns For The Scrap Happy 
Crochet A Long, it is a scrap yarn project.

🐱🐱🐱🐱🐱🐱🐱🐱🐱🐱🐱🐱🐱🐱🐱🐱🐱🐱


The Rug is stitched using 2 Strands of 
Med (4) weight acrylic or cotton yarn.
Get in your yarn stash and come up with some
 fun color combination.

This Rug measures 18 X 8 Inches, and it also 
makes a great placemat for any one who loves 
cats, fish and fishing. Put some in your camper or RV for Camping and Fishing trips. 

See The Video On My Crochet Youtube
 Channel At This LINK


Fish Shaped Rug And Mat Crochet Pattern 

Please Add This Crochet Pattern To Your Raverly Favorites

Skill: Easy to Moderate
 
Materials:
Hook size – K / 6.50 MM
Yarn - Med (4) 7 oz. skeins of yarn (I used Red Heart worsted weight)
Yarn Needle
 
Stitches:
Chain (ch)
Slip Stitch (slst)
Single Crochet (sc)
Half Double Crochet (hdc)
Double Crochet (dc)
 
Size:  18 x 8 inches
 
Notes: 
Ch1 does not count as st
Ch2 counts as hdc
Use two strands of yarn to work the entire rug. 
(I used scrap yarns I had on hand).
 
 Fish Body

R: 1 - Ch 19, 2 sc in the 2nd ch from the hook, 
1 sc in the next 16 chs, 2 sc in the last ch,
 turning and working down the opposite side of the ch, 
2 sc in the 1st ch, 1 sc in the next 16 chs, 2 dc in the last ch, 
join with a sl st, ch 2 (40sc)
 

R: 2 - 1 hdc in the 1st sc, 1 hdc in the next 18 sc,
 2 hdc in the next 2 sc, 1 hdc in the next 18 sc, 
2 hdc in the last sc, join to the ch2, ch 2 (44 hdc)

R: 3 - 1 hdc in the 1st st, *1 hdc in next 6 st, 
1 dc in the next 8 hdc, 1 hdc in the next 6 hdc* ,
 2 hdc in the next 2 hdc,  repeat from * to *, 
then 2 hdc in the last hdc, join to the ch2, ch 2.
(48 sts)
 

R: 4 - 1 hdc in the 1st hdc, 1 hdc in the next 22sts, 
  2 hdc in the next 3 hdc, 1 hdc in the next 22 sts, 
2 hdc in the last 2 hdc, join ch 2. (52 hdc)
 
R: 5 - 1 hdc in the 1st hdc, 1 hdc in the next 23 sts,  
2 hdc in the next 3 hdc, 1 hdc in the next 23 sts, 
2 hdc in the last 2 hdc, join, tie off and set aside. (58 hdc)
 

Fish Tail

R: 1 - Ch 9, 1 sc in the 2nd ch from the hook, 
1 sc in the next 2 chs, 1 hdc in the next 5 chs, turn, ch1 (3sc, 5 hdc)
 
R: 2 - 1 hdc in the first 5 sts, 1 sc in the last 3 sts, turn, ch 1 (3sc, 5 hdc)
 
R: 3 - 1 sc in the first 3 sts, 1 hdc in the last 5 sts,  turn, ch 1 (3sc, 5 hdc)
 
R: 4 - Repeat R: 2
 
R: 5 - Repeat R: 3
 
R: 6 - Repeat R: 2, Tie off leaving a tail of yarn for sewing on the fish tail.


Sewing on the Fish Tail

Place the fish tail on one of the end of the fish body. 
Using matching yarn, sew tail to body with
 whip stitches from the back side.


R: 8 - Attach 2 strands of yarn to the bottom center of the fish body,
 
With a sc. Sc evenly and loosely around the entire fish,
 join to the 1st sc where you started, Ch 2


R: 9 - 1 hdc in the 1st St, *2 hdc in the next st, 1 hdc in the next st, 
* Repeat From * to * till you reach the tail, skip the nest st,
 
1 hdc in each st up the side of the tail, 2 hdc in the corner, 
1 hdc in each st across bottom of tail, 2 hdc in the next corner,
 1 hdc in st down the tail till you reach the fish body, skip the next st,
 
Repeat from * to * across the bottom of the fish body
 around to where you stated this row, join To the ch 2, and ch 2
 
R: 10 - Repeat R: 9 and tie off


Optional - Step 5 - the Face

With Black or your color choice of yarn,
Embroidery a Smile and the eye by long straight stitches.


You can Block the rug when finished, to keep the edges from curling.


An Ad Free PDF File is Available
In My Raverly Shop At This LINK
 For $ 3.50


Monday, April 14, 2014

Round Cord Rug Crochet Pattern

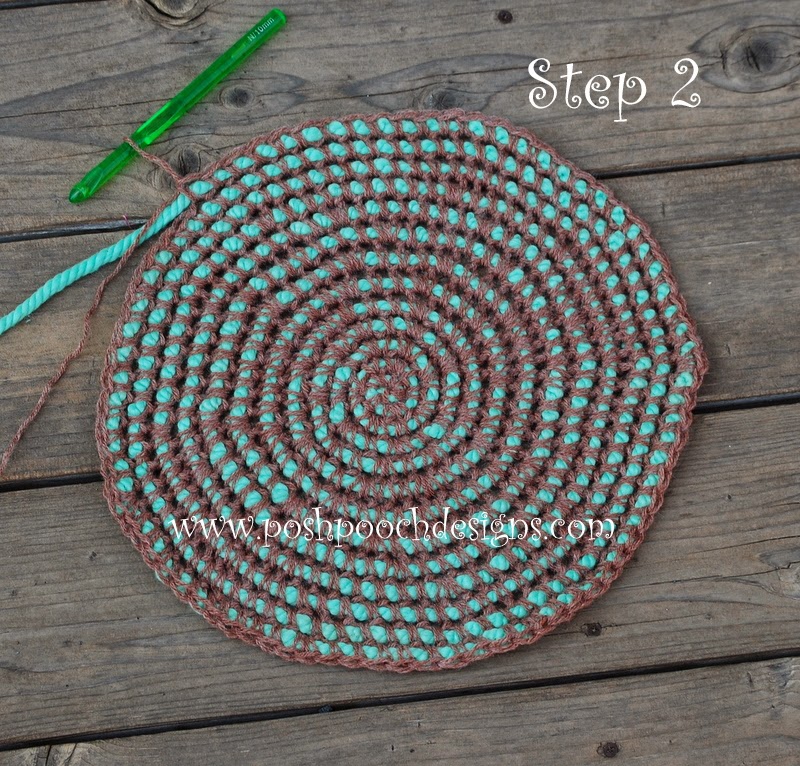
This Rug was a really fun project.
 I had the mint green super thick cord yarn. 
I don't know the exact weight because
 it was given to me without a wrapper.
 I would guess it was a (6) 12 ply.
Then I used a Red Heart
 Super Saver, Medium Brown.

Please, Add This Crochet pattern to your
Ravelry Favorites.
Skill level : Easy, But a little tricky 

Materials:
Hook size : N/P (10mm)
Large eyed yarn Needle for weaving in ends.
Yarn : 
Super Chunky (6) yarn 
Medium Brown - Red heart Super saver or Worsted Weight yarn of Choice

 Stitches :
Chain  (ch)
Slip Stitch ( sl st)
Single Crochet  (sc)

Rug  measures approximately 36 inches across.

Pattern  Notes :  Work The Rug in rounds. and stitch loosely for best results, 
st counts in (parenthesis)

We will be crocheting over the bulky yarn, With the Worsted weight yarn.  To keep the yarns from slipping, I tie a knot in the end of the yarn, then begin stitching over the cord about 5 inches from the end. The knot can be cut off when rung is finished and the ends woven in.

R : 1 - Ch 3, 6 sc in the 2nd ch from the hook, join  with a sl st to the 1st sc to form a circle.(8)

R : 2 - 1 sc in next st, 2 sc in each sc around.(16)

R : 3 -   *1 sc in the next st, * 2 sc in the next st, Repeat from * around.(24)

R : 4 - *1 sc in the next 2  sts, * 2 sc in the next st, Repeat from * around. (32)

R : 5  - *1 sc in the next  3 sts, * 2 sc in the next st, Repeat from * around.(40)


R : 6 - *1 sc in the next  4 sts, * 2 sc in the next st, Repeat from * around. (48)

 R : 7 - *1 sc in the next  5 sts, * 2 sc in the next st, Repeat from * around.(56)

R : 8 - *1 sc in the next  6 sts, * 2 sc in the next st, Repeat from * around.(62)

R : 9 - *1 sc in the next  7 sts, * 2 sc in the next st, Repeat from * around.(70)

R : 10 - *1 sc in the next  8 sts, * 2 sc in the next st, Repeat from * around.(78)

R : 11 - *1 sc in the next  9 sts, * 2 sc in the next st,  Repeat from * around.(86)

R : 12 - *1 sc in the next  10 sts, * 2 sc in the next st, Repeat from * around.(94)

R : 13 - *1 sc in the next  11 sts, * 2 sc in the next st, Repeat from * around.(102)

R : 14 - *1 sc in the next  12 sts, * 2 sc in the next st, Repeat from * around.(110)

R : 15 - *1 sc in the next  13 sts, * 2 sc in the next st, Repeat from * around.(118) 


  If you want the rug bigger continue to follow the pattern adding increase stitches. 
I continued to until the Rug measured 36 inches

Tie off bulky yarn and weave in the end, leaving the WW yarn still attached.


R : 16 - With just the ww yarn, 1 sl st in 1st St, *skip the next st, 
4 dc in the next st, skip the next st, 1 sl st in the next st,* 
Repeat From *to* around the edge of the Rug.Tie off and weave in the end.

The Rug is very sturdy 
and looks great out back, But

I put it in my Guest room, 
it's just too pretty to put outside!