Friday, January 21, 2022

Let's Make Some Valentines With Crochet Lace Hearts | Posh Pooch Designs

 Friday Fun Day With Sara
Let's Make Some Valentines With
 Crochet Lace Hearts
With Sara Sach of Posh Pooch Designs


The Lace Hearts Stitch up super quick and are great
 way use up come left over yarns, because it takes
 very little yarn to make them.

You can use them as appliques and attach them to 
just about anything. Bags, Hats, headband, shirts,
 jackets sweater and blanket.
Hearts are not just For Valentines Day!

I Designed a Valentine For You all.


Just Copy, Paste it to a Word Document and Print.
Or You can buy some or make some of your own.


Here is the diagram For The Lace Heart we are 
stitching up today, the written pattern is below.


See The Video On My Crochet Youtube
 Channel At This LINK


Lace Hearts Crochet Pattern

Skill: Easy

Materials:
Crochet h - H / 5.00 MM
Yarn- Med (4) I used Acrylic yarn (small amount)
Yarn Needle

Stitches:
Chain(ch)
Single Crochet (sc)
Double Crochet (dc)
Skip (sp)
Space(sp)

Size:  4 X 4.5 Inches

Notes:
Ch4 Counts as dc, ch1

Pattern:
 R: 1 - Ch 12, dc in the 6th ch from the hook
(counts as a dc, ch1)
*ch1, sk next ch, dc in the next ch*
Repeat From * to * 2 More Times,
Turn, ch 4
(5 dc, 4 ch1 sps)


R: 2 - Sk 1st dc, dc in next dc,
*ch1, dc in the next dc*, 
Repeat from * to * 1 more times,
Turn, ch 4 (5 dc, 4 ch1 sps)


R: 3 - Repeat R: 2

R: 4 - Sk 1st dc, dc in next dc,
*ch1, dc in the next dc*, 
Repeat from * to * 1 more times,
Turn, ch 1 (5 dc, 4 ch1 sps)


R: 5 - sc in the 1st dc, sc in the ch1 sp,
ch3, sk next 2 ch1 sps, sc in the next ch1 sp, ch 2
(center of the heart)
sc in the same ch1 sp,
ch3, sk the next 2 "ends of the row sts"
sc in the last sp, sc in the corner,


Evenly sc 8 sts down the side of the heart
to the bottom point, ch 3
Evenly sc 8 sts up the last side,
join with a slst to the 1st sc,


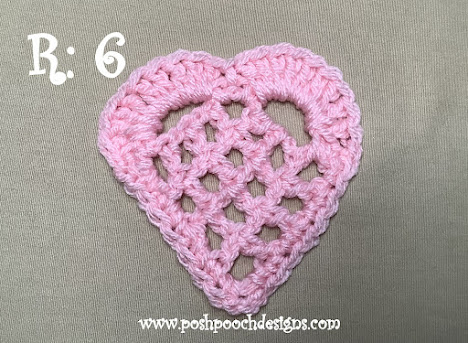
R: 6 - 9 dc in the ch3 sp, 
slst in the ch2 sp in the center of the heart
9 dc in the next Ch3 sp,
slst in the next sc, tie off and weave in your ends. 


Blocking the Hearts: 
If your Hearts are not laying as flat as you would
 like, you can block them. Pin them to a blocking board, 
spray with a little water and let them dry.

If you want to hang them up, Mix a 50% School Glue
 and 50% water, to stiffen them up.


If you do not have a blocking board, 
card board with a towel over it will work also.


Wednesday, January 19, 2022

Beaded Slouchy Hat Crochet Pattern | Posh Pooch Designs

 Beaded Slouchy Hat 
Crochet Pattern
By Sara Sach of Posh Pooch Designs


I designed The Beaded Slouchy Beanie Over 7 years ago,
And decided we need to make a video to go with
 the Crochet Pattern.
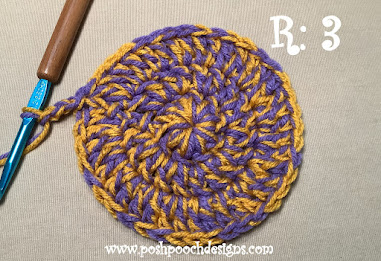
 It is still one of my favorite beanies to wear and
 to stitch up.


The original Beanie was designed using Michael's Impeccable
 yarn in black with silver pony beads.
It's a stretchy beanie that is very comfortable to wear, 
and the beads give it a touch of class and fun. 
It is perfect for the guys and the girls.


It can be worn as a slouchy Hat or 
rolled up as a regular beanie


I chose to update the crochet Pattern with Michael's
  Craftsmart yarn, in the Blue Ambre Colorway. 
I used silver and blue small pony beads. I really 
love how the updated pattern worked out.

See The Video On My Crochet Youtube
Channel At This LINK


Beaded Slouchy Hat Crochet Pattern

Please Add This Crochet Pattern To Your Raverly Favorites
 
Skill: Easy
 
Materials:
Hook - H / 5.00MM
Yarn - Med(4) Acrylic Yarn Craftsmart / Blue Ombre
          (4 oz. / 214 yds)
Yarn Needle
42 Silver Pony Beads
 
Stitches:
Chain    (ch)
Slip stitch (sl st)
Single Crochet (sc)
Double Crochet (dc)
Double Crochet Together (dctog) 
 
Size: fits a 22 – 24 inch head  
It is a very stretchy Hat
 

 Getting Started:
Thread the needle with the yarn, then feed all 42 beads on the yarn. 
You will put the beads forward as we make the hat until the beads are needed
 Remove the needle and set aside.
 

Notes: Ch 1 does not count as a st, 
Push beads forward as we crochet, until they are needed.
We will be starting with the band of the hat.

Patterns:
 
R: 1 - Ch 25, 1 sc in the 2nd ch from the, and in each across, ch 1 turn.
 (24 sc)
 

R: 2 - Working in the back loops on the row and in each row of the band,
1 sc in each sc, ch 1, turn (24 sc)
 

R: 3 – R: 12 - Repeat R: 2
 

R: 13 - We will begin using the beads on this row, 1 sc in the 1st 4 sc, 
pull up a bead and sc in the next sc, *sc in the next 2 sc, pull up a bead 
and sc in the next sc* , Repeat From * to * 4 more times, 
1 sc in each of the last 4 sc, ch 1 turn  (24 sc, 6 beads)
 

R: 14 – R: 15 - 1 sc in each sc, ch 1 turn, (24 sc)
 

R: 16 - Repeat R: 13
 
R: 17 – R: 34 - Repeat R: 14 - R: 16 
                         For 6 More Times
 

R: 35 – R:  46 - 1 sc in each sc, ch 1 turn, (24 sc)
 

R: 47 - R: 76  - 1 sc in each sc, ch 1 turn, (24 sc)
 
Be sure to measure to make sure it's a good fit.
Band should measure about 22 inches across.


R: 77 - Put the 2 ends together, right side out, 
sew together with sc stitches,
do not tie off.


R: 78 - 1 sc in the end of each row around had band, join to the
1st sc with a sl st, ch 3
(78sc The amount of sc = the amount of rows)
 

R: 79 – R: 80 1 dc in each sc around, join, ch 3 (78 dc)
 

R: 81 - *1 dc in the next 6 dc, dctog the next 2 dc, *
Repeat from * to * around hat, join, ch 3 (60 dc, 9 dc dec)
  
R: 82 - Repeat R: 81 ( 53 dc, 7 dc dec)
 

R: 83 - * 1 dc in the next 4 dc, dctog the next 2 dc*,
Repeat From * to *, join ch 3
 

R: 84 - * 1 dc in the next 2 dc, dctog the next 2 dc*,
Repeat From * to *, join ch 3
 

R: 85 - * 1 dc in the next dc, dctog the next 2 dc*, 
Repeat From * to *, join.
 Tie off  leaving a 12 in tail of yarn.
 

Use the tail to sew closed the hole at the top of the hat.


An Ad Free PDF File is Available In
 My Raverly Shop At This LINK
 For $4.50


Tuesday, January 18, 2022

Coffee And Crochet Podcast - Winner of The Mystery Box Give Away | Posh Pooch Designs

 Coffee And Crochet Podcast - 
Winner of The Mystery Box Give Away!
With Sara Sach Of  Posh Pooch Designs

One Small Piece of Advise - No matter where
 you are in Your Crochet Journey -
have fun and enjoy the trip!


Today We announced The Winner of 
Mystery Yarn  Box 
The Winner Will also receive their Choice of the 
Muslin Bag or the Canvas Zipper Bag.
Was it you?
👆

Watch Today's Live Video, Coffee and Crochet Podcast,
 On Our Youtube Channel 
At This LINK


????????????????????????????????????

 We also Did a Premier Yarn
Un-Boxing!
Wonder What was In The Box?

!!!!!!!!!!!!!!!!!!!!!!!!!!!!!!!!!!!!!!!!!!!!!!!!!!!!!!!!!

What's New This Week
Posh Pooch Designs

Spiral Rose Heart
 Crochet Pattern and Video - LINK


Super Nova Super Scarf And Wrap
Crochet Pattern and Video - LINK


Scrap Happy Drawstring Bag 
Crochet Pattern And Video - LINK
1st Crochet Pattern 2022
Scrap Happy Crochet A Long


Thank You for stopping By!
I will see You next week.


Monday, January 17, 2022

Scrap Happy Drawstring Bag Crochet Pattern | Posh Pooch Designs

 Scrap Happy Drawstring Bag
 Crochet Pattern 
By Sara Sach Of Posh Pooch Designs


Today's Pattern is The 1st Crochet Pattern
 In Our Year Long Crochet A Long,
"Scrap Happy Crochet a Long".

Each pattern will be a Pattern designed to use 
up our yarn scraps and left overs into fun and 
useful projects.
Each Crochet Pattern will have a Written Crochet
 Pattern, Photo Tutorial And a Video Tutorial.

This First Crochet Pattern is 
The Scarp Happy Drawstring Bag
 It is designed For Our left over Acrylic medium (4) yarns.
 Any colors you have in Your yarn stash will work.
We are stitching Up the Bag holding 2 strands of 
yarn together and a K / 6.5 MM Crochet Hook.
This Will make a sturdy and Washable Bag.


It is a big bag Measuring 26 inches around, 
and 16 inches long. Perfect for yarn projects, 
market shopping or even as a travel bag.

See The Video On My Crochet Youtube
 Channel at This LINK
The Video also shows a few ways to change yarn color.


Scrap Happy Drawstring Bag Crochet Pattern

Please Add This Crochet Pattern To Your Raverly Favorites
 
Skill: Easy
 
Materials:
Crochet hook – K / 6.50 MM
Yarn – Med (4) 10 – 12 oz. / 500 - 550 yds.
Yarn Needle
 
Stitches:
Chain (ch)
Slip Stitch (slst)
Double Crochet (dc)
Back Loop Only (BLO)
Skip (sk)
Space (sp)
 
Size:  26 Around X 16 Length Inches
 
Notes:
The bag is worked using 2 strands of yarn held together.
Rounds/ Rows are joined to the ch3 with a slst
Ch3 Counts as dc
Ch4 Counts as dc, ch1
 
Pattern:

R: 1 – holding 2 strands of yarn together,
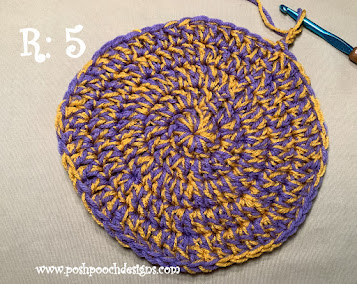
Ch 5, join in a circle, ch3, 9 dc in the circle,
Join, and ch 3 (10dc)


R: 2 – 1 dc in the same st as the ch3,
2 dc in each dc around, join, ch 3 (20 dc)
 

R: 3 - 1 dc in the same st as the ch3,
2 dc in each dc around, join, ch 3 (40 dc)
 

R: 4 – Dc in the next 3 dc, 2 dc in the next dc,
*1 dc in the next 4 dc, 2 dc in the next dc*
Repeat From * to * around, join, ch 3 (48dc)
 

R: 5 - 
Dc in the next 4 dc, 2 dc in the next dc,
*1 dc in the next 5 dc, 2 dc in the next dc*
Repeat From * to * around, join, ch 3 (56dc)
 

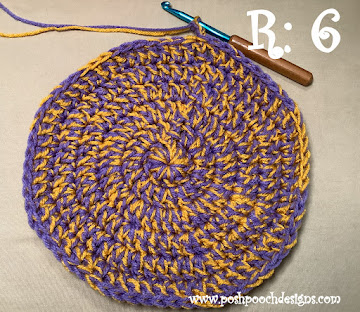
R: 6 - Dc in the next 5 dc, 2 dc in the next dc,
*1 dc in the next 6 dc, 2 dc in the next dc*
Repeat From * to * around, join, ch 3 (64dc)
 

R: 7 - Dc in the next 6 dc, 2 dc in the next dc,
*1 dc in the next 7 dc, 2 dc in the next dc*
Repeat From * to * around, join, ch 3 (72dc)
 

R: 8 – BLO, 1 dc in each dc around, join (72 dc BLO)
 

R: 9 – Ch4,  *sk the next dc, dc in the next dc, ch1*
Repeat From * to * around, join to 3rd ch of the ch4, 
ch 3 (72 sts)


R: 10 - 1 dc in each ch1 sp and dc around, join, (72dc)


R: 11 – R: 22 – Repeat R: 9 And R: 10, alternating Rows.
Tie off, Weave in your ends. 


For a longer bag continue to repeat R: 9 - R: 10
For an many rows as desired. 


Drawstring – With 3 strands of yarn Ch 150, securely tie each end
 of the drawstring.
Weave through every other  Ch1 sps of R: 21, and tie the ends together.


An AD Free PDF file is Available
 In My Ravelry Shop At This LINK
 For $ 4.50