
Round Boho Bag Crochet Pattern
By Sara Sach of Posh Pooch Designs

I am so excited about this Fun Bag.
It's A big bag that Measures
12 X 12 inches.
Perfect For All your "bag" needs.
Shopping, traveling, going to the park, beach and pool.
Also, Makes a great bag for projects.
And Because it can be lined, you will not lose your stuff.

It has a thick sturdy handle,
adorable chain fringe,
And big fun buttons.

See The Video On My Youtube Crochet
Skill: Easy
Materials:
Crochet hook- H, 5.00 MM
Yarn – Med (4) 7 oz. Red Heart Colorscape /
Munich
Yarn Needle
4 Large Button – 1.5 inch, I used wooden
buttons.
Stitches:
Chain (ch)
Slip Stitch (slst)
Single Crochet (sc)
Double Crochet (dc)
Space (sp)
Skip (sk)
Materials For Lining
Fabric (2 - 14 X 14 inch pieces)
Sewing needle
Thread
Pins
Fabric Scissors
Materials For Lining
Fabric (2 - 14 X 14 inch pieces)
Sewing needle
Thread
Pins
Fabric Scissors
Size:
12 by 12 inches, not counting the
handles or fringe.
Notes:
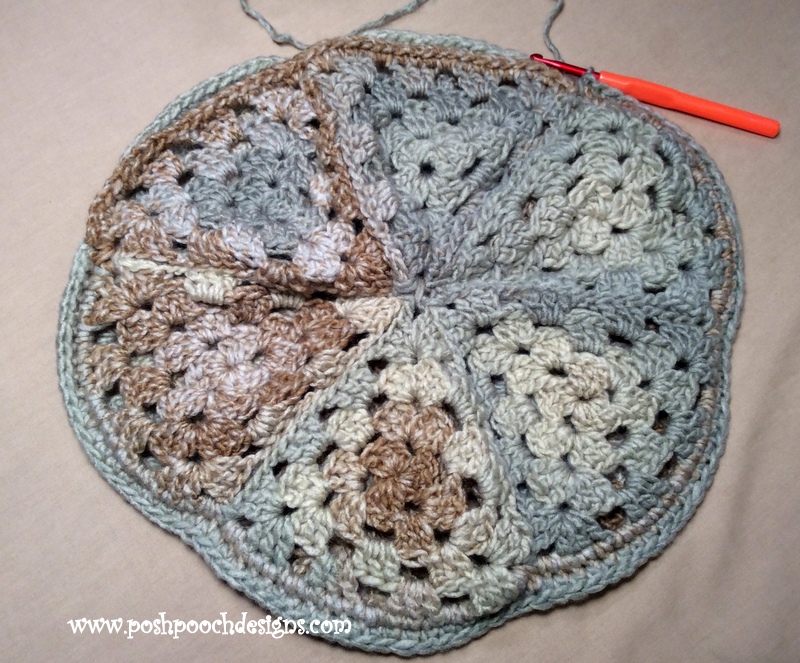
Make
12 Triangle Grannies
How To Make A
Granny Triangle Crochet Pattern
By Sara
Sach - LINK

Forming the Bag:
Step 1- Face 2 Triangles
right sides together, *slst, ch 1* in the outside loops of both triangles,
Repeat From * to * "sewing" them together,
Repeat From * to * "sewing" them together,


add the 3rd triangle and repeat.
Tie off Weave in ends.


Repeat with the next 3 Triangles.
Step 2 - Place the 2 half
Circle right sides together and Repeat, sewing them together
to form a circle,


Step 3 - Sc evenly around
the circles, placing a sc in each dc,
2 sc in each ch2 sp, join to the 1st
sc, tie off and weave in your ends.

Repeat The First 3 Steps, do not tie off.
Step 4 - Place the 2
circles together, right sides out.
Sc evenly around the 1st 4
triangle ends,
Leave the last 2
open,
Evenly sc, around
the bag opening, join back to the 1st sc in the
back opening, tie
off, Weave in your ends.

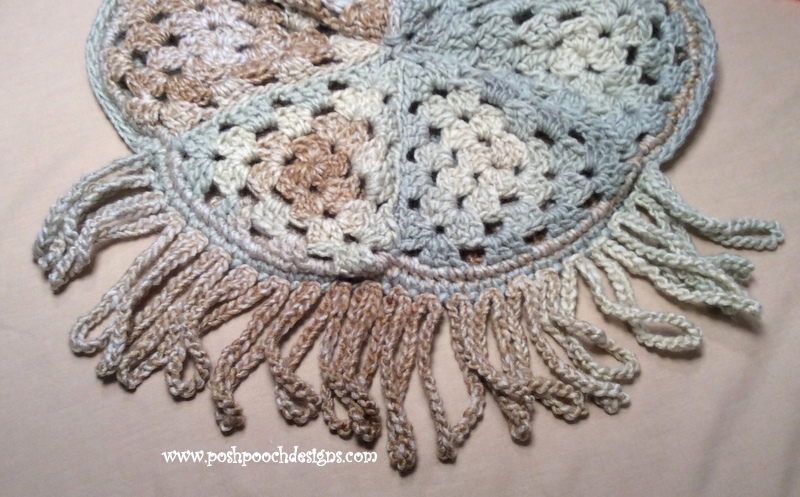
Step 5 - Bag Fringe:
Join yarn to the 2nd Triangle bottom,
We will only be adding the chain Fringe to the 2 center Triangle bottoms.
We will only be adding the chain Fringe to the 2 center Triangle bottoms.
*Ch 30, slst in the next 2 sc*
Repeat From * to
* around the bottom of the bag to center of the
4th Triangle Bottom, tie off weave
in your ends.
Step 6 -Bag Handle: (24 inches)
Using 4 strands of
yarn, leaving 8 inch tail of yarn,
Ch 50, tie off leaving an 8 inch tail of yarn.
Attach handle securely to the side of the bag opening,
Attach handle securely to the side of the bag opening,

If a longer
handle is wanted, ch more chains.
Step7- Button Loop
Ch 30, leaving an 8 inch tail of yarn,
slst in the 10th ch from the hook, ch 20,
slst in the last ch, tie off leaving an 8 inch tail of yarn.
Attach button loop to the center of the top of the front
of the bag, using the tails of yarn.
Step7- Button Loop
Ch 30, leaving an 8 inch tail of yarn,
slst in the 10th ch from the hook, ch 20,
slst in the last ch, tie off leaving an 8 inch tail of yarn.
Attach button loop to the center of the top of the front
of the bag, using the tails of yarn.
Step 8 - Sew a Button with
matching yarn and a needle
to the center front and back of the back.
And at the sides
of the back where the handle
is joined, if desired.


Step 9 - Lining The Bag


Lay Bag on the 2 Layers of Fabric you chose for the lining.
Draw Around the bag on the liner, marking where the bag opening will be.
Cut the Fabric about 1/4 in around the line.

Draw Around the bag on the liner, marking where the bag opening will be.
Cut the Fabric about 1/4 in around the line.

Pin the fabric is needed. Thread Your needle and sew around the line drawn.
You can do this by hand or with a sewing machine.
Do not sew over the bag opening.

You can do this by hand or with a sewing machine.
Do not sew over the bag opening.

Slide the lining into the bag, and pin in place.
Sew the lining around the opening, under the edge so the lining does
not show around the top of the bag.

Stitches need to be small and close together, so the lining stays secure.


Sew the lining around the opening, under the edge so the lining does
not show around the top of the bag.

Stitches need to be small and close together, so the lining stays secure.

And Now my Bag is all ready for use.
And None of things will fall through the holes.
I love This one so much I think I will keep it.
An Ad Free PDF file is Available
It includes the pattern for the triangles,
the bag ad how to line the bag.
for $4.50
No comments:
Post a Comment