
Grateful Granny Poncho
Crochet Pattern
By Sara Sach of Posh Pooch Designs

If you have wanted to crochet a Poncho,
but too afraid to try.
This is a poncho for you.
It's easy and quick to stitch up.
I have been working on this design off and on since
last year. And Decided it was time to get
it our there for you all.
It's comfy to wear and goes with lots of different
styles. Wear it with a a dressy dress or or casual
jeans and shirt.

I chose to make it with the Big Caron Cakes
in the Cranberry Crisp colorway, but you can use
any medium (4) weight yarn you like.
It would look lovely in Ombres, long stripes,
and even a solid color.

The Pattern is a loose comfy fit that's perfect for layering.
With Sizes From XS/ S To 3X/4X.
The length is up to you. If your short like me,
stitch less rows, if you prefer it longer, stitch
more rows. Just remember to measure as you
go and it will be a perfect fit.
See The Video On My Crochet Youtube
Channel At This LINK
Grateful Granny Poncho Crochet Pattern
Please Add This Crochet Pattern To Your Ravelry Ravorites
Skill: Easy
Materials –
Crochet hook – I 5.5 mm.
Yarn- med (4) Acrylic - Caron Big cakes /Cranberry Crisp
XS/S – 10.5 oz, M/L – 12 oz. XL/ 2 X – 13.5 oz./ 3X -4X – 15 oz.
Yarn Needle
Yarn- med (4) Acrylic - Caron Big cakes /Cranberry Crisp
XS/S – 10.5 oz, M/L – 12 oz. XL/ 2 X – 13.5 oz./ 3X -4X – 15 oz.
Yarn Needle
Wooden Beads Optional
Stitches:
Chain (ch)
Slip Stitch (slst)
Single Crochet (sc)
Double Crochet (dc)
Triple Crochet (tr)
Foundation Double Crochet (FDDC)
Size: XS - 4 X – Roomy Comfy Fit
Pattern is written in the XS/S Size with larger Sizes in parenthesis
so measure as you work.
XS / S – 28 Inch Neck opening
M / L – 32 Inch Neck Opening
XL / 2X – 36 Inch Neck Opening
3X /4X – 40 inch Neck Opening
3 Rows = 2 inches - The length of the Poncho is up to You.
Notes:
Ch3 Counts as a dc
Ch4 Counts as a tr
Pattern: Demo is Stitched in the M/ L Size
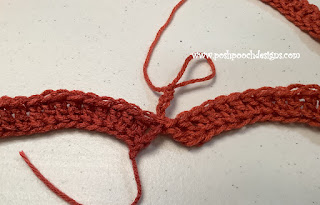
Use the end
of the yarn and needle to close the gap at the join.
Chain (ch)
Slip Stitch (slst)
Single Crochet (sc)
Double Crochet (dc)
Triple Crochet (tr)
Foundation Double Crochet (FDDC)
Pattern is written in the XS/S Size with larger Sizes in parenthesis
so measure as you work.
XS / S – 28 Inch Neck opening
M / L – 32 Inch Neck Opening
XL / 2X – 36 Inch Neck Opening
3X /4X – 40 inch Neck Opening
3 Rows = 2 inches - The length of the Poncho is up to You.
Ch3 Counts as a dc
Ch4 Counts as a tr


((*ch2, sk 2 sts, 1 tr in the next 2 sts*
Repeat from * to *
XS/ S – Repeat 10 More Times
M/ L – Repeat 11 More Times
XL/2 X – Repeat 12 More Times
3X/ 4 X – Repeat 13 More Times))
slst in the next tr, slst In the ch2 sp, ch 3
(11, 12, 13, 14 sets of 2 Tr on each side, 2 corners of 2tr, ch2, 2tr)

*1 dc in each dc, 2 dc in each ch2 sp around
Till you reach the poncho point*
2dc, ch2, 2 dc in the ch2 sp of the poncho point,
Repeat from * to *, join to the ch3 with a slst,
Slst in the next dc, slst in the ch2 sp, Ch4

((*ch2, sk 2 sts, 1 tr in the next 2 sts*
Repeat from * to *
XS/ S – Repeat 11More Times
M/ L – Repeat 12 More Times
XL/2 X – Repeat 13 More Times
3X/ 4 X – Repeat 14 More Times))
slst in the next tr, slst In the ch2 sp, ch 3
(13,14, 15,16 sets of 2 tr on each side, 2 corners of 2 tr, ch2, 2tr)

R: 5 – R: 22
– Repeat R: 3 – R: 4
Alternating rows, and increasing every row.
If a longer
Poncho is desired continue to Repeat R: 3 – R: 4
slst in the
next tr, slst In the ch2 sp, ch 1
Alternating rows, and increasing every row.

*sc in the next ch2 sp, ch5*
Repeat From * to * around, join to the 1st sc with a slst,

*sc in the next ch5 sp, ch6*
Repeat from * to * around, join to the 1st sc,
tie off and weave in your ends.

Tie - Ch 100, or more if a longer tie is desired. Lace Through every 2 sts on R:1
Leave a long tail on both ends if beads are desire.
Add Beads and Tie securely.

An Ad Free PDF file is Available
In My Raverly Shop At This LINK
For $4.50

No comments:
Post a Comment