Showing posts with label yard sign. Show all posts

Thursday, May 25, 2023

FRIDAY FUN DAY - Patriotic American Flag Yard Sign Crochet Pattern | Posh Pooch Designs

 FRIDAY FUN DAY!
Patriotic American Flag Yard Sign
Crochet Pattern
By Sara Sach Of Posh Pooch Designs


With some Of the American Patriotic Holidays Being
 Celebrated, Memorial Day, Flag Day And The 4th of July, 
we decided It was time to retest and update our Patriotic
 American Flag Yard Sign Crochet Pattern.
This Pattern Was Written 7 years ago, so Yes it was time.
We added lots of new pictures and 
 Filmed a brand new video

The Sign fits a standard yard sign hanger,
 as it measures 17 X 15 inches.
You can also use a small curtain rod, wooden or bamboo rod
 or even a nice sturdy stick for a rustic appearance.
So whatever your outdoor decorations are, it will fit right in.


It's a great Patriotic Decoration that you can stitch up really quick, because it is crocheted using Super Chunky
 (6) weight  yarn! 
The Flag is Trimmed off with a easy shell stitch border.
The Cute Star is embroidered on.


See The Video On My Crochet Youtube 
Channel At This LINK


American Flag Yard Sign Crochet Pattern By Sara Sach


Please Add This Crochet Pattern To Your Ravelry Favorites


Skill: Easy


Materials:

Crochet Hook – N /9 MM

Yarn – Chunky (6) 5 oz. / 76 yds. of each color –Yarn Bee True Colors

             C1 – Red, C2 - white, C3 – Blue, C4 - Yellow

Yarn needle

Hanger - It fits the standard yard sign hanger


Stitches:

Chain (ch)

Slip Stitch (slst)

Single Crochet (sc)

Double Crochet (dc)


Notes:

Ch3 Counts as a dc.

When changing colors, ch3 after the color change.

When changing colors, do not cut your yarn.


Size: 17 X 15 inches


How To Change Colors:


Pattern:


R: 1 – With C1, Chain 32, 1 dc in the 4th ch from the hook, 

and in each ch across, Turn, Ch3

(30dc – st count remains the same for all rows of flag)


R: 2 – 1 dc in each dc, Turn


R: 3 – Change to C2, Ch3, 1 dc in each dc, turn, Ch3


R: 4 – 1 dc in each dc, turn


R: 5 - R: 12 - Repeat R : 1 – R : 4 For 2 more times.


R: 13 – With C1, ch3, 1 dc in the next 14 dc, Chg to C3, 

1 dc in the next 15 dc, Turn, ch3

(15 red C1, 15 dc C3)


R: 14 – 1 dc in the next 14 dc, change to C1, 1 dc in the next 15 dc, Turn
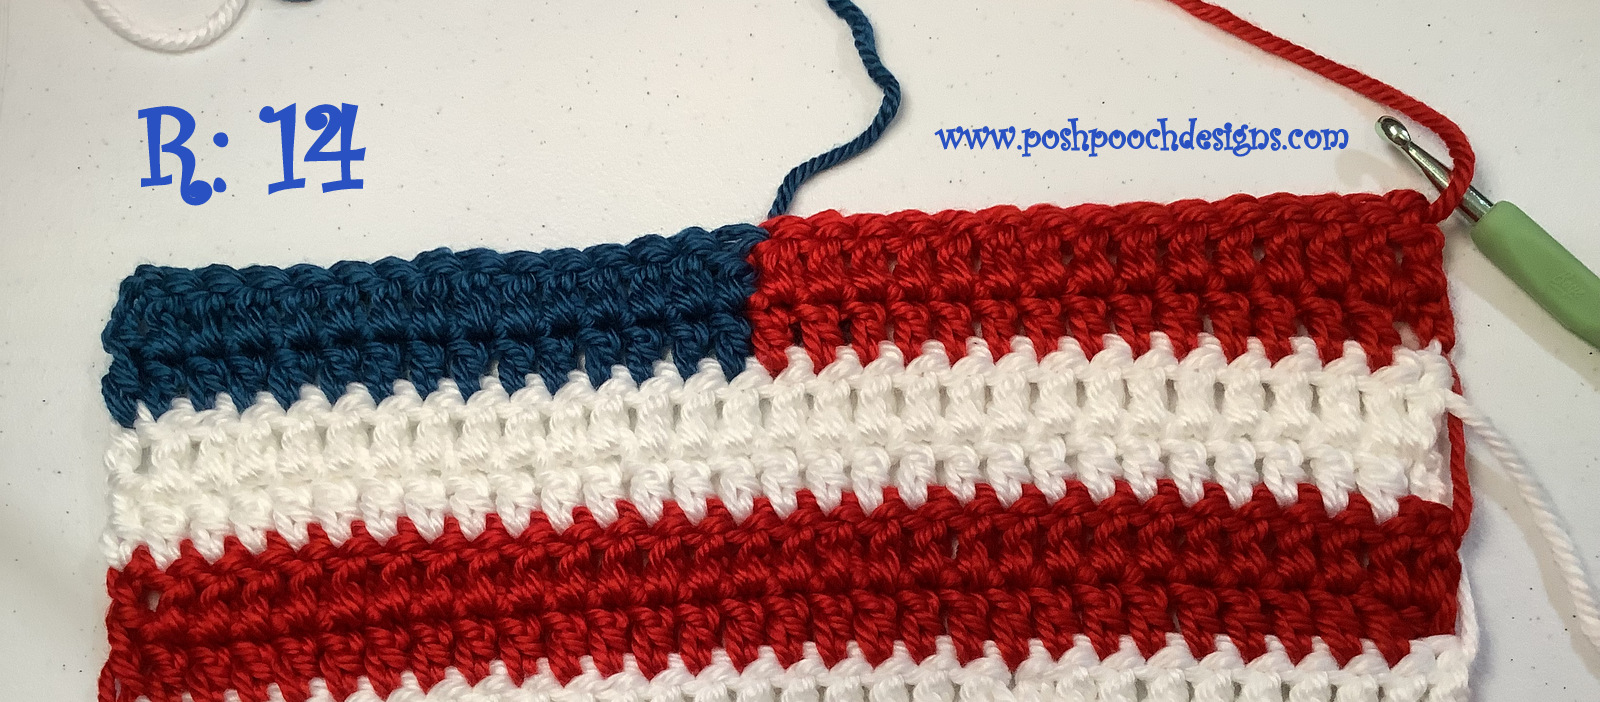


R: 15 - With C2, ch3, 1 dc in the next 14 dc, Chg to C3,

 1 dc in the next 15 dc, Turn, ch3

(15dc C2, 15dc C3)


R: 16 - 1 dc in the next 14 dc, change to C2, 1 dc in the next 15 dc, Turn


R: 17 – R: 20 – Repeat R: 13 – R: 16 1 more time.


R: 17 – Change to C3, ch 3, 1 dc in each dc across,

Turn working down the 1st side of the flag,

We will be placing stitches into the ends of the rows.

1 sc in the corner, *sk the next row end, 3dc in the next row end,

sk the next row end, sc in the next row end*

Repeat From * to * Down the side, across the bottom of the flag, 

then up the other side.

Dc across the top of the Flag, tie off leaving about 30 inch piece of yarn.


 To Form the Star, thread white yarn on the needle, find the center of the blue field,

 stitch a  +, the St an X on top of the +.


Fold the top 2 rows of the flag over, to form a fold to put the rod through,

 and sew closed with the tail of yarn.


Slide the Flag on and hang it up!


An Ad Free PDF file Is Available

In My Ravelry Shop At This LINK

For $4.50


Friday, April 14, 2023

FRIDAY FUN DAY! Garden Sign You Design Crochet Pattern | Posh Pooch Designs

 FRIDAY FUN DAY!
Garden Sign You Design Crochet Pattern
By Sara Sach of Posh Pooch Designs


I Found This Cute Garden Sign At my Local Hobby Lobby
 When I was searching for the clearance sale.
When I saw it I decided I wanted to make a s
fun garden or yard sign for Spring.
 It would also look nice on an interior door or
 wall in any room in your home. 
The hanger is 7.9 X 5 inches
but The Sign we make to hang on it is 6.5 X 8 inches


Other Options For A Sign Hanger.
1. A small wooden dowel
2. A wire hanger
3. A thin stick from the yard


There Are 5 Steps In Making the Sign.
You can personalize the sign by getting into your yarn
 stash and button stash, and have some fun. 
Choose the colors you like, the buttons you like and even appliques your like. Make it to fit your style.

See The Video On My Crochet Youtube
 Channel At This LINK


Garden Sign You Design Crochet Pattern

Please Add This Crochet Pattern To Your Ravelry Favorites

1. I began by designing a back ground with green
 and two shades of blue in simple single crochet rows.

What You Need:

Crochet Hook - H/ 5.00mm
Yarn - Med Weight (4) green, light blue, medium blue (1 oz. of each color)
               assorted colors from your yarn stash
Yarn Needle
 Scissors
Sign Hanger

Stitches:
Ch (ch)
Single Crochet (sc)
Change to (chgto)

Size: 6.5 X 8 inches

Notes:
Ch1 Does not count as a st

R: 1- With Green yarn, Ch 21, sc in the 2nd ch from the hook
 and in each ch across, ch1, turn (20 sc)


Each Row of the back ground has 20 sc

R; 2- 1 sc in each sc across, turn, ch 1


R: 3 - R: 10 - Repeat R: 2


R: 11 - R: 20 - Chgto Light Blue yarn and Repeat R: 2

R: 21- R: 30 -Chgto Med Blue yarn and Repeat R: 2


Row R: 31 - sc over the bar of the sigh hanger,
1 sc in each sc, tie off weave in your ends. 


2.  Embroidered some flower stems
in a different shade of green, and  in different
 heights.
I stitched on 5 but you can make as many
 as you like.

I used what is called a lazy daisy stitch.


3.  5 different color crochet flowers.
 attach them to the top of the stems 
with needle and matching yarn.

Flowers: Make 5 in Assorted colors

Ch2, 6 sc in the 2nd ch from the hook, join to the 1 st sc,
*Ch 5, slst in the next sc*
Repeat From * to * 5 more times for 6 flower petals,
Tie off, leaving a 10 in tail of yarn for sewing on pot holder.
Sew Flowers on as shown in picture.


4.  Crochet Several Leaves.
Sew those on with needle and matching yarn.

Leaf Crochet Pattern
Make 6 or more from green yarn
Size: 2 inches

What you need:
Crochet Hook - H/ 5.00mm
Yarn- Green Worsted Weight (4)
Yarn Needle
 Scissors

Stitches:
Chain (ch)
Slip Stitch (slst)
Single Crochet (sc)
Double Crochet (dc)

Ch 6, slst in the 2nd ch from the hook, 
sc in the next ch, dc in the next ch, 
sc in the next  ch, slst in the last ch,

(slst, sc, dc, sc, sl)

Turn, working down the opposite side of the ch,
 and slst in the 1st ch, sc, in the next, dc, in the next,
 sc in the next, slst in the last
Join to the 1st slst with a slst. 
(slst, sc, dc, sc, st)
Weave in the beginning tail of yarn, 
sew on with the ending tail of yarn.


5.  Personalize your Sign:

Add buttons of bugs, birds, flowers, animals, etc.
Add appliques, beads, gems
Embroider a sun, clouds or rainbow


I had so much fun with This 
design I just know you will also.

An Ad Free PDF File is Available
 In My Raverly Shop At This LINK
 For $4.50