Monday, September 20, 2021

September Stitch of The Month - Filet Squares Stitch Pattern - Filet Squares Table Runner | Posh Pooch Designs

 September Stitch of The Month
Filet Squares Stitch Pattern 
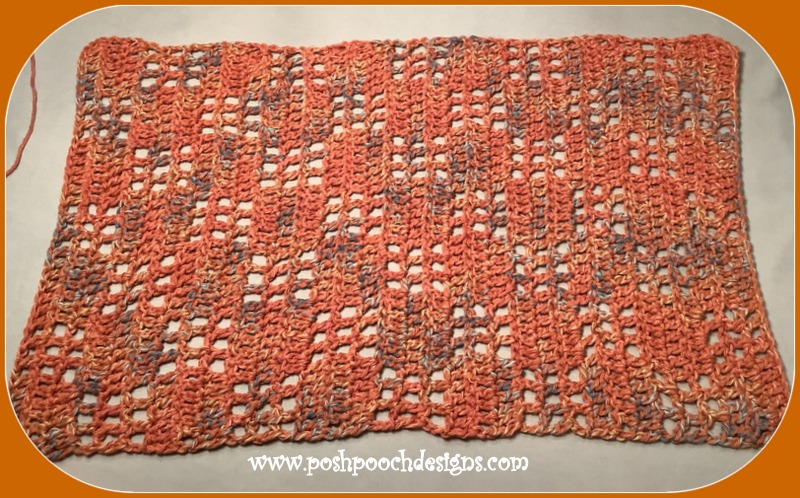
Filet Squares Table Runner Crochet Pattern
 By Sara Sach of  Posh Pooch Designs


I have received so many messages, comments and
 emails about Filet Crochet, I thought it would be fun
 to learn a simple Filet Crochet Stitch Pattern Together.
The Filet Squares is a perfect pattern for just that.

What is "Filet Crochet"?
Filet is a  French word that means Net or Mesh.
Filet Crochet is stitching a fabric that consists of a mesh or grid-like appearance. It usually consists of Double Crochet Stitches and chain 1 spaces to form shapes and letters. It is a rather easy technique and there are many different ways to use this technique.


For September's  Crochet Stitch Pattern
we are stitching up the  Filet Squares Table Runner
 in Fall Colors. I have chosen Crafters Secret Cotton. 
It is a medium (4) 100 % Cotton yarn, and Auburn Clay
 is the colorway. You will need 2 balls which is 5 oz.
I designed the Table Runner using an I / 5.5 MM crochet hook.
 Some times it is difficult to keep your gauge or tension when
 working Filet Crochet. 
I found that this size hook helped keep me on track.


See The Video On My Crochet Youtube 
Channel At This LINK


September Stitch of The Month is 
Filet Squares Stitch Pattern

Filet Squares Table Runner Crochet Pattern By Sara Sach

Please Add This Crochet Pattern To Your Raverly Favorites
 
Skill: Easy
 
Materials:
Crochet Hook – I / 5.5 MM
Yarn- Cotton, Med (4) I used Crafters Secret Cotton
          / Auburn Clay 5 oz. / 240 yds.
Yarn Needle
 
Stitches:
Chain (ch)
Single Crochet (sc)
Double Crochet (dc)
Skip (sk)
Space (sp)
 
Size:  14  X  22 Inches
3 Chs = 1 inch
3 Rows – 2 Inches
Multiples – 12 + 9 chs
 
Notes:
Ch3 Counts as dc
Ch4 Counts as a dc, ch1
 
Pattern:

R: 1 – Ch 45, 1 dc in the 4th ch from the hook, 1 dc in the next 5 dc,
*ch1, sk the next ch, dc in the next ch,  
Ch1, sk the next ch, dc in the next ch,
 Ch1, sk the next ch, dc in the next ch,
1 dc in the next 6 chs*
Repeat From * to * 2 more times, turn, ch 3
(9 ch1 sps, 34 dc = 43 sts)
 

R: 2 – 1 Dc in the next 6 dc,
*ch1, sk the next st, dc in the next st,  
Ch1, sk the next st, dc in the next st,
 Ch1, sk the next st, dc in the next st,
1 dc in the next 6 sts*
Repeat From * to * 2 more times, turn, ch 3
(9 ch1 sps, 34 dc = 43 sts)
 

R: 3 – Repeat R: 2


R: 4 – *Ch1 more, Sk the next st, dc in the next st,
Ch1, Sk the next st, dc in the next st,
Ch1, sk the next st, dc in the next 7 sts*
Repeat From * to * 2 More Times,
Ch1, sk the next st, dc in the next st,
Ch1, sk the next st, dc in the last st, turn, ch 3
(12 ch1 sps, 31 dc = 43 sts)
 

R: 5 – R: 6 – Repeat R: 4
 

R: 7 - 1 Dc in the next 6 dc,
*ch1, sk the next st, dc in the next st,  
Ch1, sk the next st, dc in the next st,
 Ch1, sk the next st, dc in the next st,
1 dc in the next 6 sts*
Repeat From * to * 2 more times, turn, ch 3
(9 ch1 sps, 34 dc = 43 sts)
 

R: 8 – R: 9 – Repeat R: 7
 

R: 10 – R: 30 – Repeat R: 4 – R: 9, For 4 More times
Or More if a longer Table runner is Desired


Trim – Evenly sc around all 4 sides of the table Runner
Placing 3 sc in each of the 4 corners, Join to the 1st sc, ch4
 

*sk the next sc, dc in the next, ch1*
Repeat From * to * around all for sides of the Table runner,

join to the ch3 with a slst, and tie off.


An Ad Free PDF File 
is Available in My Ravelry Shop
 At This LINK
For $4.50


Wednesday, September 15, 2021

The Granny Shoulder Bag Crochet Pattern | Posh Pooch Designs

 The Granny Shoulder Bag
 Crochet Pattern
By Sara Sach of   Posh Pooch Designs


The Granny Shoulder Bag is a new crochet pattern
 release that I have been working on for sometime.
I wanted the bag to be fun, and useful.
as well as, a bag design that would use up left 
over yarns from my Yarn Stash. It is designed using an 
assortment of Medium (4) Acrylic yarns from 
all my left over projects. Different colors, shades
 and brands. It turned out exactly how I wanted it.

It is a big roomy bag and holds a lot of things, 
and it is super pretty.
It is also a really easy Crochet pattern to stitch up.
It consists of 3 Granny Squares, stitched together 
to form a bag or purse. And the rest of the fun
is in the cute details.


You will notice there are 2 crochet hooks listed
 in the materials list.
Crochet Hooks – I / 5.500 MM - For Bag
                                        K/ 6.50 MM - For Bag Strap
We will be holding 3 strands of yarn together to 
form the bag strap so we need a larger crochet hook.


See The Video On My Crochet Youtube
 Channel at This LINK


Granny Shoulder Bag Crochet Pattern

Please Add This Crochet Pattern To Your Raverly Favorites
 
Skill: Easy
 
Materials:
Crochet Hooks – I / 5.500 MM - For Bag
                          K/ 6.50 MM - For Bag Strap
Yarn- med (4) Acrylic Yarn- 10 oz. / 400 yds. From Your scrap yarn
Yarn Needle
2 inch Metal Rings - 3

Stitches:
Chain (ch)
Slipstitch (slst)
Single Crochet (sc)
Double Crochet (dc)
 Space (sp)
 
Size: 17 X 17 Inches, Not including the bag strap
 
Notes:
Ch1 Does not count as a st
Ch3 Counts as a dc
Ch4 Counts as a dc, ch1
Rounds are joined to the ch 3 with slst
 
Pattern: Make 3 Squares – each Square is 12 X 12 Inches


R: 1 – Ch 5, join in a circle, ch 4,
11 dc, ch1 in the circle, join, slst in the ch1 sp, ch 3
(12 sets of dc, ch1)


R: 2 – dc in the same sp as the ch 3, ch1,
2dc, ch1 in each ch1 sp, join, slst to the next ch1 sp, ch3
(12 sets of 2dc, ch1)


R: 3 – 2 dc in the same sp as the ch3, ch2,
3 dc, ch2 in each ch 1 sp, join, slst to the ch2 sp, ch 3
(12 sets of 3dc, ch2)


R: 4 – 2dc, ch2, 3dc in the 1st ch2 sp, ch2, 3dc in the next ch2 sp,
Ch2, 3dc in the next ch2 sp, ch 2
*3dc, ch2, 3dc in the next ch2 sp, ch2, 3dc in the next ch2 sp,
Ch2, 3dc in the next ch2 sp, ch 2*
Repeat from * to * 2 more times, join, slst to the ch2 sp, ch3
(4 sets of 3dc, ch2, 3dc, ch2  and 3dc, ch2, 3dc, ch2)

Do not worry if your square looks a little wonky - it will shape right up after R: 5


R: 5 - 2dc, ch2, 3dc in the 1st ch2 sp, ch2, 3dc in the next  ch2 sps, ch 2
*3dc, ch2, 3dc in the next ch2 sp, ch2, 3dc in the next ch2 sps,
Ch2, 3dc in the next ch2 sp, ch 2*
Repeat from * to * 2 more times, join, slst to the ch2 sp, ch3


R: 6 – R: 9 – Continue To Repeat R: 5 increasing every Round


R: 10 – 2 dc. Ch2, 3 dc in the corner ch2 sp,
1 dc in each dc and ch2 sp across,
*3dc, ch2, 3dc in the next corner ch2 sp, 1 dc in each dc and ch2 sp across*
Repeat from * to * 2 more times, join, tie off and weave in your ends.
 
Make 3 Squares, and lay them out as shown.


sc the squares together, with the right sides facing out.


Trim: Join yarn to right top corner of the bag,
*sc around the opening of the bag, join to the 1st sc*
Repeat from * to * 1 more time, join, tie off and weave in your ends.


Rings: Place and stitch a ring to the top point of each side of the Bag,
using matching yarn and the yarn needle, sew the rings on securely


Bag  Strap:  Use 6. 50 MM Crochet Hook
The Strap is made holding 3 strands of yarn together

Ch 200, cut yarn, lace the strap through each ring and 
 tie  them securely. This will make a double thick handle.

Ring Flap:
Join yarn to the last ring, 6 sc around the ring, turn, ch 1 (6 sc)
*1 sc in each sc, turn ch 1*
Repeat From * to * 5 More times, tie off leaving a 12 inch tail of yarn.
Sew to the inside back of the center of the bag, with needle and tail of yarn.
Weave in the ends.

Ring Fringe:
Cut 6 pieces of matching yarn 6 inches long.
Attach  them to the bottom of ring.


An Ad Free PDF File is Available 
in my Ravelry Shop At This LINK
For $4.50


Tuesday, September 14, 2021

COFFEE AND CROCHET WITH SARA (131) Tying off and Weaving Ends In Neatly | Posh Pooch DEsigns

 COFFEE AND CROCHET WITH SARA (131)
Tying off and Weaving Ends In Neatly
With Sara Sach of Posh Pooch Designs


See The Video On my Crochet Youtube Channel At This LINK


THIS WEEK'S SHOUT OUT GOES TO: 
Kylee of Okie Girl Bling N' Things 
Youtube Channel LINK
You will love this Channel- Please Head Over And Subscribe


THIS WEEK'S QUESTION: 
"How Do I Tie of and weave in neatly"?


New Yarn's From Michael's - 
I Love Them!

What's New This Week At 

Fuzzy Lovely Blanket
 Crochet Pattern and Video - LINK


How I Recycle a Sweater -
Friday Fun With Sara - LINK


The Wicked Beanie Hat
 Crochet Pattern and Video - LINK


Thank YOU for Stopping by!


I will see You All Next Week! 

Monday, September 13, 2021

The Wicked Beanie Hat Crochet Pattern | Posh Pooch Designs

 The Wicked Beanie Hat
 Crochet Pattern
By Sara Sach of  Posh Pooch Designs


I have to admit That I Really, Really, Really Love 
This Beanie. It's so fun to wear, and super comfy
 and warm also. And I really love This colors which is 
were it got i's name "Wicked". It reminds me of 
The Wizard of Oz and Halloween.
but you can use any yarn colors of your choosing.


Roll Up The Hat Edge

Or Wear It Unrolled

I designed This Chunky Beanie using Red Heart Reflective
 yarn, in 4 different colors. Purple, orange, green and Black.
 It is a Bulky (5) weight Acrylic yarn, and has 
 then reflective thread running through it.


It is perfect for early morning and late evening walks
 with the dogs, or jogging.
 You can use any Bulky (5) Yarn you have on hand.
Use up your left overs and stripe it how ever you would like.
have fun and see what color combinations you can
 put together.

See The Video On my Crochet Youtube
 Channel At This LINK


The Wicked Beanie Hat Crochet Pattern
 By Sara Sach
Please Add This Crochet Pattern To Your Raverly Favorites

Skill: Easy
 
Materials:
Crochet Hook – K - 6.50MM
Yarn - Bulky (5) (9 Oz./ 300 Yds) I used Red Heart Reflective
                      Purple, Orange, Green, Black
Yarn Needle 

 Stitches:
Chain (ch)
Slip Stitch (slst)
Single Crochet (sc)
Double Crochet (dc)
Back Loop Only (BLO)
 
Size: Fits Youth to Adult 24 X 10 inches
1 Row = 1 inch
 
Notes:
Ch1 Does not count as a St
Ch3 does Count as a Stitch
I changed colors every 2 rows, the Striping is not noted in the pattern,
         as you can stripe the beanie as you like.
When changing colors, ch1 after the color change

Pattern: 
 
R: 1 – Ch 27, 1 sc in the 2nd ch from the hook, 1 sc in the next 2 chs,
1 dc in the next 23 chs, turn, ch3 (3 hdc + 23 dc = 26 sts)
 

R: 2 – Working in the BLO, Ch3 counts as 1st dc, 1 dc in the next 22 dc,
 1 sc in the next 3 sc, turn,
ch1 (23 dc + 3 sc = 26sts)
 

R: 3 – Working in the BLO, ch1, 1 sc next 3 sc, 1 dc in next 23 dc,
turn, ch3 (3sc + 23 dc = 26 sts)


R: 4 - Repeat R: 2


R: 5 - Repeat R : 3

R: 6 - Repeat R: 2


R: 7 - R: 24  - Continue To Repeat R: 3 and R: 4, alternating rows.


 Line Up the sides of the hat together, right side out, and sc closed, 
stitching the front and back together.


Cut n 18 inch tail of yarn, thread it on the needle.
Turn the hat wrong side out and gather the top of the hat closed.
tie securely and Flip back to front side.


Make a Pom pom With matching yarn - Demo Shown On The Video


An AD Free PDF File is Available
In My Raverly Shop At This LINK
 For $3.50