Showing posts with label crochet hat. Show all posts

Wednesday, December 20, 2023

Everyday Beanie Hat Crochet Pattern | Posh Pooch Designs

 Everyday Beanie Hat 
Crochet Pattern 
By Sara Sach Of Posh Pooch Designs


The Every Day Beanie Hat is just that. 
A beanie to wear everyday.
It makes a great last minute gift to have on hand. 
And Can be stitched using any Chunky (5) yarn.
It stitches up super fast and is super easy with a 2 row repeat.
 It has just enough texture, and lot's of comfort.


You will love stitching this hat up. 
They are just as much fun to make, as they 
are to give, and to wear.
You will want to make some for everyone and
 for yourself.
Perfect for the guys and girls.


I designed this one with Premier Yarn Colorfusion
 in the Cotton Candy colorway.
It has 15 different colorways to choose from.
100%  Super Soft Acrylic
3.5 oz. / 109 yds per ball

Click This Link 
To find All The Beautiful Premier Yarns

The most soft and  comfy chunky yarn
you will every stitch with.
And all the colorways are gorgeous.


See The Video On my Crochet Youtube 
Channel At This LINK


Everyday Beanie Hat Crochet Pattern

Please Add This Crochet Pattern To Your Ravelry Favorites
 
Skill: Easy
 
Materials:
Crochet Hook – L / 8 mm.
Yarn – Chunky (5) Acrylic – Premier Colorfusion / Cotton Candy (4.5 oz.)
Yarn Needle
Decorative Buttons
 
Stitches:
Chain (ch)
Slip Stitch (slst)
Single Crochet (sc)
Double Crochet (dc)
Back Loop Only (BLO)
Front Loops Only (FLO)
Skip (sk)
Cross Stitch (crst) Sk the next dc, dc in the next dc, 
                   cross back and dc in the sk st
 
Size: Fits Youth to Adult – 22 – 24 inch head
 
Notes:
Ch1 Does not Count as a st
Ch1 Counts as a dc

Pattern:
 
R: 1 – 30 FDC, turn, ch3 (30 FDC)


R: 2 – BLO, 1 dc in the 1st 3 FDC,
*sk the next FDC, dc in the next FDC, cross back and dc in the sk st*
Repeat from * to * 11 more times,
1 sc in the last 3 FDC, turn, ch1 (3dc, 12 crst, 3sc)


R: 3 – FLO, sc in the 1st 3 sc, 1 dc in each st across, turn, ch 3
(3 sc, 27 dc)
 

R: 4 - – BLO, 1 dc in the next 2 dc,
*sk the next dc, dc in the next dc, cross back and dc in the sk st*
Repeat from * to * 11 more times,
1 sc in the last 3 FDC, turn, ch1 (3dc, 12 crst, 3sc)


R: 5 - FLO, sc in the 1st 3 sc, 1 dc in each st across, turn, ch 3
(3 sc, 27 dc)


R: 6 – R: 25 – Repeat R: 4 – R: 5, alternating every other row.


R: 26 – Place the sides of the hat together to form a tube,
Wrong side out.
Slst the side together, tie off leaving a 12 inch tail of yarn.


Thread the tail of yarn onto the needle,
gather the top of the hat to close the hole.
Tie off securely.
Flip Right side out.
 
Add a button, or Pom pom if you choose.


An Ad Free PDF File Is Available 
In My Ravelry Shop At This LINK
For $4.50


Friday, June 23, 2023

Summer Messy Bun Bucket Hat Crochet Pattern | Posh Pooch Designs

 Summer Messy Bun Bucket Hat 
Crochet Pattern 
By Sara Sach of  Posh Pooch Designs


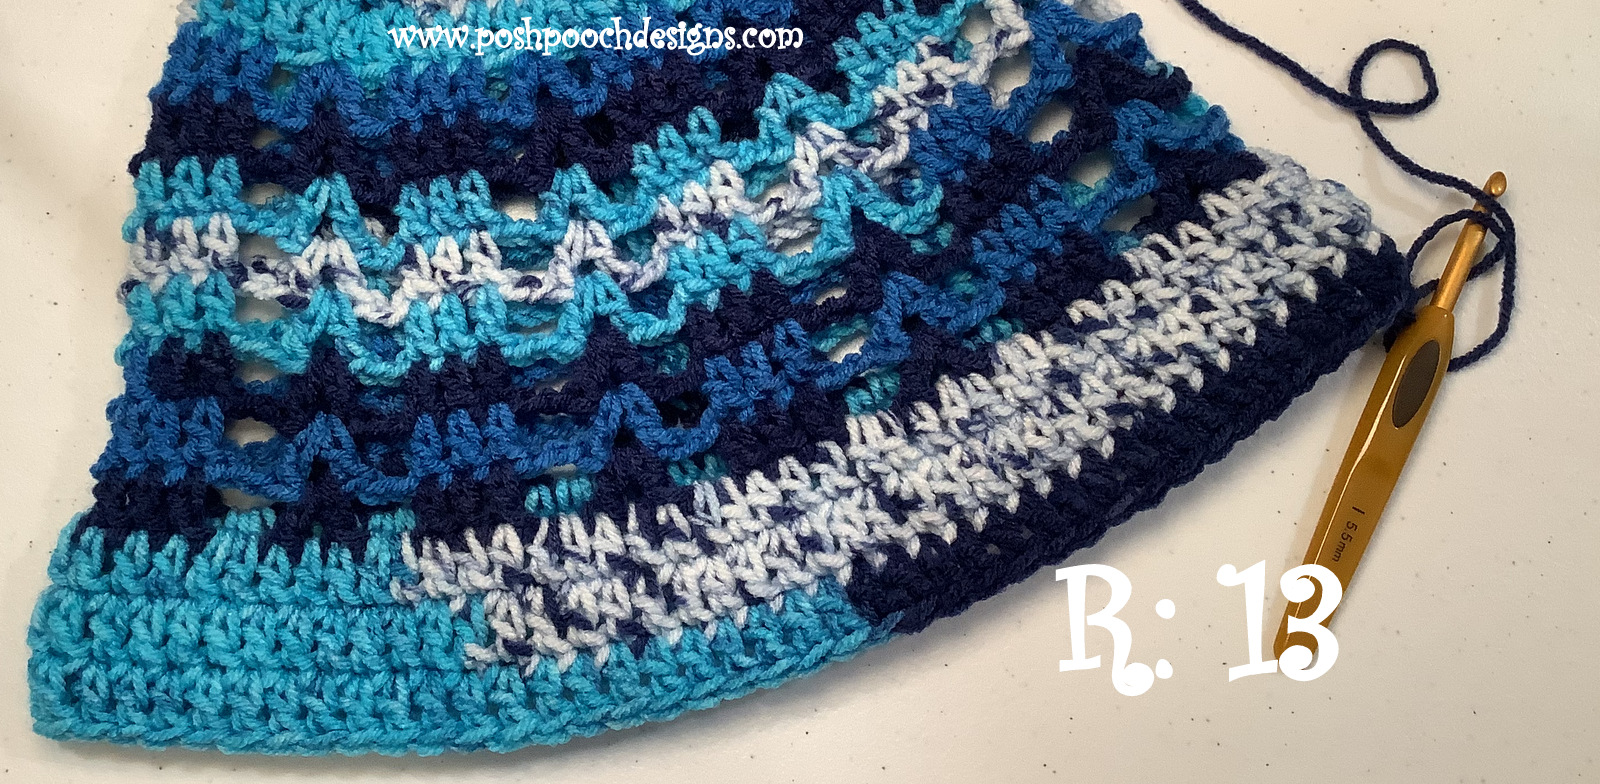
I Love my "Bucket Hats", they are roomy and comfy.
 I Love my "Sun Hats", they are lose and lacy, 
and they have a brim to keep the sun out of my eyes.
I also love my "Messy Bun Hats" so I can put my hair up. 
I decided to do a "mash up" And combine all three
 styles into one.

And So "The Summer Messy Bun Bucket Hat" 
was designed. 


It has room for a bun or ponytail on top,
 the sides are open and airy, it has a shape like a
 bucket hat, and it has a brim to keep the sun
 out of my eyes.
I Love It So Much!


The Premier Yarn, Sweet Roll Fruits if the perfect
 yarn for the hat. I chose to use the Blueberry 
colorway. You can make this adorable hat with just
 cake of yarn.  I love how it looks and fits.


There are so many fruits to choose from, 
you will want to make a hat in each "flavor".
Get Yours at This LINK


See The Video On My Crochet Youtube
 Channel At This LINK


Messy Bun Bucket Hat Crochet Pattern

Please Add This Crochet Pattern To Your Raverly Favorites
 
Skill: Easy
 
Materials:
Crochet Hook – I / 5.5 MM
Yarn – Med (4) 3.5 oz. Sweet Roll Fruits / Blueberry/ Premier Yarns
Yarn Needle
 
Stitches:
Chain (ch)
Slip Stitch (slst)
Single Crochet (sc)
Double Crochet (dc)
Space (sp)
Skip (sk)
V Stitch (V St)
Foundation Double Crochet (FDC)
 
Size: Fits a 22- 24 inch head
Hat is designed to fit loosely
 
Notes:
Ch1 Does Not Count as a st
Ch3 Counts as a dc
 
Pattern:

R: 1 – 40 FDC, join in a circle, ch3 (40 FDC)


With Needle And Beginning tail of yarn,
Close the joining gap


R: 2 – 1 dc in the next 3 FDC, 2 dc in the next FDC,
*1 dc in the next 4 FDC, 2 dc in the next FDC*
Repeat From * to * around, join to the ch3 with a slst, ch 3
(48 dc)


R: 3 – 1 dc in the next 2 dc, ch1, sk the next dc,
V st in the next dc, ch1, sk 1 dc,
*dc in the next 3 dc, ch1, sk the next dc,
 V st in the next dc, ch1, Sk the next dc*
Repeat From * to * around, join to the ch3 with a slst, ch 3
(24 dc, 8 V sts, 16 ch1)


R: 4 - 1 dc in the next 2 dc, ch2,
V st in the ch1 sp of the next V st, ch2,
*dc in the next 3 dc, ch2,
 V st in the next ch1 sp of the next V st, ch2, *
Repeat From * to * around, join to the ch3 with a slst, ch 3
(24 dc, 8 V sts, 16 ch2)


R: 5 - 1 dc in the next 2 dc, ch2,
V st in the ch1 sp of the next V st, ch2,
*dc in the next 3 dc, ch2,
 V st in the next ch1 sp of the next V st, ch2, *
Repeat From * to * around, join to the ch3 with a slst, ch 3
(24 dc, 8 V sts, 16 ch2)


R: 6 – R: 10 – Repeat R: 5


R: 11 – Dc in the next 2 dc, 2 dc in the ch2 sp,
Dc in the dc, ch1 sp of the Vst, dc, 2 dc in the next ch2 sp,
*dc in the next 3 dc, 2 dc in the ch2 sp,
dc in the dc, ch1 sp of the next Vst, dc,  2 dc in the ch2 sp*
Repeat From * to * around, join to the ch3 with a slst, ch3 (80 dc)


R: 12 – 1 dc in each dc around, join, to the ch3 with slst, ch3 (80 dc)
 
R: 13 – 1 dc in each dc around, join, to the ch3 with slst, ch1 (80 dc)


R: 14 -  1 sc in each dc around, join to the 1st sc with a slst,
 tie off and weave in the ends. (80 sc)


An Ad Free PDF file Is Available
In My Ravelry Shop At This LINK
For $4.50


Wednesday, April 13, 2022

Healing Butterfly Beanie Crochet Pattern | Posh Pooch Designs

 Healing Butterfly Beanie
 Crochet Pattern
By Sara Sach of Posh Pooch Designs

I have received a lot of requests for the Healing Butterfly
 Beanie to be made in cotton yarn, in 
place of the acrylic yarn it was originally designed from.
I felt it was time to retest and up date the pattern and I love
 how it stitched up in the cotton yarn.


I used Sugar Ad cream cotton yarn, in the potpourri
 Ombre colorway. It's 100 % cotton yarn that is a off 
white with flecks of teal, lavender and pink running
 through out the yarn. It's lovely colorway and
 perfect for this design. 

The Video Demo is stitched up with Redheart 
Stipes / Cool Stripe yarn. Another really pretty colorway. 


The Hat design is mostly Half Double Crochet Stitches
 and works up quite quickly. I removed all the color
 changes and stayed with one colorway. 
Although you can stripe this hat if you like.


See The Video On MY Crochet Youtube
 Channel At This LINK 


Healing Butterfly Beanie Crochet Pattern

Please Add This Crochet Pattern To Your Raverly Favorites

Skill: Easy
 
Materials:
Crochet Hook – I/ 5.50 mm
Yarn – Cotton (4) 3.5 oz. Sugar And Cream / Potpouri Ombre
Yarn Needle
 
Stitches:
Chain (ch)
Slip Stitch (sl st)
Half Double Crochet (hdc)
Half Double Crochet together (Hdctog)
Skip (sk)
Change (chg)
Back Loop Only (BLO)
 
Size: 22 - 24 inches / Youth/ Adult hat
2 rows of hat band = 1 inch
 
Notes:
Ch1 Does not Count as a st
Ch2 counts as a half Double Crochet.( unless stated otherwise)
Rounds are joined to the ch2 with a Slst
 
Pattern:
 
R: 1 – Starting with the Hatband –
Ch 5, 1 hdc in the 2nd ch from the hook, and in each ch, Turn, ch1 (4hdc)
 

R: 2 - BLO,1 hdc in each hdc, turn ch 1 (4hdc)


R: 3 – R: 48 – Repeat R: 2

Be sure To measure you hat band, add or substract rows as needed.


Put the ends of the band together, sl st across with 4 slsts, do not cut your yarn.
 

R: 49 – Working on the top of the band, ch 2, 
place 1 hdc in the top of each hdc row around,
Join to the 1st hdc, and ch2. (48hdc)
 

R: 50 – ch2, 1 hdc in the next 5 hdc, ch7, sk the next 7 hdc,
 join to the next hdc with a hdc, 1 hdc in each hdc around,
 join to the ch 2. (41 hdc, 7chs = 48sts)


R: 51 – Repeat R: 50


R: 52 – 1 hdc in the 5 hdc, ch 3, sc around the chs, and in the 4th hdc of R 49,
Ch3, 1 hdc in the hdc around, join, ch 2 (6 chs, 1 sc, 41 hdc = 48 sts)


R: 53 - 1 hdc in the 5 hdc, ch 3, sc in the sc, ch3,
Ch3, 1 hdc in the hdc around, join, ch 2 (6 chs, 1 sc, 41 hdc = 48 sts)
 

R: 54 –1 hdc in each hdc, in each ch sc around, join, (48 hdc)


R: 55 – Ch2, 1 hdc in each hdc, join. (52hdc)


R: 56 – R: 61 – Repeat R: 55


R: 62 – ch2, 1 hdc in the next hdc
*hdctog the next 2 hdc, 1 hdc in the next 2  hdc*,
Repeat From * to * around, join

 
R: 63 – R: 65 – Repeat R: 62
 Join tie off leaving an 18 inch tail of yarn.


With the tail of yarn gather the hole at the top of the hat closed,
 by stitching around the last row of stitches and sew securely. 
Weave in your ends.


An AD Free PDF File is Available
In My Ravelry Shop At This LINK
 For $4.50