Showing posts with label redheart yarn. Show all posts

Tuesday, February 6, 2024

COFFEE AND CROCHET LIVE PODCAST February Give Away And Granny Square Yarn Review - With Sara Sach

 COFFEE AND CROCHET LIVE PODCAST
February Give Away 
And
Granny Square Yarn Review
 With Sara Sach of Posh Pooch Designs


I Changed The Name of 
My Youtube Channel To 

Now Our Youtube Channel 
Will Be Easier to find!

**********************************

February Give Away!
Cuddle Buddies Crochet Kit
And 
COFFEE AND CROCHET WITH SARA ZIPPER POUCH


Watch Today's Live Video
On My Crochet Youtube Channel
 At This LINK


*********************************

Yarn Review
Redheart Granny Square
All In One Yarn
Is it "Grantastic or Not"?

**********************************

What's New This Week at

THIS OR THAT? POM POMS
VIDEO LINK


The Accidental Heart Granny Square
Crochet Pattern And Video - LINK


February Amethyst Crochet Square
Crochet Pattern And Video - LINK


Monday, February 24, 2020

Cold Snap Hat and Cowl Crochet Pattern | Posh Pooch Designs


Cold Snap Hat and Cowl

 Crochet Pattern 
By Sara Sach of  Posh Pooch Designs


The Cold Snap Hat is designed using 
Heat Wave Yarn From Red Heart Yarn
It is a heat generating yarn activated by sunlight
 - even on cloudy days.

It is a med (4) Acrylic yarn.
Any Med (4) yarn will work for this pattern.
The Pattern is designed To work for both the Hat and Cowl, 
so you can even make a nice set that matched. 


See The Video On My Youtube Crochet

Channel At This LINK


Cold Snap Hat and Cowl Crochet Pattern 

Please AddThis Crochet Pattern To Your Raverly Favorites

Skill: Easy

Materials:
Crochet Hook – I / 5.50MM
Yarn - Med (4) I used heat Wave By Red heart Yarns (2 oz. of 3 colors)
           (C1- Sandy Shores – C2 –Blue Skies, C3 –Swim Short)
Yarn Needle

Stitches:
Chain (ch)
Slip Stitch (slst)
Double crochet (dc)
Change to (chgto)
Back Loop Only (BLO)
Front Post Double crochet (FPDC)
Foundation Double Crochet (FDC)

Size: Adult (24 Inches)
2.5 Chs = 1 inch
1 Row = 1 inch

Notes:
Ch 3 Counts as a dc
Rounds are joined with a slst to the ch3
When Changing colors Ch3 After the Color change

Pattern: We Will be starting at the Hat/ Cowl band.
The Hat and Cowl are stitched the same.
The Difference is the Hat is closed at the top and the cowl is not.

R: 1 – With C1, 60 FDC, join in a circle, ch 3 (60 FDC)
Don't worry about the split,
 we will close it when we are done.

R: 2 – Ch3 Counts as the first dc, *FPDC in the next st, dc in the next st*
Repeat From * to * around, join, ch3 (30 FPD, 30 DC = 60 sts)

R: 3 – Repeat R: 2, do not ch 3

R: 4 – Chgto C2, ch3, BLO 1 dc in each st around, join, ch 3 (60dc)

R: 5 – Ch3 counts as 1 dc, 1 dc in the next 2 st, *FPDC in the next dc, 1 dc in the 3 sts*
Repeat From *to * around, join, ch 3 (15 FPDC, 45 dc = 60 Sts)

R: 6 – Repeat R: 5

R: 7 – Ch3 Count as 1st dc, *FPDC in the next dc, 1 dc in the 3 sts*
Repeat From *to * around, 1 dc in the last st,
join, ch 3 (15 FPDC, 45 dc = 60 Sts)

R: 8 – Repeat R: 7

R: 9 – Repeat R: 5

R: 10 – Repeat R: 5

R: 11 – Chgto C3 – Repeat R: 7

R: 12 – Repeat R: 7

R: 13 – Repeat R: 5

R: 14 – Repeat R: 5

R: 15 – Repeat R: 7

R: 16 – Repeat R: 7

R: 17 – Chto C1, 1 dc in each dc, join, ch 3 (60 dc)

R: 18 – Repeat R: 17

For The Cowl- Tie off weave in your ends

For The Hat:
leave a tail of yarn 16 - 18 inches long, thread it on the needle.
Turn the hat Wrong side out and gather the hat closed.

 Remember to Close the Split From R: 1 
Thread the tail of yarn in the a needle and sew it closed securely. 
Add a pom pom if desired.


An Ad Free PDF File is Available 
In my Raverly Shop At This LINK
For $4.50


Friday, May 6, 2016

The Ladder Headband Crochet Pattern and Video | Posh Pooch Designs

The Ladder Headband/ Ear Warmer
Free Crochet Pattern and Video
By Sara Sach of
 Posh Pooch Designs
I call it Both a headband and an Ear Warmer because it is wider then a traditional headband, but not quite as wide as an ear warmer, so it the best of both designs.
It's a Quick and Easy pattern, but looks classy When wearing it.
 Just takes about two ounces of any kind 
of Worsted Weight (4) yarn you have on hand.
The headband is stitched using 2 strands of yarn,
and I show you how to do that in the video.
If you want you could also use 1 strand of Chunky (5) yarn.
So there are so many possibilities for color and texture.
Then there is the buttons!

See The New Video on my Youtube Crochet 
Channel At This LINK


Ladder Headband Crochet Pattern By Sara Sach
 Please add this Crochet Pattern to Your Ravelry Favorites


Skill: Super Easy

Materials:
Crochet Hook - J / 6.00MM
Yarn - Any Worsted Weight (4) about 2 oz.
             (grey and purple Chic Sheep, Red heart Colorscapes, or Red heart Unforgetable 
2 or 3 Decorative Buttons
Yarn Needle

Stitches:
Chain (ch)
Single Crochet (sc)
Double Crochet (dc)
Foundation Double Crochet (fdc)
Skip (sk)
Slip Stitch (slst)

Size:  Youth - Adult 20-22 inch head)

Gauge: 2 FDC = 1 inch

Pattern Notes:
The Headband is stitched by holding 2 strands of yarn together.
Ch 3 at ends of rows counts as the 1st dc of the next row.
Ch 1 at ends of rows, does not count as a st.

R: 1 - FDC 50, ch3 turn. (50dc)

R: 2 - 1 dc in each dc across, ch3 turn. (50dc)

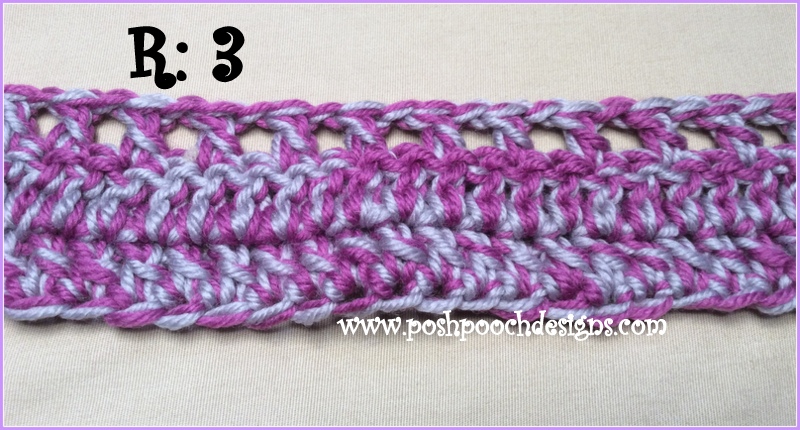
R: 3 - 1 dc in the 1st 2 dc, *ch1, sk next dc, 1 dc in the next dc*
Repeat From * to * across row, 1 dc in the last 2 dc, ch3, turn. (50 sts)

R: 4 - 1 dc in each dc, and in each ch1 space across, ch3, turn. (50dc)

R: 5 - 1 dc in each dc across, turn, ch1,

Working down the end of the headband,
st 10 sc, ( 2 sc in the end of each row), ch 1 turn ( 10sc)

R: 6 - 1 sc in each sc, ch1, turn. (10sc)

R: 7 - R: 10 -Repeat R: 6, Do not tie off.


Place the 2 ends of the Head band together, and sl st them together,
tie off, weave in your ends.

Sew your buttons in the  sc section of the Headband.
I like the way it looks like an over lap without actually overlapping the ends.

So You see there are so many ways to crochet this 
super easy headband!
Different yarn and colors, Buttons and more.
Have Fun!

An Ad Free PDF FILE is now Available
For $2.50 in my Ravelry Shop
At This LINK

Monday, April 11, 2016

Watercolor Forest Shawl Crochet Pattern and Video | Posh Pooch Designs

Watercolor Forest Shawl Crochet Pattern
By Sara Sach of

We remade the Video - 
It clear and not Fuzzy, and the Stitches are closer up.
See This Video on my Youtube Channel at this LINK


Watercolor Forest Shawl Crochet patter By Sara Sach
Please, add this pattern to your Ravelry Favorites


Skill: Easy

Materials:
Crochet Hook: N-9.00MM
Yarn: Worsted Weight (4) 13.5 oz. / 604 yds.
           I used Red Heart Boutique Treasure / Watercolor (4 skeins)

Stitches:
Chain (ch)
Slip Stitch (slst)
Double Crochet (dc)
Skip (sk)
Space (sp)

Notes:
This is basically a C2C Style Shawl (corner to corner)
Therefore you will turn each row.


Size: Width – 60 inches, length - 30 inches
R: 1 – We will be starting at the point and working up in a variation of the C2C method.
Ch 6, 1dc in the 4th ch from the hook, 1 dc in the next ch, ch1, sk the next ch,
1 dc in the next ch,

R: 2 – ch 6, 1dc in the 4th ch from the hook, 1 dc in the next ch, ch1, sk the next ch,
Slst in the 1st ch 3 space, ch3, dc, ch1, dc in the ch 3 sp,

R: 3 – ch 6, 1dc in the 4th ch from the hook, 1 dc in the next ch, ch1, sk the next ch,
Slst in the 1st ch 3 space, ch3, dc, ch1, dc in the ch 3 sp,
 Slst in the next ch 3 space, ch3, dc, ch1, dc in the ch 3 sp,

R: 4 - ch 6, 1dc in the 4th ch from the hook, 1 dc in the next ch, ch1, sk the next ch,
Slst in the 1st ch 3 space, ch3, dc, ch1, dc in the ch 3 sp,
 *Slst in the next ch 3 space, ch3, dc, ch1, dc in the ch 3 sp* Repeat 1 more time,

R: 5 - ch 6, 1dc in the 4th ch from the hook, 1 dc in the next ch, ch1, sk the next ch,
Slst in the 1st ch 3 space, ch3, dc, ch1, dc in the ch 3 sp,
 *Slst in the next ch 3 space, ch3, dc, ch1, dc in the ch 3 sp* Repeat 2 more times,

R: 6 - ch 6, 1dc in the 4th ch from the hook, 1 dc in the next ch, ch1, sk the next ch,
Slst in the 1st ch 3 space, ch3, dc, ch1, dc in the ch 3 sp,
 *Slst in the next ch 3 space, ch3, dc, ch1, dc in the ch 3 sp* Repeat across row

R: 7 – R: 41 – Repeat R: 6 (repeat as many times as you like to make it as big as you like.)

R: 42 – Top Trim – Turn Working across the top of the Shawl, *Slst in the 1st ch3 sp,
Dc, ch2, dc in the st*( The stitch between the bumps)  Repeat From * to * across,

Side Trim- Turning and working down the 1st side, *Sc in the 1st row edge,
Dc, ch2, dc in the next row edge,* Repeat From * to * across to the Point of the shawl,
dc, ch2, dc, ch2, dc, ch2 in the point.
Then repeat as done for the first side of the shawl, join with a slst to the 1st st.

An ad Free Instant download PDF file 
is available in my RAVELRY shop
 for $4.50 at this Link


Have fun making this classy shawl!
And post a pic to my facebook page at this link:
Posh Pooch Designs

Monday, June 10, 2013

Paw Print Blanket is Pooch Approved

 I want to share with you all 
my Paw Print Blanket 
and how I made it.
This is not an official Crochet Pattern, 
but rather an explanation.

Maximo and Rosie love the blanket.
They prefer a Crocheted blanket 
over any other kind.
I have taught them well. 

This is what I did...
I used an H hook
4 colors of Red heart Super Saver Yarn.
Choc. Cherry variegated, Brown, 
cranberry and cream

First : I started with a paw print square graph, 
and made it into a granny square.

Secondly: I made 12 granny squares
 to go around the edges. 
I wanted the blanket a square, not a rectangle.
 Then I attached them all together.

Lastly, I added a trim of shells.

It was a very simple project and 
I think it turned out lovely. 

It is perfect for my window seat.
I Love how it turned out.