Showing posts with label Red heart. Show all posts

Tuesday, April 30, 2024

COFFEE AND CROCHET LIVE PODCAST - Another Yarnie Video! - With Sara Sach

 COFFEE AND CROCHET LIVE PODCAST 
Another Yarnie Video!
With Sara Sach of Posh Pooch Designs


**********************************

This Week's Shout Out is 
Crochet By Fabio
Youtube LINK

**********************************

PREMIER PARFAIT CHUNKY 
LIMITED EDITION COLORS 
- 16 New Colors! 
100% Polyester 3.5oz / 131yds
 #6 Super Bulky

CLICK THIS LINK AND SEE THEM! 

**********************************


See The Live Video On My Crochet
 Youtube Channel At This LINK


What's New This Week At

A Walk Through My garden 2024
Video LINK


FRIDAY FUN DAY!
Mary's Mesh Shawlette
Crochet Pattern And Video - LINK


Gorgeous Granny Bag
Crochet Pattern And Video - LINK


Friday, May 6, 2016

The Ladder Headband Crochet Pattern and Video | Posh Pooch Designs

The Ladder Headband/ Ear Warmer
Free Crochet Pattern and Video
By Sara Sach of
 Posh Pooch Designs
I call it Both a headband and an Ear Warmer because it is wider then a traditional headband, but not quite as wide as an ear warmer, so it the best of both designs.
It's a Quick and Easy pattern, but looks classy When wearing it.
 Just takes about two ounces of any kind 
of Worsted Weight (4) yarn you have on hand.
The headband is stitched using 2 strands of yarn,
and I show you how to do that in the video.
If you want you could also use 1 strand of Chunky (5) yarn.
So there are so many possibilities for color and texture.
Then there is the buttons!

See The New Video on my Youtube Crochet 
Channel At This LINK


Ladder Headband Crochet Pattern By Sara Sach
 Please add this Crochet Pattern to Your Ravelry Favorites


Skill: Super Easy

Materials:
Crochet Hook - J / 6.00MM
Yarn - Any Worsted Weight (4) about 2 oz.
             (grey and purple Chic Sheep, Red heart Colorscapes, or Red heart Unforgetable 
2 or 3 Decorative Buttons
Yarn Needle

Stitches:
Chain (ch)
Single Crochet (sc)
Double Crochet (dc)
Foundation Double Crochet (fdc)
Skip (sk)
Slip Stitch (slst)

Size:  Youth - Adult 20-22 inch head)

Gauge: 2 FDC = 1 inch

Pattern Notes:
The Headband is stitched by holding 2 strands of yarn together.
Ch 3 at ends of rows counts as the 1st dc of the next row.
Ch 1 at ends of rows, does not count as a st.

R: 1 - FDC 50, ch3 turn. (50dc)

R: 2 - 1 dc in each dc across, ch3 turn. (50dc)

R: 3 - 1 dc in the 1st 2 dc, *ch1, sk next dc, 1 dc in the next dc*
Repeat From * to * across row, 1 dc in the last 2 dc, ch3, turn. (50 sts)

R: 4 - 1 dc in each dc, and in each ch1 space across, ch3, turn. (50dc)

R: 5 - 1 dc in each dc across, turn, ch1,

Working down the end of the headband,
st 10 sc, ( 2 sc in the end of each row), ch 1 turn ( 10sc)

R: 6 - 1 sc in each sc, ch1, turn. (10sc)

R: 7 - R: 10 -Repeat R: 6, Do not tie off.


Place the 2 ends of the Head band together, and sl st them together,
tie off, weave in your ends.

Sew your buttons in the  sc section of the Headband.
I like the way it looks like an over lap without actually overlapping the ends.

So You see there are so many ways to crochet this 
super easy headband!
Different yarn and colors, Buttons and more.
Have Fun!

An Ad Free PDF FILE is now Available
For $2.50 in my Ravelry Shop
At This LINK

Wednesday, June 24, 2015

Enchanted Evening Cowl - Free Crochet Pattern, Yarn and Product Review | Posh Pooch Designs

Enchanted Evening Cowl Free Crochet Pattern
By Sara Sach of

I decided to Retest and update this Crochet Pattern
Using Lion Brand Scarfie Yarn, since the original 
yarn I designed this Pattern for is no longer available.
I decided on The Color Denim/ Navy and since
 it reminds me of the night sky, I kept the name.
The Scarfie yarn is Also a Chunky (5).
It is 78 % Acrylic and 22 % Wool.
It a great Combination for a warm, soft 
and comfortable Cowl.
Any Bulky (5) Yarn will Work for this Crochet Pattern.

Warm and Cozy. A perfect Cowl For A Cool Evening out.

Enchanted Evening Cowl Crochet Pattern By Sara Sach
Please add this to your Ravelry Favorites

Skill: Easy

Materials:
Crochet Hook –J / 6.00 MM
Yarn – 3.5 oz Bulky (5) Scarfie by LionBrand
 Yarn Needle

Stitches:
Chain (ch)
Foundation Double Crochet (FDC)
Double Crochet (dc)
Front Post Double Crochet (FPDC)
Half Double Crochet (hdc)
Skip (sk)
Back Loops only (BLO)

Size: 4.5 X 36 inches

Notes:
Ch2 counts as a hdc
Ch3 Counts as dc

R: 1 – 88 Fdc, join in a circle, ch 2(counts as 1st hdc)

****Optional Start – Ch 88, join in a circle, ch 3 (counts as 1st dc)
 I dc in each ch around, join ch 2(counts as 1st hdc)

(88 dc - the Number of sts will be the same throughout the project)

There will be a gap when joining the FDC, use the tail of yarn to close that gap.

R: 2 – *FPDC in the next dc, hdc in the next dc*
Repeat From * to * around, join, ch 3

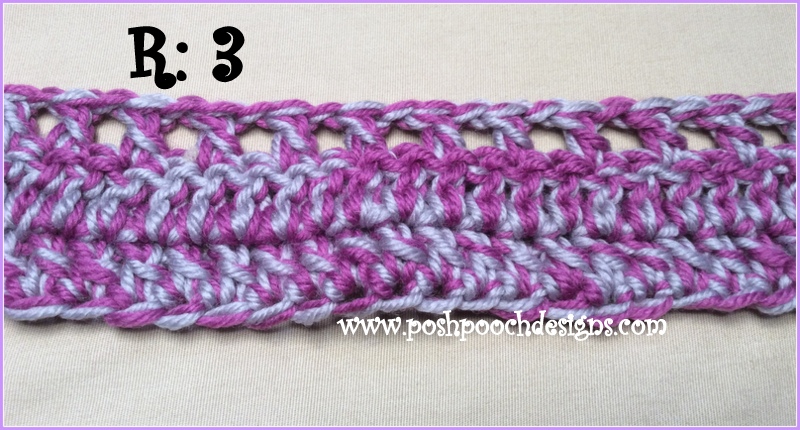
R: 3 - R: 4 – Repeat R: 2

R: 5 – Working in the BLO, 1 dc in each st around, Join, ch 3

R: 6 – *sk the next dc, 1 dc in the next 2 dc, cross back and dc in the sk dc*
Repeat From * to * around, join, ch 3 

R: 7 - Repeat R : 6

R: 8-  1 dc in each st around, Join ch 3

R: 9 - Working in the BLO, 1 dc in each st around, Join ch 3 

R: 10 -*FPDC in the next dc, hdc in the next dc*
Repeat From * to * around, join, ch 2

R: 11 - 12 – Repeat R : 8, ch1 after R: 12

R: 13 - 1 sc in each st around, join to 1st sc, tie off weave in you ends.
Close up of the Stitches.

Optional  Big Bow:
R : 1 - Ch29, 1 dc in the 4th ch from the hook, and in each ch across,
Turn, ch 3 (26dc)
R : 2 – 1 dc in each dc, turn, ch 3
R : 3-5 – Repeat R : 2, tie off after R : 5.
With a 20 inch piece of yarn, inch together the bow,
Wind the yarn around the center to form a bow, and tie securely.
Sew bow on Cowl with matching yarn.

Pic of the Bow of Close.

An Ad Free PDF File is Now Available
 For $4.50In my Ravelry Shop 
At This LINK

Saturday, September 20, 2014

Which Wig Do You Think Is The Winner In The Design Your Own Wig Contest!

We really have some great entries!
I am so impressed with 
every one's creativity!

I have numbered all the Pictures.
There are 2 ways to vote for 
your favorites.

 1.You can comment here on the Blog .
and/or
2. You can like Your favorite from the 
Album on Facebook.

You can Find the Free Crochet pattern here:
Fun Silly Wig Crochet Pattern

And FYI It has been retested and reedited.
I know it is too late to enter the contest,
I would still love to see your wig creation.
Feel Free to post it to my facebook page.


Winner will be 

announced on

Sept 30th

We have 14 entries!

If you want to see 
a bigger picture of them, 
Go on over to 
my facebook page,
Posh Pooch Designs


The Winner Will receive 
A Mystery Box
of Red Heart Yarn!
Thank you!
Best of Luck!

Monday, June 2, 2014

Red Heart Yarn Give Away!!!!!!

has reached 10,000 fans!
Woo- Hoo!
And I Love to give away yarn!!
We are so excited 
that we are having a 
 Give away!!!

We are Giving away 6 skeins
 of Red heart Yarn!
1. Red Heart Stripes-Sonoma Stripe
2. Red Heart Super Saver- Day Glow
3. Red Heart shimmer - Hot Pink
4. Red Heart Pomp A doddle -Shoreline
5. Red Heart Boutique-Regal
6. Red Heart Soft -Berry

To enter the Give away-
It is very simple

Go to Posh Pooch Designs 
and Like our page, 
then share it on your page.
or
Follow us on Google+ 
at Posh Pooch Designs ,
and share it on Goggle+

Then Comment here on the blog, 
that you did.

Winner will be chosen from the 
Comments on the blog
on June 20th, 2014

The Yarn Give
 Away Startes.....
NOW!

Monday, February 3, 2014

Jelly Bean Slouchy Hat By Snappy Tots!

Today's Featured 
Free Pattern is the 
By Snappy Tots!
I Love This pattern.
I Love Slouchy hats!

You can find it at this link:
 It has amazing texture 
and the is super easy to make.
The pattern is beginner friendly.
I chose Black and 
Black light yarn from
 Red heart on this one.
 One my 2nd hat I just used 4 different 
Worsted weight yarns I had on hand.
Depending on what color yarns
 you choose, 
and how you stripe it 
you get different results!
The way the hat is made it could 
easily be a ponytail hat, as well.

Friday, January 24, 2014

Reflective Yarn Dog Collar

This is More of a technique, then a Crochet pattern.
So I am going to tell you how I made a Dog Collar with
 Reflective yarn.

You can use Red Heart Reflective Yarn or 
Hobby Lobby Reflective Yarn or any yarn you want.

See The Video On my Youtube Channel at This LINK


Reflective Yarn Dog Collar By Sara Sach
Please add this Crochet Pattern to Your Ravelry Favorites

What You will need-
Tape measure 
Reflective Yarn - Amount depends on the size of the collar.
(both the red heart Reflective Yarn and 
Hobby Lobby Reflective Yarn will work for this project)
 H or G -Hook
Yarn Needle
A regular dog collar 
( I found some at the Dollar store)
After pricing, the buckle, clips and D rings, 
it was way cheaper
to use a reg. collar, then to buy all the pieces.

Skill: Super Easy

Stitches Used:
 Chain (ch)
Single Crochet (sc)

Okay, Let's Get Started:

Measure your dog's neck and set the collar to your dog's
 neck measurement.

With the reflective yarn of choice, make a slip knot,
then wrapping the yarn around the end of the collar,
 sc across until you reach the little buckle.
ch 3, then continue to sc around the collar
 until you reach the end of the collar. Next, tie off, 
weaving the yarn in at both ends.
AND That's it!

Both dog's wearing the collars.

Here is where I hang them, right by the door.
So all I have to do is put them on and take them off quickly.

I also have a crochet pattern for a leash and
 collar that would be perfect for this yarn.

Here is the link:

Saturday, January 18, 2014

M & M Candy Crochet Hook Holder

How to make a 
Crochet Hook Holder out of the 
M & M Minis Candy container.

First, Buy a M & M Minis Container, 
and eat the M & Ms.
They are usually located
at the checkouts.
FYI :  the entire container only has 250 calories.
Next, remove the label. 
What you will need:
H - Crochet Hook
a few oz. of Worsted Weight yarn-
(I used Red heart black light)
1 cute small button

Stitches:
Single Crochet  (sc)
Slip Stitch ( sl st)

Pattern :
Note-Stitched in the round
R : 1 - Ch 2, 6 sc in the 2nd ch from the hook, ( 6sc)
R : 2 - 2 sc in each sc, (12 sc)
R : 3 - *1 sc in the 1st sc, 2 sc in the next sc, Repeat From *, ( 18 sc) 
R - 4 - 1 sc in each sc, ( 18 sc)
R : 5-25 -  Repeat R : 4 
R : 26 - Sl st around the top of tube for a finished Edge.

Lid: Repeat R : 1-4, the sl st to the 9th sc, ch 10, sl st in the same st, this forms your button loop, sl st the last 9 sts, tie off leaving a 9 inch tail. use that tail to sew the lid onto the tube.

Finish: Slip the container into the tube, push the lid up inside the lid portion, use the loop to button the lid in place. 
The lid of the container will not snap shut. 
You can cut it off, but I left mine
 to help keep the form of the lid.
Slip your hooks inside and 
keep this in your to go 
Yarn project bag.
 You can also add a clip 
and clip it to the inside of the strap
of your bag.