Saturday, December 20, 2014

My Ugly Sweater Vest For Our Ugly Sweater Party


My Ugly Sweater Vest For Our
 Ugly Sweater Party
By Sara Sach of
Posh Pooch Designs
We are having a Ugly Sweater Party,
 tomorrow evening!!
I am so excited!
I bought a sweater from the Store, But I don't think
 it is "funky" enough.
 I wanted to make a silly Sweater vest to go with it,
I think I nailed it!
I think this is more of Recipe, then a Pattern,
Because you can adjust it as needed.
I Love it and think it is so fun.
I whipped this vest up in one evening.
It is very stretchy so I am going to say
 it fits an average adult or youth, and it's really easy to
 adjust to fir just about anyone.
Here is what I did.


Ugly Sweater Vest Crochet Pattern
Please, add this pattern to your Ravelry Favorites
You don"t want to lose this one!

Skill: Super Easy and Quick

Materials:
Hook - P, this Not a typo I did use a P hook.
Yarn - 4 oz of Worsted weight yarn (4)
I used I Love This yarn - Christmas Variegated
Pompom Yarn - About 1 oz.For the Trim
Yarn Needle

Stitches: 
Chain  (ch)
Double Crochet ( dc)
Skip (sk)
Space (sp)

Sizing: This Vest is Very stretchy -
One Size Fits most -
These are approximate measurements.
From Shoulder to trim - 26 inches
Waist - Approx. 40 inches

Gauge:
1 dc Row = 1 inch
2 dc stitches = 1 inch

Note:
Ch 1 at ends of rows is a turning ch, does not count as a st.
It is basically a Granny Square vest.


R: 1  -We will be starting at the Back Hem, ch 43,
1 dc in the 2nd ch from the hook, and in each ch across, 
ch 1 turn ( 42 dc)

To make this vest wider, just add more chains in increments of 2.

R: 2  - 1 dc in each dc, ch 1, turn, (42 dc)

R: 3 - 1 dc in the 1st 2 dc, ch 2, sk2, *1 dc in the next 2 dc, ch 2, sk 2*
Repeat From * to * across row, 1 dc in the last 2 dc, ch 1 turn,
(22 dc, 20 ch 2 spaces) 

R: 4 - 1 dc in the 1st 2 dc, 2 dc in the ch 2 space, ch 2, sk 2,
*2 dc in the next ch 2 space, ch 2, sk 2*
Repeat From * to * across row, 1 dc in the last 2 dc, ch 1 turn.

R: 5 - 1 dc in the 1st 2 dc,*2 dc in the next ch 2 space, ch 2, sk 2*
Repeat From * to * across row, 1 dc in the last 2 dc, ch 1 turn.

R: 6 - R: 21 -  Repeat R : 4 and R: 5 Alternating rows

R: 22 - 1 dc in each dc and in each ch 2 space, ch 1, turn
(42 dc)

R: 23 - 1 dc in each dc, ch 1, turn (42 dc)

R: 24  - Right Front side - 1 dc in the 1st 2 dc, ch 2, sk 2
*2 dc in the next ch 2 space, ch 2, sk 2*
Repeat From * to * 4 times, 1 dc in the last dc, ch1 turn

R: 25 -1 dc in the 1st  dc, 2 dc in the ch 2 space, ch 2, sk 2,
*2 dc in the next ch 2 space, ch 2, sk 2*
Repeat From * to * across row, 1 dc in the last 2 dc, ch 1, turn

R: 26 -1 dc in the 1st 2 dc,*2 dc in the next ch 2 space, ch 2, sk 2*
Repeat From * to * across row, 1 dc in the last  dc, ch 1 turn.

R: 27- R: 44 - Repeat R: 25 and R: 26 Alternating rows.
Turn, ch 1

R: 45 - 1 dc in each dc and in each ch 2 space, ch 1, turn

R: 46 -1 dc in each dc, cut yarn, weave in your end.

Attach yarn to the Left side and repeat R: 24 - R: 46

Ties: Mak2 - Christmas ribbon can be used as well.
With 2 strands of the yarn ch 30, to attach  to the sides,

Fold The Sweater in half Forward, center the ties.
Lace through the Front to the back to hold the sides closed.
Tie in a Bow.

Pom pom Trim -
To add a pompom trim, I used some red pompom yarn
 I had on hand, and sl st with it around the hem of the vest.
I just put pom poms on the hem,  but you could add 
it to the neckline and up the trim of the vest, 
if you wanted too.

I Put some strings of the pom pom
 yarn at the neck.
And I also changed the Shirt to Say
"Christmas" instead of X-mas.
I used Felt with a Sticky back.
I may not win the "Ugly Sweater Contest"
But I think My outfit looks pretty funky!

Thursday, December 18, 2014

Lovey Crochet Pattern Collection - A Treasury of Lovey Blankets To Crochet

 In This Crochet Pattern "Round-Up" I have 
A Treasury of Lovey Blankets To Crochet.

Some are Free and Some are not.
But There is a nice Selection of different styles, 
and for boys, girls or even puppies!

The Name of the Lovey Design is the link,
Just click it for the pattern.
The name of the Designer is underneath.

Repeat Crafter me

Calleigh's Clips and Crochet Creations

My Merry Messy Life

Carolina Guzman

Sandy Powers

Cre8tion Crochet

Stitch 11


Posh Pooch Designs

Snappy Tots

Petals to Picots

Carolina Guzman

Look At What I Made

Cheryl Bain

Repeat Crafter me

So you have squares, 
and different shapes, 
and even fleece.
And Different Characters to choose from.
These are all great Baby Shower gifts, 
Birthday gifts, Christmas Gifts, 
or an anytime gift..
And Nothing says "I Love You",
More then a hand made gift,
 made with love.

Tuesday, December 16, 2014

How I make Pompoms - Picture Tutorial

I love making pompoms.
 Many people have asked me,
 how I make mine.
Well, there are lots of contraptions
 you can use, 
and lots of different ways.

I have tried making pompoms 
with a pom pom maker,
 forks, card board tubes, 
and card board circles, 

But I like to just use my 
hand, scissors and yarn.
It is the simplest method
 I have every used.
And you can make 3 different sizes,
Again, just using your hand!
2 inch,   3 inch,     4 inch
Pom poms

This is an approximate measure, 
but it has been very accurate for me.

Okay, This is what I do.
For a 2 inch pom pom, 
I wrap the yarn around my 2 finger, loosely.

For a 3 inch pompom, 
I wrap the yarn around my 3 fingers, loosely.

For a 4 inch pom pom, 
I wrap the yarn around my 4 fingers, loosely.

You should be able to to
 wiggle your fingers.

The amount of wraps I do, 
depends on how thick I want the pom pom.
I usually wrap the yarn 20 to 30 times around.
 I have a 10 inch 
piece of yarn already cut.
I Slide that piece of yarn
 threw my fingers, 
with the tails to the front.
Then I Tie the yarn, 
and slide the loops off my fingers.

I then Make sure the
 tying yarn is centered, 
and tie securely.
Then I trim the pompom evenly.

This method works great for me.
I am working on a new Cowl design 
that will have pompoms and
 I will be using these pompoms.

Monday, December 15, 2014

Super Simple Crochet Belts - Free Belt Crochet Pattern


Super Simple Crochet Belts Crochet Pattern

These Belts were designed when I had lost a few pounds,
 and I wasn't ready to go down a size just yet.
My tops and sweaters were a little baggy,
and the belts were a really great solution.
You can cinch the waist of your top in and
 look slimmer instantly.
This is a very simple pattern, and it works up fast. 
It is also a great project to take along with you when you travel.

And You can use just about any type of Cotton yarn.
Acrylic and Wool can be a little too Stretchy for the belts.

See The Video on my Youtube Channel at this LINK

Super Simple Crochet Belts Crochet Pattern 
By Sara Sach
Please add this Crochet pattern to Your Ravelry Favorites

Skill: Super Easy

Materials:
Crochet Hook - G/ 4.00 MMor H/ 5.00 MM - Either one will work just fine.
Yarn - Any kind of Cotton - 1 ball - I used Sugar and Cream I had on hand.
The mount will depend on your waist measurement.
2 D- Rings - I prefer the 3/4 or 1 inch D - Rings
Stitches:
Chain ( ch)
Single Crochet  (sc)

Note - ch1 at ends of rows, is a turning ch, does not count as a st.

Gauge4 rows = 1 inch

R: 1 - Working over the flat edge of 2 D-rings, stitch 6 sc, ch 1 turn ( 6sc)


R: 2 - 1 sc in each sc, ch1, turn ( 6sc)

R: 3 - R : 140  - Repeat R : 2  For a 30 inch waist. 

4 rows = 1 inch
30 x 4=120 + 20 more rows for over lap = 140 rows

If your Waist is smaller or larger - 
you will need to adjust the amount of rows to fit your waist.

Cut yarn and weave in your end after R: 140, or your last row. 
The Brown Belt I only used 5 sc across, 
and the Black belt is 6 sc across.

You can add fringe, beads, 
buttons or even appliques.
The #1 New Years Resolution is to Lose Weight or 
get healthy.I know it is mine every year. 
I have a lot of really pretty sweaters, and do not want to 
buy clothes until
 I have lost a little more weight.
So I made a few of these belts.

Sunday, December 14, 2014

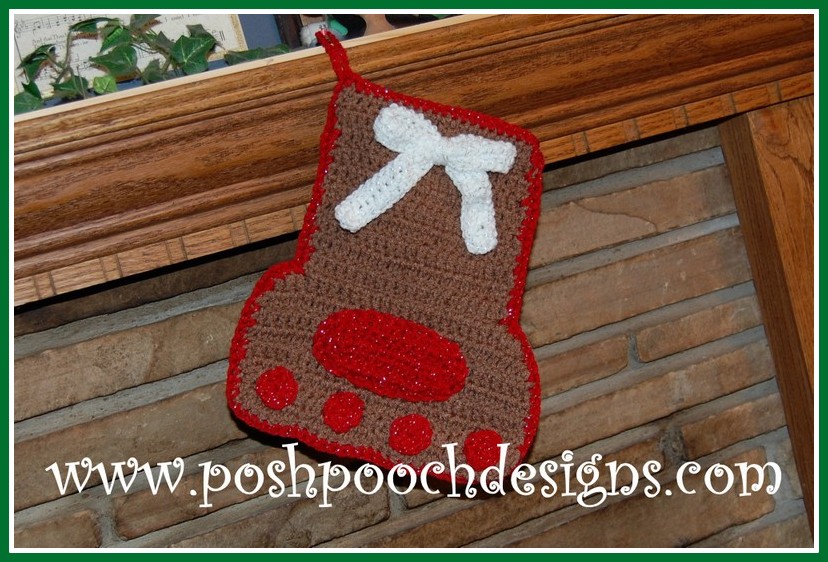
Paw Print Christmas Stocking Free Crochet Pattern

Paw Print Christmas Stocking Free
 Crochet Pattern
This Stocking is Perfect for Dog or Cat lovers!
By Sara Sach of
 Posh Pooch Designs


It is super easy to make, and super fast as well.
I have made them in many different colors
for Both dog lovers and cat lovers.
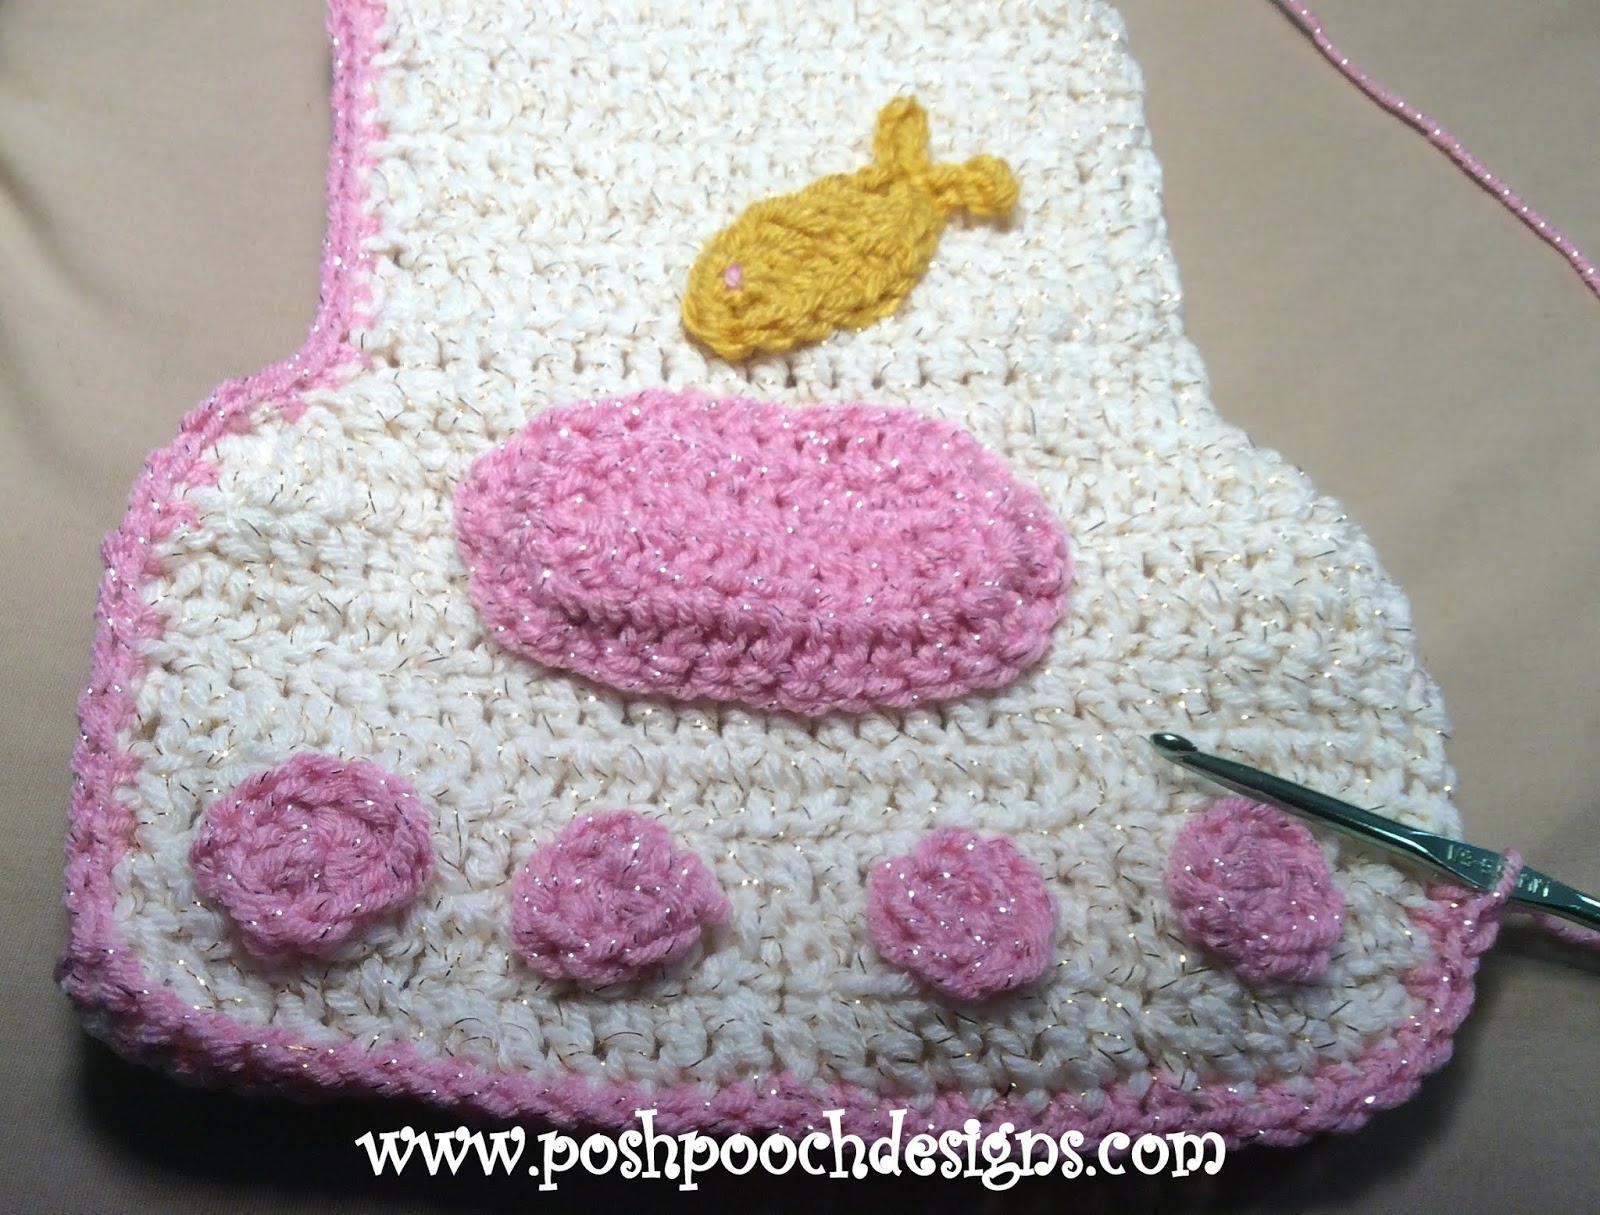
We Updated The Pattern with a little Fish for the Cat lovers.
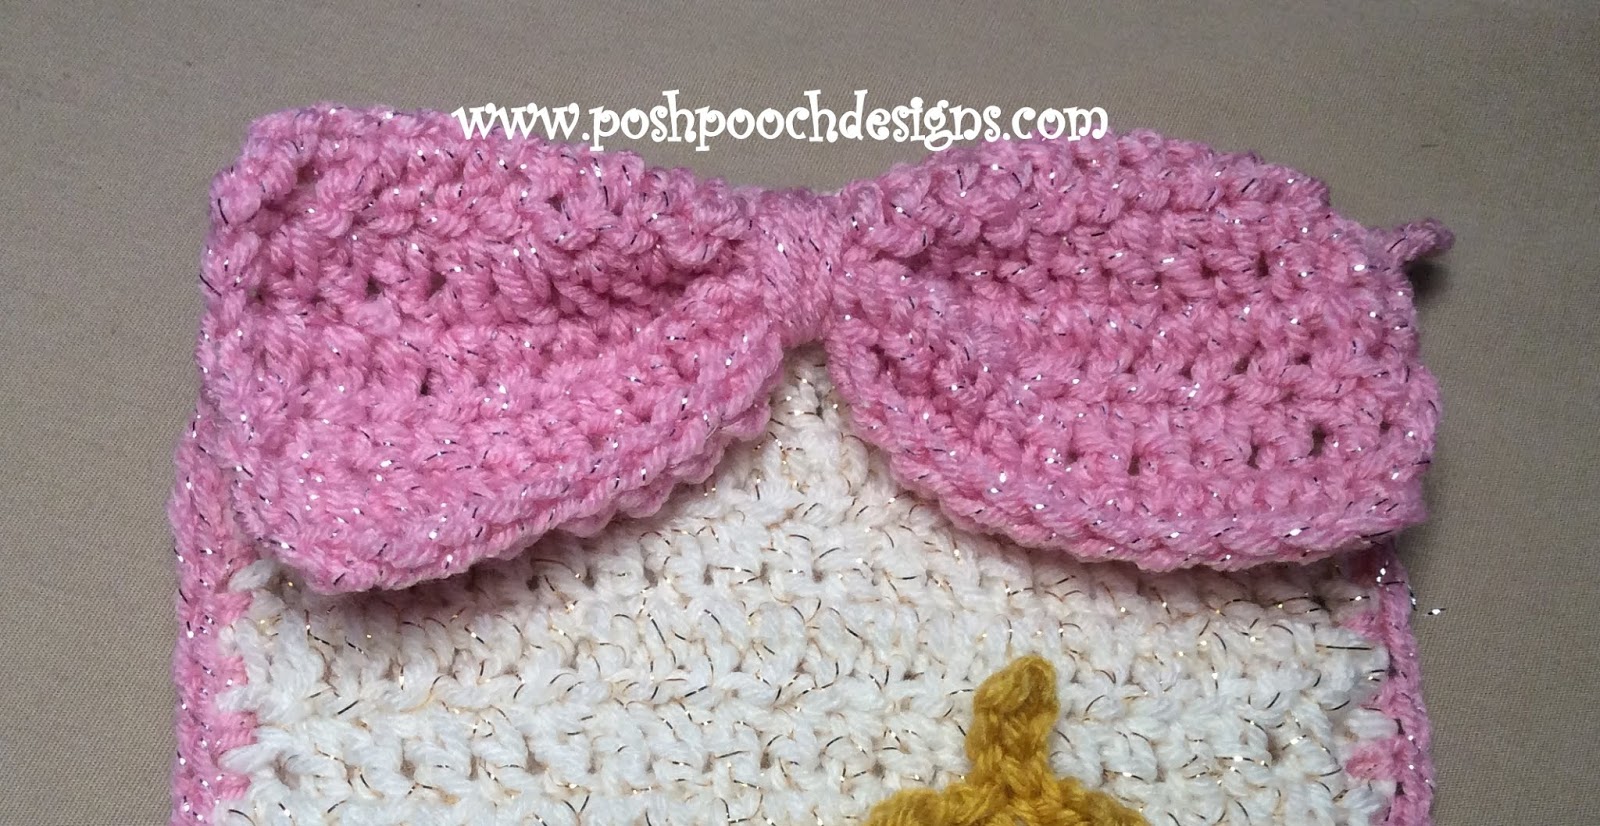
 And also added a Big Bow,
Although the alternate tie is still in the Pattern, 
so you can decide which you like better.

See The Video on my Youtube Crochet
 Channel At This LINK


Paw Print Christmas Stocking Free Crochet Pattern
By Sara Sach
Please, add this Crochet pattern to your Ravelry Favorites.

Skill : Easy

Materials:
Crochet Hook - I/ 5.50 MM
Yarn Needle
Yarn : Worsted Weight ( 4) I Love This Yarn Med. Brown ( 3oz)
Red Sparkle, White Sparkle,(2 oz of each)

Stitches :
Chain (ch)
Slip Stitch (sl st)
Double Crochet (dc)
Half Double Crochet (hdc)
Stitch Together / double Crochet Decrease)  (Stog)

Size: Measures Approximately 12 inches long By 8 inches at the widest part.

You will need to make two, a front and a back for the 
stocking out of the med. brown yarn or 
what every yarn color you choose.

Note:
Ch3 counts as a dc
Ch1 does not count as st

Stocking:

R: 1 - Ch 22, dc in the 4th ch, and in each ch across, ch 3, turn (20dc)

R: 2 - R: 10 - Dc in each dc, ch3, turn (20dc)

R: 11 - Ch 4, sl st in second ch from hook, 
sl st in ch and slst to the end of the row, ch 5, turn (23 slsts,  5 chs)

R: 12 -  Dc in the 4th ch hook, dc in each ch, 
sl st, and ch, across row, ch 3, turn (26dc)

R: 13 - 1 dc in the same st as the ch3, 1 dc in each dc, 2 dc in the last dc, ch4, turn.(28dc)

R: 14 - I dc in each dc, ch 3 turn (28dc)

R: 15 - R: 17 - Repeat R:14, turn
  *ch1 at the end of R: 17

R: 18 -  Stog 1st 2 dc in each dc, stog the in last 2 dc, 
ch 1 turn (26 dc)

R: 19 - Dc in first 5 sts, 1 sc in next st, 6 dc,
 1 sc, 6 dc, 1 sc, 5 dc, 1sc, ch 1, turn (22dc, 4sc)

R: 20 -  1 sc in the 1st st, Dc in next 5 sts, 1 sc in next st, 6 dc,
 1 sc, 6 dc, 1 sc, 5 dc, 1sc,, tie off, weave in your ends.

Large Pad for Paw: Make 1

R: 21 - Ch 14, 1 dc in the 4th ch, and in next 10 dc, 2 dc in last ch, (12 dc)
turn, working  down the opposite side of the ch
1 dc in each ch, join to form an oval. (12 +12 =24 dc)

R: 22 - Ch 3, 1 dc in first st, 1 dc in next 10 sts, 2 dc in next st, 
2 dc, in next stitch, 1 dc in the next 10 sts around,
 2 dc in last st, join and tie off. (28 dc)
Place on Center of paw and sew on.

Small Pads For Paw:
You will need to make 4 of these

Ch 4, in 4th ch from the hook, 8 dc, join to form a circle,
 tie off, place and sew on paw stocking.

After the pads are sewn on the stocking, 
place the front on top of the back, 
and sc around the stocking, with the red sparkle yarn, 
sc around the opening at the top, ch 12 and make a loop
 to  hang the stocking from.

The Bow
R: 1 - Ch 22, dc in the 4th ch, and in each ch across, ch 3, turn (20dc)

R: 2 - R: 5 - Dc in each dc, ch3, turn (20dc)

With an 18 inch of Matching yarn, wind the yarn around the enter to form a bow,
attach to the top of the Stitching with the matching color.

Alternate - Ribbon:
To make the Ribbon:
With Red Sparkle Yarn , or  yarn  of your choice.
Ch 65, 1 hdc in each ch, ch 1 turn
1 hdc in each hdc, tie off, work in ends.

Lay the ribbon out in a cross bow pattern. 
Cut a 24 in piece of yarn and wrap it tightly around the center 
of the cross to form the center of the bow. 
Attach in place with matching yarn.


Little Fish:
Ch 10, sc in the 2nd ch from the hook, 1 hdc in the next 2 chs,
1 dc in the next 3 dc, 1 hdc in the next 2 chs, sc in the last ch,
Working down the opposite site of the ch,
1 sc in the first ch, 1 hdc in the next 2 chs,
1 dc in the next 3 dc, 1 hdc in the next 2 chs, sc in the last ch,
join to the 1st sc,
*ch 4, sl st in the 2nd ch, slst in the next 2 chs, join to the 1st sc,
Repeat From * to *, tie off weave in ends,
leaving a 12 inch tail of yarn for sewing in place.

Sew Fish onto the Stocking using the the tail of yarn and a needle.

There are lots of other appliques you could add, 
like a dog bone, fish, or any Christmas applique to personalize 
the Stocking for your pet or pet lover.
Finished and ready to hang on the tree, mantel or give as a gift.

An Ad Free PDF File Is Now Available
For $3.50 In My Ravelry Shop
At This LINK

I also re-released the Dog Bone Stocking 
a few weeks ago.
You can find that Free Crochet pattern
 at the link Below.

Saturday, December 13, 2014

What Is A "Turning Chain" And How Do I Use It?

I get this question a lot.
So, I thought I would explain what it is 
and why I use it.

First of all, 
Those who know me, 
and know my patterns...
understand that I do not 
stay within the "norms" of 
Crochet pattern writing.

I design my own way and 
what works best for my patterns.
not what others think I should do.
Just thought I would put that out there! 

What is a turning chain - 
It is simply a chain made at the end of a row, 
for the purpose of making the turn,
 to the next row, lay smoothly.
 A Sc Swatch I made, 
 It is always understood to 
do a turning ch with sc.

But, I actually use the ch1, turn , 
which is the Turning chain, 
every time I want a smooth turn, 
no matter the stitch  being used.

I know that is crazy of me!

I do it because it
It leaves a smooth edge, not a hole.
Now, let me show you why:
These are 2 Hdc Swatches 
I  made to show the difference.
The one on the top left is ch1, turn (turning chain).
The one on the lower right is the ch2, turn.

The Standard is to Ch2 at the end
 of the hdc row.
But you can see that it leaves a hole, 
and is not a smooth turn.

These are 2 DC Swatches 
I made to show the difference.
The Standard is to Ch3 for Dc,
 at the end of the row.

The one on the top left is ch1, turn
 (turning chain).
The one on the lower right is the ch3, turn.
But you can see that it leaves a big hole, 
and is not a smooth turn.

If you ch 3, turn,
it makes it really hard to get a smooth edge, 
and really difficult  to put a border on, also.

"Ch1, turn, make your 1st stitch,
 in the 1st stitch of the next row,
and you will never have a hole".

This is the same for taller stitches, like Tr,
 as well, 
the taller the stitch the bigger the holes get.

Like I said, I love to use the turning ch, 
no matter the stitch I use, 
when stitching in rows,
 to get a smooth edge.

Friday, December 12, 2014

Quick Christmas Crochet Patterns - Christmas Treasury of Crochet Patterns


A Collection of 
Quick Free Christmas Crochet Patterns

Christmas is just a few Weeks away,
YIKES!!!
And here is a round up of fun 
Free Christmas Crochet Patterns 
to help you decorate, 
or use as gifts.

I have included a few for
 the pooches or kitties,
some mini decorations and 
a couple things just for fun!


Just  click the name 
of the crochet pattern 
you want to see 
and it will take to where
 the pattern is.


great for kitties, too!

perfect for gift cards

Makes a fun photo prop for babies and kitties, too

great gag gift or put on a package for the dog lover.


perfect for gift cards!


These are all lots of fun to make -
I know because I made them all.
I think there is something 
for everyone 
on this List.
And Sometimes you can have
 unexpected Visitors. 
Having a few of these on hand, 
will let you make sure 
every visitor leaves with a gift.
Have Yourselves a 
Merry Little Christmas!