Fall is the time for Pumpkin everything!
I originally wanted to make toys for my pooches.
Then I saw them sitting on my table
and thought they were adorable for fall decorating.
The Pattern has 3 sizes so you can choose what size you want to make. Or make all three for a table decoration.
Than I decided to make a bigger one!
I used 15 Oz. of Bernat Blanket yarn and
an N/10.00 MM Crochet Hook. And Bunch of Stuffing!
I Topped it with a stick from my yard,
and some brown thick yarn for a bow.
I Followed The Pattern For the Large Pumpkin.
It turned out huge and fabulous!
It measure 40 inches around.
See The Video On My Youtube Crochet
Channel At This LINK
3 Little Pumpkins Crochet Pattern By Sara Sach
Please, add this pattern to Your Ravelry Favorites
Skill: Easy
Materials:
Crochet
Hook – I / 5. 50 MM
Yarn
– Worsted Weight (4) Orange (2 oz.) Green (.5 oz.)
Yarn
needle
Small
amount of fiber fill
Small Stick for a stem - Optional
Small Stick for a stem - Optional
Stitches:
Chain
(ch)
Single
Crochet (sc)
Double
Crochet (dc)
Slip
Stitch (slst)
Together
(tog)
Size: Small – 13 inches around, 3
inches tall
Medium -15 inches around, 4 inches
tall
Large – 17 inches around, 5 inches tall
Notes: Ch3
at beginning of round counts as
the 1st
dc in that round.
Join each round to the ch3 at the beginning of each
round.
S
(M, L) -
R: 1 – - With orange yarn, ch 5, join in a circle, ch3,
R: 2 – 1 dc in the same st as the ch3, 2 dc in each st around,
Join, ch 3. (20 dc)
R: 3 – *1 dc in the next dc, 2 dc in the next dc*
Repeat
From * to * around, join and ch 3 (30 dc)
Skip to R : 8 For Small
R: 4 - *1 dc in the next 2dc, 2 dc in the next dc*
Repeat
From * to * around, join and ch 3 (40 dc)
R: 5 - *1 dc in the next 3dc, 2 dc in the next dc*
Repeat
From * to * around, join and ch 3 (50 dc)
Skip to R : 8 For Medium
R: 6 -*1 dc in the next 4dc, 2 dc in the next dc*
Repeat
From * to * around, join and ch 3 (60 dc)
R: 7 --*1 dc in the next 5dc, 2 dc in the next dc*
Repeat From * to * around, join and ch 3 (70 dc)
R: 9 – R : 11 – Repeat R: 8 for Small
R: 9 – R : 12 – Repeat R: 8 for Medium
R: 9 -R : 13 – Repeat R: 8 for Large
R: 14 – For All Sizes –
*1 dc in the next dc, st tog the next 2 dc*
Repeat
From * to * around, join, ch 3 (20, 40, 60 dc)
Gently
stuff your pumpkin.
Repeat R: 14 -
- 1 time for Small,
- 2 times for Medium,
- 3
times for Large.
Add
more stuffing if needed.
Tie
off leaving a 12 in tail of yarn.
Use
that tail of yarn to gather closed the top
of the pumpkin.
To
Form the ridges. Thread a 24 inch piece of yarn
In
your needle. Attach to the bottom center of the pumpkin.
Wrap
the yarn, gently pulling to the top center of the pumpkin,
Make
a stay stitch, then wrap the yarn to the bottom,
Then
stitch another stay stitch.
Repeat
3 more times.
Place the stick in the hole, gently pushing it in.
You can use glue if desired. I did not.
Then tie a bow around the stick.
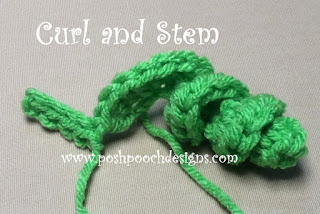
Stem And Curl
Curl and Stem – With green yarn,
ch 13, 3hdc in the 1st ch and in each of next 11 chs,
Then ch 5,
turn and slst back down the ch to form the stem.
Tie off
leaving an 8 inch tail of yarn for sewing on top of Pumpkin.
An Ad Free PDF File is Available
For $3.50 In my Ravelry Shop
At This LINK
Do you Love pumpkin Coffee, cookies,
cakes, ice cream and all things pumpkin?
I have to confess,
I do not!
So I will keep crocheting my pumpkins.


No comments:
Post a Comment