Showing posts with label tote bag. Show all posts

Monday, April 7, 2025

Guava Tote Bag Crochet Pattern By Sara Sach

 Guava Tote Bag Crochet Pattern 

By Sara Sach of Posh Pooch Designs


 The Guava Tote Bag Crochet Pattern was a fun 
crochet pattern to design. I wanted a tote bag that
 is pretty and useful. I really love all the Sweet Roll Fruits
 yarn from Premier yarn. I love how bright the colors
 are and how they flow throughout the cake of yarn.


The Guava Tote Bag is nice size bag. It is
 12 inches tall X 24 inches around, not counting
 the handle. It is the perfect size for carrying groceries, 
veggies, books and yarn. Makes a great project bag.
I did not line mine, but you can if you would like to too.


Here is link on how to easily line a 
Crochet Bag - LINK


I chose to use the Guava Sweet Roll Cake yarn.
 It is a medium (4) weight yarn.
And Of The Fruit Yarns would look lovely and work
 beautifully for this tote bag.


CLICK MY PREMIER LINK
AND SEE ALL 
THE FUN COLORS : LINK


Any Medium (4) Weight yarn will work for this bag.
Solids, Ombres, And Variegated will work to make 
 a perfect tote bag. Look In Your yarn stash, I bet you
 have some yarn that will look amazing.


See The Video on My Crochet Youutbe 
Channel At This LINK


Guava Tote Bag Crochet Pattern

Please Add This Crochet Pattern To Your Ravelry Favorites
 
Skill: Easy
 
Materials:
Crochet hook – H / 5 mm.
Yarn – Med (4) Acrylic/ Premier Sweet Roll Fruits/ Guava 5.5 oz.
Yarn Needle
2 Metal Ring – 6 inch For Handles
Button - 1 inch
 
Stitches:
Chain (ch)
Slip Stitch (slst)
Single Crochet (sc)
Double Crochet (dc)
Skip (sk)
Space (sp)
Shell Stitch (shst) 2dc, ch1, 2dc
 
Size: 12 inches tall X 24 inches around, not counting the handle
 
Notes:
Ch3 Counts as a dc

Pattern:
 
R: 1 – Ch 42, sc in the 2nd ch from the hook, 
1 sc in each ch across, (41 sc)


Turn Working down the opposite Side of the ch,
1 sc in each ch (41 sc) join to the 1st sc with a slst
 ch1 (41 + 41 – 82 sc)


R: 2 – 1 sc in each sc around, join to the 1st sc with a slst, ch1 (82sc)


R: 3 – R: 5 – Repeat R: 2 – ch3 after R: 5


R: 6 – 1 dc in each of sc, join to the ch3 with a slst and ch3 (82dc)


R: 7 – 1 dc in the next 3 dc, sk 2 dc, shst in the next dc, sk 2 dc,
* 1 dc in the next 4 dc sk 2 dc, shst in the next dc, sk 2 dc *
Repeat From * to * Around, sk 3 dc after the last repeat 
Join to the ch3 with slst, ch3
(9 sets of 4 dc, shst)


R: 8 - 1 dc in the next 3 dc, shst in the next ch1 sp*
* 1 dc in the next 4 dc, shst in the next ch1 sp *
Repeat From * to * Around, Join to the ch3 with slst, ch3
(9 sets of 4 dc, shst)
 

R: 9 – R: 21 – Repeat R: 8


R: 22 – Dc in each dc, dc in the dc of the shsts,
 do not dc in the ch1 sp , join the ch3 with a slst, ch1 (72 dc)


R: 23 – Sc in the 1st 12 dc, place the ring,
sc in the next 12 working around the ring,
Sc in the next 24 dc,
sc in the next 12 working around the ring,
sc in the last 12 sc, join to the 1st sc.
(72 sc)


R: 24 – Sc in the 1st 12 sc, sc around the top of the ring,
Place as many sc as will fir snuggly, the St Count is not important,
we want to completely cover the ring.
Sc in the next 24 sc,
sc around the top of the ring,
Place as many sc as will fir snuggly,
Sc in the last 12 sc, join to the 1st sc, tie off weave in your ends.


Button Loop:
Ch 15, sk the next 7 sc, slst up the ch,
 Tie off and st in place at the center from of the bag.


Button: Sew Button in place, lined up with the button loop.


An Ad Free PDF file Is Available
 In My Ravelry Shop At This LINK
For $4.50


Monday, April 29, 2024

Gorgeous Granny Bag Crochet Pattern By Sara Sach

 Gorgeous Granny Bag 
Crochet Pattern 
By Sara Sach of Posh Pooch Designs


I Just love This Gorgeous Granny Bag.

I Love that it's made using Granny Squares and 
I love Granny Squares. I also love the construction of it, 
as well as, how big it is. 
It measure 24 X 24 inches, and  6 inches deep.
It's the perfect size to use as a shopping or market bag, 
but not too big to use as a purse or tote. 
The pretty flap keeps everything neatly in side the bag.


You just need nine six inch granny squares
 to make this bag. I used the Red Heart Granny Square
 All In One Yarn, In the Soft White / Pink Punch color way.
You can use any six inch granny squares you want to
 make the bag.
I made the standard or vintage style granny squares, 
but you can use any style granny squares you like, 
as long as they are 6 inch squares.
 

The Gorgeous Granny Bag can be lined.
 A really simple way to line a bag can be found
 at This LINK


Whether you line the bag or not, it's great bag 
for lots of uses. Use it for shopping, A tote bag, 
as a project bag, vacation bag  or an everyday bag,
You will love using this bag.

See The Video On My Crochet Youtube 
Channel At This LINK


Gorgeous Granny Bag Crochet Pattern

Please Add This Crochet Pattern To Your Raverly Favorites
 
Skill: Easy
 
Materials:
Crochet Hook – H / 5 mm.
Yarn – Med (4) Acrylic 15 oz. – Red Heart Granny Square All in one
            – Soft White / Pink Punch
Yarn Needle

Stitches:
Chain) ch)
Slip Stitch (slst)
Single Crochet (sc)
Double Crochet (dc)
Skip (sk)
Space (sp)
 
Size: 12 X 12 inches, 6 inches deep
 
Notes:
Color changes are not indicated in the Pattern
When changing colors, ch 3 after the color change

Pattern:
Make 18 - 6 inch Granny Squares.
 
R: 1 - Ch 5, form into a circle,
ch3, 2 dc, ch 2 in the circle, * 3dc, ch2* 
Repeat From * to * 2 more times,
Join to ch 3, turn. (4 sets of 3dc, ch2)


R: 2 - Ch3, 2 dc, ch2, 3dc in the 1st ch2 sp,
*3dc, ch2, 3dc in the next ch 2 sp*
Repeat From * to * 2 more times,
Join to ch 3, turn (4 sets of 3dc, ch2, 3dc)


R: 3 - Ch3, 2 dc, ch2 in the 1st ch2 sp,
3dc, ch2, 3dc in the next ch 2 sp, 
*3 dc, ch 2 in the next ch2 sp, 3dc, ch2, 3dc in the next ch 2 sp*
Repeat From * to * 2 more times,
Join to ch 3, turn (4 sets of 3dc, ch2, 3dc, and 3dc, ch2)


R: 4 - Ch3, 2 dc, ch2 in the next 2 ch2 sps,
3dc, ch2, 3dc in the next ch 2 sp,
* 3 dc, ch 2 in the next 2 ch2 sps, 3dc, ch2, 3dc in the next ch 2 sp*
Repeat From * to * 2 more times, ch 2, 3 dc in the last ch2 sp,
Join to ch 3, turn (4 sets of 3dc, ch2, 3dc, and 3dc, ch2)


R: 5 - Ch3, 2 dc, ch2 in the next 3 ch2 sps,
3dc, ch2, 3dc in the next ch 2 sp,
* 3 dc, ch 2 in the next 3 ch2 sps, 3dc, ch2, 3dc in the next ch 2 sp*
Repeat From * to * 2 more times, ch 2, 3 dc in the last ch2 sp,
Join to ch 3, tie off weave in the ends.
 (4 sets of 3dc, ch2, 3dc, and 3 dc, ch2)


Repeat R: 1 – R: 5 For 17 More times


18 Squares


Bag Assembly:

The Bag: 
Place 2 squares together, right side out
Join yarn at the corner, stitching through inside loops of both squares,
*slst in the 1 st dc, ch1, sk the next dc*
Repeat from * to * across tie off weave in the ends.
 
Place the next Square Right side out And Repeat from * to *
 
Repeat 3 more times, you will have 5 Squares together
 
Place the 2 sets of 5 Squares together and
From Repeat * to * across all 5 squares

Front, bottom, back

Sides of the Bag:
Place 2 squares together, right side out
Join yarn at the corner, stitching through inside loops of both squares,
*slst in the 1 st dc, ch1, sk the next dc*
Repeat from * to * across tie off weave in the ends, set a side
 
Repeat, you will have 2 sets of 2 squares.


Adding The Sides:
Right sides out place the 2 square pieces in the sides of the bag,
 And stitch in place using from * to *
 
Repeat On the other side of the Bag


Bag Flap:
Repeat method from the “sides of the “bag.
Stitch the 2 sets of Squares together using from * to *.


Adding The Bag Flap:
Place the bag flap on the back of the Bag, right side facing out,
Attach the flap to the bag using the * to*
Do not cut yarn, sc evenly around the Bag opening,
And around the bag flap, do not tie off, 


Turn working around the edge of the bag flap, sc in each ch2 sp, sc in each dc,
And around the edge of the bag.

Drawstring -
Holding 2 strands of yarn together, ch 100, 
tie off, knot each end of the drawstring.
 Staring From the front of the bag 
lace through the top row of Ch2 Sps


Bag Handle –
R: 1 – Starting With a 9 inch tail of yarn,
Ch 10, sc in the 2nd ch from the hook, 1 sc in the next 8 chs,
Turn, ch 1 (9sc)
 
R: 2 – 1 sc in each sc, turn, ch 1 (9sc)
 
R: 3 – 1 sc in each sc, turn, ch 1 (9sc)
 
R: 4 – R: 85 – Repeat R: 3, tie off leaving a 9 inch tai of yarn.
 
Place each end of the Handle at the side of the bag and
 sew in place using the tail of yarn and needle.


An Ad Free PDF File is Available in
 My Raverly Shop At This LINK
For $4.50


Monday, April 15, 2024

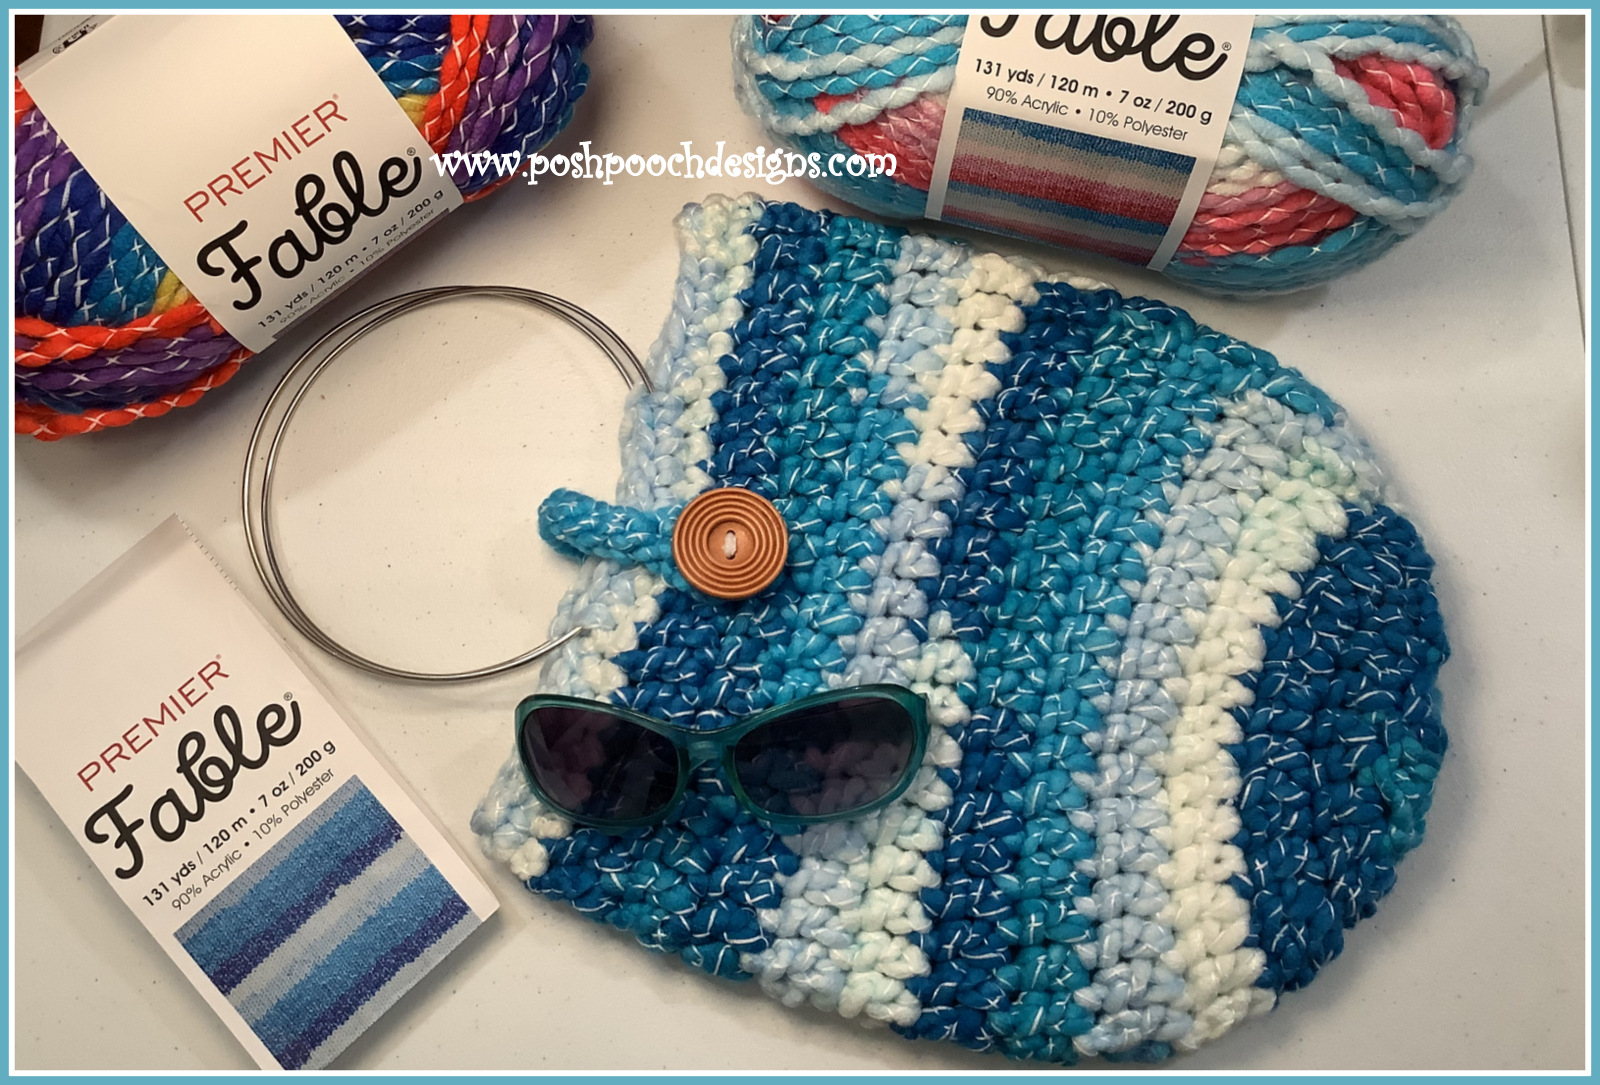
Ocean Cruise Tote Bag Crochet Pattern By Sara Sach

 Ocean Cruise Tote Bag 
Crochet Pattern
 By Sara Sach of Posh Pooch Designs


The Ocean Cruise Tote Bag is the perfect Vacation Bag.
It holds just enough of your things, as not to be too 
heavy, and yet big enough to add a few items you
 may need or purchase. It makes a lovely everyday
 purse, as well.

The Pattern is a super quick and super easy,
And The yarn is super amazing. 
I should have called this the 
Super Amazing Ocean Cruise Tote Bag!
But That Name is just too long.


Another super thing about this tote bag is you
 can stitch it up with just 1 skein of the 
Premier Fable Yarn.
Isn't That Super! 

Premier Fable Yarn


See It At My Premier Yarn LINK
10 colors
90% Acrylic, 10% Polyester
200g / 7oz, 120m / 131yds
#6 Super Bulky
$ 8.99 A Ball
Machine wash cold, tumble dry low

As you can see, it is machine wash and 
dryer safe! Which is a another super thing about
 this tote bag.  When you get home form your trip, 
or whenever it gets a little dirty, toss it in the
 washer and dryer. And it's all ready for the next time
 you want to use it.


See The Video On My Crochet Youtube
 Channel At This LINK


Ocean Cruise Tote Bag Crochet Pattern

Please Add This Crochet Pattern To Your Ravelry Favorites
 
Skill: Easy
 
Materials:
Crochet Hook – N / 9 mm
Materials: Super Bulky (6) Premier / Fable/ Nessie
2 Rings - Silver metal/ 6 Inch
Yarn Needle
1 Button – 1 – 1.5 inch
 
Stitches:
Chain (ch)
Slip Stitch (slst)
Single Crochet (sc)
Double Crochet (dc)
 
Size: 22 inches around, 12 inches tall, not counting the handles
 
Notes:
Ch 1 does not count as a st
Ch 3 Counts as dc
Rounds are joined to the ch3 with a slst
 
Pattern:

R: 1 - Ch 5, Join in a circle, Ch 3, 9 dc in the Circle
 Join with a slst to the Ch 3. (10dc)


R: 2 - 1 dc in same st as ch3, 
2 dc in each st around, join, ch3. (20 dc)


R: 3 – *2 dc in next st, 1 dc in the next st*
Repeat from * to * around, join, ch3. (30 dc)


R: 4 –1 dc in the next st,
*2 dc in the next st, 1 dc in the next 2 sts*
Repeat From * to * around, join, ch 3. (40 dc)


R: 5 – 1 dc in each dc around, join, ch3 (40dc)


R: 6 – R: 12 -   Repeat R: 5
Ch1 After R: 12
 

R: 13 – 1 sc in each dc around, join to the 1st sc, ch 1 (40sc)


R: 14 – 1 sc in the 1st 6 sc,
Sc in the next 8 sc holding one of the rings
 in place and sc over the ring,
 sc in the next 12 sc,
Sc in the next 8 sc holding one of the rings
 in place and sc over the ring,
Sc in the last 6 sc, join to the 1st sc, 
tie off weave in the ends.

 
Button Loop, Join yarn to the 4th sc of the 8 at the back ring, 
ch 16, slst in the 8th ch,
Slst in the last chs, join to the next sc, 
tie off and securely weave in the ends.
 
Line up the button to the loop, 
and sew in place on the front of the tote.


An Ad Free PDF file is Available 
In My Ravelry Shop At This LINK
 For $ 3.50