Friday, May 18, 2012

Plant Hanger Extender Crochet Pattern

I Bought This beautiful
pot of petunias
 to hang up on my Deck....
But it was so high...
I couldn't reach it to water it,
without a ladder.
So I made this...
A Planter Hanger extender.
Now I can water them
and enjoy them.
Here is what I did:

With a thick yarn and a J hook

Ch 13, 1 sc in 2nd ch from hook and
in each ch across, ( 12 sc)
 then ch 6, turn,
working down the other side of the ch,
1 sc in each ch(12 sc)
Then ch 6 , join with a sl st and tie off.
Be sure to weave in ends securely
 for a strong hold.


Thanks!


Sunday, May 13, 2012

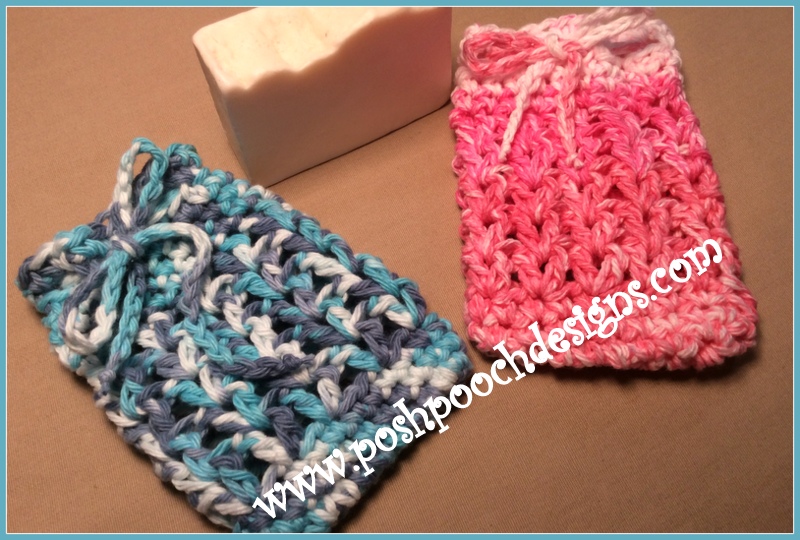
Soap Bag Crochet Pattern

Cotton Soap Bag Crochet Pattern
By Sara Sach of Posh Pooch Designs

Number 3 in my Cotton Yarn Journey

I have made a few of these,
but they are always to big!

I Love The V-Stitch so I decided to incorporate it into this
Cute little soap bag.

We have re-tested, up dated, added more pictures and a Brand New Video

See the Video On my Youtube
Crochet Channel at This LINK


Cotton Soap Bag Crochet Pattern by Sara Sach
Please, Add This Crochet Pattern to YourRavelry Favorties.

Skill: Easy

Materials:
Crochet Hook -H / 5.00 MM
Cotton worsted Weight Yarn - I used Peaches and Cream

Stitches:
Chain (ch)
Slip Stitch (sl st)
Single Crochet (sc)
Double Crochet (dc)
V Stitch (Vst) for this pattern is just 2dc

Size - 5 X 3 inches

Notes: 
Ch1 does not count as a st.
Ch3 counts as a dc

R: 1 - Ch 9, 2 sc in the 2nd ch from the hook,
 1 sc in next 6 chs,
 2 sc in the last ch, turn working down
the opposite side of the ch,
 2 sc in the next ch, 1 sc in the next 6 chs,
2 sc in the last ch, join with a sl st, ch 1
(20sc)

R: 2 - 1 sc in each sc around, join, ch 1 (20sc)

R: 3 - Repeat R: 2 , ch 3 (20sc)

R: 4 - 1 dc in the same st as the ch3,
* skip the next st, 2 dc in the next st*
Repeat from *to * around, join (10 groups of 2 dc)

R: 5 - Slst in between the 1st 2 dc,
Ch3 (counts as 1st dc) 1 dc in same place,
2 dc  between the next 2 dcs,(V st),
 2 dc between  each of the 2 dc around,
join. (10 Vst)

R: 6 - R: 8 - Repeat R : 5 (ch 1 after R: 8)

R: 9 - 1 sc in each st around join , tie off.

R: 10 - R : 11 - Repeat R: 9

R: 12 - *1 sc in the 1st st, skip the next st, ch1*
  Repeat from * to * around,
join, ch 1

R : 13 - 1 sc in each st around join , tie off.

Draw string  - ch 60,  and weave through
 spaces on row R : 12
and tie in a knot, for the draw string.

Slip it on your favorite bar of soap.

Tah - Dah                      That's it!
An Ad Free PDF File is Available
 For $3.50 in my Ravelry Shop
 At This LINK

Monday, May 7, 2012

Baby bunny Wash Cloth Free Pattern

Baby Bunny Wash Cloth Crochet Pattern -
By Sara Sach of Posh Pooch Designs

I have a few friends having babies and was thinking
 it would be fun to make something to go in a gift basket.
This blog has both the crochet pattern
 for the baby wash cloth, and how to form the bunny.
These adorable Bunnies are perfect for baby gifts, but also make great additions to  Easter and Gift basket.
or place a few in your guest Bathroom for people with children who are visiting.

See The Video On My Youtube Channel At This LINK


Baby Bunny Wash Cloth Crochet Pattern 
by Sara Sach
Please,  Add This Crochet pattern to Your Ravelry Favorites.

Skill: Easy

Materials:
Hook-H
Cotton worsted Weight Yarn - I used peaches and cream
You can several of these with one ball of yarn.

Stitches:
Chain (ch)
Half Double Crochet (hdc)
Picot Stitch ( pt st)

Size: 6 X 8 Inches

Notes:
Ch1 at ends of rows does not count as  stitch.

R : 1 - Ch 22 loosely, 1 hdc in the 2nd ch from the hook, skip the next ch,
*2 hdc in the next ch, skip the next ch*, repeat from *to* across,
1 hdc in the last ch, ch1, turn.

(20 hdc - the amount of hdc is the same for all rows 1-10)

R : 2 - 1 hdc in the 1st hdc, skip the next st, *2 hdc in the next st,
skip the next st*, repeat from*to* across, 1 hdc in the last st, ch 1, turn.

R : 3-10 - Repeat R : 2

R : 11 - TRIM - 1 hdc in each st across, 3 hdc in the last st to form the 1st corner,

*hdc evenly down the side of the cloth, 3 hdc in the next corner,
Repeat from * on the remaining 2 sides, join with a sl st, ch 2 ( do not turn)

R : 12 - (*1 hdc in the next 3 sts, 1 hdc pt st), repeat from (* to )
around all 4 sides of the cloth, join and tie off.


Forming The Bunny:
Roll the cloth with the short ends to the sides. 
Then Cut a 15 inch piece of yarn, or thin ribbon.
Then fold the Roll in half, 
and tie the yarn around the center and form a bow.


This bunny would make a greatbaby shower package topper.
Make a set of 3 or 4 as a gift.

An Ad Free PDF file is now Available
For $3.50 in my Ravelry Shop
At This LINK
Knitting Pattern for a washcloth at this link:
Washcloth Knitting Pattern
I Hope you enjoy this Pattern
 I think it is just so sweet!

Saturday, May 5, 2012

Cotton Fever

I got a really great deal on a
huge bunch of Cotton Yarn!
All this for $9.99
I usually work with worsted weight, but have done 
a few things with cotton yarn.
I have decided to see what really cool items
 I can make with it.
Sweatbands/ headbands - thick and thin Styles
Get the pattern HERE


These are a few Cotton Crochet patterns to come....
3. Hair Scrunchies - Coming Soon
8. Shopping and produce Bags:


It would be fun to put
them together in a E-Book
I think I will..
And I will call it
"Cotton Fever"!

Thursday, April 26, 2012

Swimsuit Cover up - From a Beach Towel

I am going on a Cruise this Summer
and wanted to design a  swimsuit cover-up
for me to wear.

This is what I came up with.
Combining Crochet and
 a beach towel.
See The Video on my Youtube Channel at This LINK

Swim suit cover  From a Beach Towel Crochet 
Pattern By Sara Sach
Please, Add This Crochet Pattern to Your Ravelry Favorites.
Skill- Super Easy

Materials :
Hook - J
Yarn Needle
30 X 63 inch Beach Towel ( child 16 X 26)
40 small wooden colorful beads
3 colors of Worsted Weight yarn - (C1, C2, C3)
I don't recommend cotton yarn, it get heave when wet

Stitches :
Chain (ch)
Single Crochet (sc)
Slip Stitch ( sl st)
Double Crochet ( dc)
Half Double Crochet ( hdc)
Blanket Stitch ( bl st)

Size:
You can use any size towel that you would like, to fit any size person.


R : 1 - With C1, Blanket Stitch across one 
of the long sides of the towel
How To Blanket Stitch Photo Tutorial
approx. 180 sts (child 62)
R : 2 - 1 sc in each bl st loop across towel, tie off.


R : 3 - With your yarn needle, Lace on to yarn all 40(child 30) of the beads, 
moving the beads forward, sc in the 1st 20 sts (10 child), *slide 1 bead down , 
sc in the next 4 sts, Repeat from * across top of towel till
 the beads are gone, then sc across the rest of the towel.


R : 4 - Change C2, 1 sc in the 1st st, *
sk next sc, 2 sc in the next st*, 

Repeat from * across row,  1 sc in the last st, ch 1, turn


R : 5 - Repeat R : 4

R : 6 - Change to C3 , Repeat R - 4, When you reach the end
 of the row, corner of the towel, 
3 sc in the corner, sc down the side to the towel,
 turn and slip st back up to the corner.

R : 7 - Repeat R : 4, finishing off the other corner 
with scs to the edge of the towel, tie off.


Straps : make 2
With Green yarn, Ch 68(24 child)

R : 1 - starting in the 2nd ch from the hook, 1 hdc in each ch across, ch 2, turn.

R : 2 - 1 hdc in the space between each hdc, ch1, turn.

R : 3 - Change to pink or orange yarn, 1 sc in the 1st st,
* 2 hdc in the next st, skip the next st, Repeat from * across strap,
and tie off. Sew straps on each end of the Towel,
about 8 inches apart (5 child),  as seen in the picture.

Flower:
R : 1 - With green yarn, ch 3, 10 hdc in the 2nd ch 
from the hook, join to form a circle

R : 2 - Change to the pink or orange yarn,
 *1 sc in the 1st st, ch 4 , 1 sc in the next st, 
Repeat from * 4 more times, join with a sl st.

R : 3 - *1 sc in the 1st sc, (6 dc, ch 1, 6 dc)
 in the ch 4 space , Repeat from * 4 more times
 for 5 petals, join and tie off.

With green yarn, Close the hole in the center
 of the flower, and sew on the buttons in the 
center of the flower, then sew on to the flap 
you want to be the front of your cover -up..

Let's Go To the Beach!


Tuesday, April 24, 2012

My Mermaid Tears Bag

 is doing a
Crochet Along  using
The Mermaid Tears Bag

She also has the all The videos
linked on her blog,
which was a big help .
Here is my Take on the pattern.
I used Light peach "I Love This Yarn"
for the main colors.
 I used Chocolate Sparkle by "Red Heart"
for the Handles


"I Love This Yarn" in Cream for the Flower
And added a cute little peach button.

I Love How it turned out!


Saturday, April 21, 2012

Flower Embellished Flip Flops

Fun With Flip Flops!
I Love These so much
 that I just had to share them!
I bought a pair of flip Flops From the Store
 for about $1.00.
Then I found 3 really bright colors of
Worsted Weight yarn
Orange, Pink and Green
My I Crochet hook and my Bright Beads.
See The Video On my Youtube Channel
 at This LINK:

Fun With Flip Flops Crochet Pattern By Sara Sach
Please add this Pattern to Your Ravelry Favorites

Skill: Easy

Materials:
Flip Flops
Crochet Hook - I
Yarn - Worsted Weight (4)
Beads, Buttons, Gems or what ever you want to add.
Yarn Needle

Stitches:
Chain (ch)
Slip Stitch (slst)
Single Crochet (sc)
Double Crochet (dc)

Size: This pattern will work for any size flip flop, and most styles.

For The Flip Flops - 
Join Yarn around the strap, leaving a 10 inch tail to weave in the end.
sc up the strap working around the strap to the toe, then move to other side and sc down the 2nd strap, tie off. Weave in your ends. 
At Buttons, bows, ribbons, hearts or what ever type of embellishment you would like.
The amount of sc is up to you, 


At Buttons, bows, ribbons, hearts or 
whatever type of embellishment 
you would like.


Crochet Beaded Flip Flops-
Thread the yarn in the needle, while still connected to the ball or skein of yarn,
 put 12 or more beads on the yarn, depending on of Flip flop size.
Join yarn to flip flop strap, sc 6 times, 
Sc around the Flip Flops straps Using this pattern:
*3 sc, ch 1, push 1 bead forward, ch 1* Repeating from * to * for
 both of the straps, tie off when you reach the end of the 2nd strap.
End with 6 sc, tie off weave in your ends.


Make sure you have the same amount of beads
 on each side of the Flip flops.


Flower:
R : 1 - With first color, Ch 3, 6sc in the send ch from the hook, join (6sc)

R : 2 - In each sc,  (1 sc, 3 dc ,1sc) for 6 petals.

R : 3 - Ch 2, attach to the center back of the first petal with a sl st,ch2,
repeat on the remaining 5 petal backs, join

R : 5 - In each ch 2 space, ( Ch2, 3 dc, ch2) for the 8 back petals,
 tie off, weave in your ends, and attach to top of the Flip Flop
 by sewing  with matching yarn.
See The Video For the Flower at 
This LINK
The Flower is the same Flower we used for Our 
Shell Stitch Dog Collar! 

LOVE THEM!

It is Flip Flops Season!