Showing posts with label Bernat yarn. Show all posts

Friday, December 6, 2024

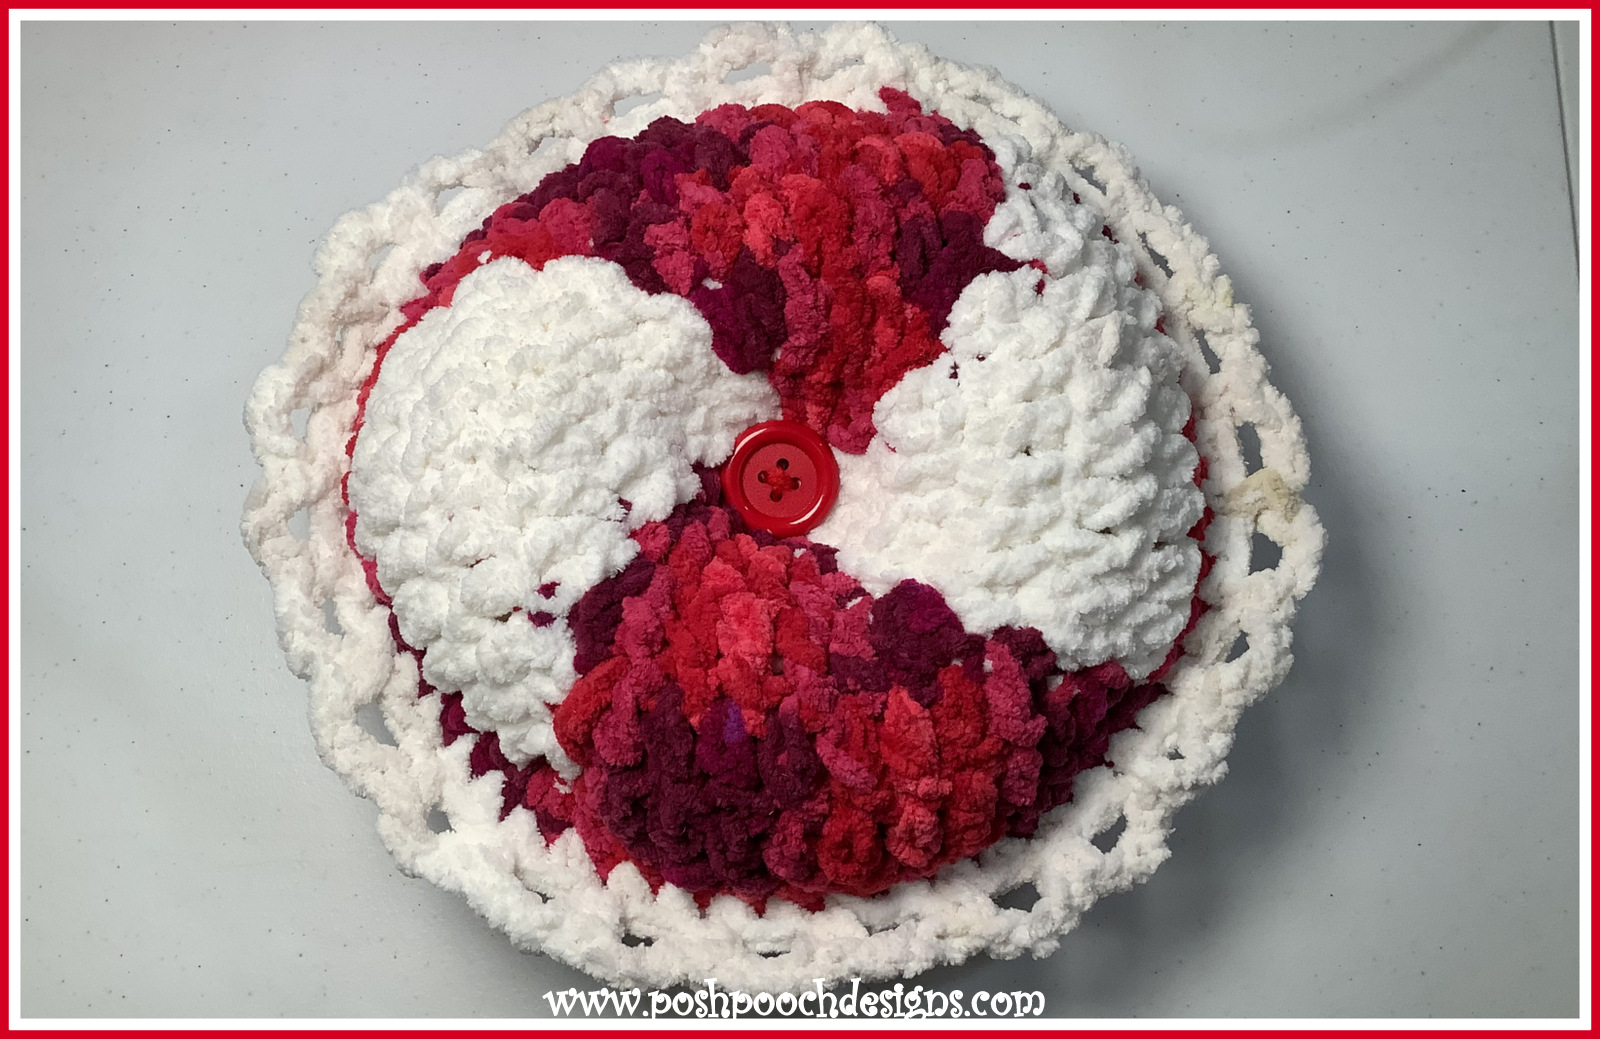
Fuzzy Peppermint Pillow Crochet Pattern By Sara Sach

FRIDAY FUN DAY!
 Fuzzy Peppermint Pillow 
Crochet Pattern 
By Sara Sach of Posh Pooch Designs

The Fuzzy Peppermint Pillow is the perfect
 Project for A Sweet And Festive
Friday Funday!

It is designed using Bernat super bulky (6) weight 
blanket yarn, so it stitches up super quick. And,
It only uses a few ounces of yarn
You can make it in just a couple of hours. 


It Measure 12 X 12 inches and it's a nice addition
 to your Christmas and Holiday decorations.
It is also so soft and squishy, that everyone will
 want one. 

You do not have to make it in traditional Christmas
 Colors, just use your imagination and look through
 your yarn stash and see what fun color combinations
 you can come up with.


I just know you will enjoy stitching up some of these.
I know I did. They are so fun to make, decorate with
 and give to others.


See The Video on My Crochet Youtube
Channel At This LINK


Fuzzy Peppermint Pillow Crochet Pattern

Please Add This Crochet Pattern To Your Ravelry Favorites
 
Skill: Easy
 
Materials:
Crochet Hook – N / 9 mm.
Yarn- Super Bulky (6) Bernat Blanket Yarn –
          C1- Red – Cranberry Variegated- 4 oz.
          C2- Wispy Whites – 4 oz.
Yarn Needle
Stuffing - Polyfiberfil- 10 -12 oz.
2 Buttons- 1 – 1.5 inches
 
Stitches:
Chain (ch)
Slip Stitches (slst)
Single Crochet (sc)
Double Crochet (dc)
Change to (chgto)
Shell Stitch (shst) 3 dc in the same sc
 
Size - 12 inches
 
Notes:
Ch3 Counts as a dc
When Changing colors do not cut your yarn,
           Carry it across the back of the circle.

How To Change Colors:


 A.-You will change Colors every 4th dc
yo, pull through the 1st 2 loops,

Yo with C2 and pull through the 2 loops 

This gives you a neat and tidy color change.


Pattern:

R: 1 - With C1, Ch 5, join in a circle, ch3, 3 dc in the circle,
Chgto C2, leave c1 attached, 4 dc,
Chgto C1, leave c1 attached, 4 dc,
Chgto C2, leave c2 attached, 4 dc,
Join to the ch3, slst in the next dc,
(8 C1 dc, 8 C2 dc = 16 dc)
 
When Changing colors leave yarn attached,
Carry across the back of the circle.

 
R: 2- Chgto to C1, slst in the next dc,
2 dc in this dc, 1 dc in the next 2 dc, 2 dc in the next dc,
Chgto C2, 2 dc in the next dc, 1 dc in the next 2 dc, 2 dc in the next dc,
Chgto C1, 2 dc in this dc, 1 dc in the next 2 dc, 2 dc in the next dc,
Chgto C2, 2 dc in this dc, 1 dc in the next 2 dc, 2 dc in the next dc,
Join to the ch3, slst in the next dc,
(12 C1, 12 C2 = 24 dc)


R: 3 - Chgto to C1, slst in the next dc,
2 dc in this dc, 1 dc in the next 4 dc, 2 dc in the next dc,
Chgto C2, 2 dc in the next dc, 1 dc in the next 4 dc, 2 dc in the next dc,
Chgto C1, 2 dc in this dc, 1 dc in the next 4 dc, 2 dc in the next dc,
Chgto C2, 2 dc in this dc, 1 dc in the next 4 dc, 2 dc in the next dc,
Join to the ch3, slst in the next dc,
(16 C1, 16 C2 = 32 dc)


R: 4 - Chgto to C1, slst in the next dc,
2 dc in this dc, 1 dc in the next 6 dc, 2 dc in the next dc,
Chgto C2, 2 dc in the next dc, 1 dc in the next 6 dc, 2 dc in the next dc,
Chgto C1, 2 dc in this dc, 1 dc in the next 6 dc, 2 dc in the next dc,
Chgto C2, 2 dc in this dc, 1 dc in the next 6 dc, 2 dc in the next dc,
Join to the ch3, slst in the next dc,
(20 C1, 20 C2 = 40 dc)


R: 5 - Chgto to C1, slst in the next dc,
2 dc in this dc, 1 dc in the next 8 dc, 2 dc in the next dc,
Chgto C2, 2 dc in the next dc, 1 dc in the next 8 dc, 2 dc in the next dc,
Chgto C1, 2 dc in this dc, 1 dc in the next 8 dc, 2 dc in the next dc,
Chgto C2, 2 dc in this dc, 1 dc in the next 8 dc, 2 dc in the next dc,
Join to the ch3, slst in the next dc,
(24 C1, 24 C2 = 48 dc)


R: 6 – Tie off C2, With C1,
*2 sc in the 1st dc, 1 sc in the next 10 sc, 2 sc in the next sc*
Repeat from * to * 3 more times,
Join to the sc with a slst, tie off weave in the ends.


Repeat R: 1- R: 6 For A Front and back


Place the 2 circles together, right sides out,
Chgto C2, Sc them together, leaving a opening for stuffing.
Stuff and sc closed the hole, join to the 1st sc


Trim - *ch3, sk 1 sc, sc in the next sc*
Repeat around pillow, join to the 1st sc, tie off, weave in the ends.

Buttons:
Attach a button  to center of the pillow, on both sides.


An Ad Free PDF file is Available
 In My Ravelry Shop A This LINK
 For $4.50


Friday, October 27, 2023

FRIDAY FUN DAY! - The Spider Pillow Crochet Pattern | Posh Pooch Designs

 FRIDAY FUN DAY!
The Spider Pillow Crochet Pattern
 By Sara Sach Of  Posh Pooch Designs


Silly, Cute, Sweet, Squishy, 
Not Scary Spider Pillow


It's Friday Fun Day and I have super fun
 project for you all.
This Spider Pillow 

It's Designed using Bernat Blanket yarn, 
called Tie dye-ish in the lavender Colorway.
 The Yarn makes it is also super Squishy, soft and
 the colorway makes it so cute. 
I Never knew a spider could be so soft and cute!


I do not like spiders at all, but I love this one.
Those big eyes make it look a little silly, and
not scary at all. 
This Sweet Spider likes squishy hugs from everyone.
the kids to adults will love this Spider!

See The Video On My Crochet Youtube
 Channel At This LINK


The Spider Pillow Crochet Pattern

Please Add This Crochet Pattern To Your Ravelry Favorites

Skill: Easy

Materials:
Crochet hook – L / 8.00mm
Yarn  - Bulky (6) Blanket Yarn / Bernat Blanket /
                       Tie dye- ish / lavender 6 oz. / 120 yds.
Large Safety Eyes – (2) 24mm.
Stuffing – Poly fiberfill
Large yarn needle
 
Stitches:
Chain (ch)
Slip Stitch (slst)
Single Crochet (sc)
 Double Crochet (dc)
Skip (sk)
Space (sp)
Shell Stich (shst) 6 dc in the same st
 
Size: 14 X 11 Inches not including the legs
 
Notes:
Ch3 counts as a dc
Ch1 does not count as a st
 
Pattern: Spider Body, Make 2
 
R: 1 – Ch 5, join in a circle, ch3, 9 dc in the circle,
Join to the ch3 with a slst, ch 3 (10 dc)


R: 2 – Dc in the same st as the ch3, 2 dc in each dc around,
Join to the ch3 with a slst, ch 3 (20 dc)


R: 3 - Dc in the same st as the ch3, 2 dc in each dc around,
Join to the ch3 with a slst, ch 3 (40 dc)


R: 4 – 1 dc in the next 2 dc,
*2 dc in the next dc, 1 dc in the next 3 dc*
Repeat From * to * around,
 Join to the ch3 with a slst, Ch3 (50 dc)


R: 5 - 1 dc in the next 3 dc,
*2 dc in the next dc, 1 dc in the next 4 dc*
Repeat From * to * around,
 Join to the ch3 with a slst, turn, Ch1 (60 dc)


R: 6 – Spider head - sc in the next dc, sk 2 dc,
Shst in the next dc,
Sk 2 dc, sc in the next dc, turn, ch 1 (2sc, 1 shst)


R: 7 – Sc in the sc, sc in the next dc,
2 dc in the next 4 dc, 1 sc in the next dc,
Sc in the next sc, turn, ch 1 (2sc, 8 dc, 2 sc)


R: 8 – 1 sc in the next 2 sc, 1 dc in next 2 dc,
2 dc in the next 4 dc, 1 dc in the 2 dc, 1 sc in the next 2 sc,
slst in the next st, tie off and weave in your ends.
(2sc, 12 dc, 2sc)


Repeat R: 1- R: 9 - Front And Back of the spider


Place The Googly / Safety eyes on the head at this time.


R: 9 – Place the Front and Back together, right sides out,
Join yarn to bottom right side of the spider and
 sc evenly around the spider,
Stitching them together.
Leave a 4 inch opening at the bottom for stuffing,
 
Stuff The Spider body and sc the opening closed,
 tie off and weave in the ends.


Legs:
Count down 5 from the head of the spider on the left side.
*Ch 13, sc in the 2nd ch from the hook, sc in each ch,
Join to the same sc, slst in the next 2 sc*
Repeat From * to * 3 more times, join and tie off. (4 legs)


Repeat on The other side of the Spider.


An AD Free PDF file is Available 
in My Ravelry Shop At This LINK
For $4.50

See, it's A Sweet, Fun, Silly 
Not So Scary Spider.


Friday, April 29, 2022

Flower Double Sided Scrubby Crochet Pattern | Posh Pooch Designs

 Flower Double Sided Scrubby 
Crochet Pattern 
By Sara Sach of Posh Pooch Designs


The Flower Double Sided Scrubby is the best pot
 and pan Scrubby ever.
 It's super scrubby on one side and basic scrubby on
 the other. So It will meet the need, even those
 super sticky and crusty issues. Life is too short to
 spend it scrubbing on yucky pans!


These are a great way to use up some yarns and make
 something you can actually use. Add some to a house
 warming, wedding or birthday gift.

See The Video On My Crochet Youtube
 Channel At This LINK


Flower Double Sided Scrubby Crochet Pattern

Add This Crochet Pattern To Your Raverly Favorites
 
Skill: Easy
 
Materials:
Crochet hook – H / 5.00 mm
Yarn- Scrub Off yarn 2 oz.
          (Bernate Handicrafter/ Scrub off/ Celery Sky)
Yarn Needle
 
Stitches:
Chain (ch)
Slip Stitch (slst)
Single Crochet (sc)
Double Crochet (dc)
Triple Crochet (tr)
Skip (sk)
Shell Stitch (shst) 3 dc in the same st
 
Size: 5.5 inches across
 
Notes:
Ch1 Does not count as a st

Pattern:
 
R: 1 – Ch 5, ch1, 10 sc in the circle, join to the 1st sc with a slst, ch1
(10 sc)


R: 2 – Sc, Tr in each sc around, join to the 1st sc with a slst, ch1
(10 sc, 10 tr)


R: 3 -1 sc in the 1st, 2 sc in the next st,
*sc in the next st, 2 sc in the next st*
Repeat From * to * around, join to the 1st sc with a slst, ch1
(30 sc)


R: 4 – 1 sc in the 1st sc, sc, tr in the next sc,
*1 sc in the next sc, sc, tr in the next sc*
Repeat from * to * around, join to the 1st sc with a slst, ch1
(30 sc, 15 tr)

 
R: 5 – 1 sc in each st around, join to the 1st sc with a slst, ch1
(45sc) Tie off and weave in your ends.


Repeat R: 1 – R: 5 – 1 more time to make 2 circles.
Do not tie off the second one.
 
 
R: 6 – Place the 2 circles together, right sides out,
Sc in the 1st st, going through both circles,
*sk the next sc, shst in the next st, sk st the next sc, sc in the next sc*
Repeat from * to * around 7 more times,
 

Only stitching through the front scrubby circle,
Repeat From * to * 3 more times, join to the 1st sc,
 Tie off weave in your ends.
(12 sc, 11 shsts)


An Ad Free PDF file is Available
In My Ravelry Shop At This LINK
For $3.50