Showing posts with label Christmas. Show all posts

Monday, December 23, 2024

Christmas Mug Cozy Crochet Pattern By Sara Sach

  Christmas Mug Cozy 
Crochet Pattern 
By Sara Sach Of Posh Pooch Designs


Do You Need a last Minute
 Christmas Gift?
 I Good ya covered, or
 at least your mug covered

The Christmas Mug Cozy is a great last minute gift. 
You can stitch it up super fast from your scrap yarns.
Use old or regular mugs, and cover them up with the Christmas cozy to make them fun and festive.
Add buttons, gems, and appliques to personalize them.


If you are having a Christmas get together or party, 
make some up ahead of time and let everyone choose
 which one they want to use, and let them take it home.


They are great to have around for unexpected guests
 and visitors, filled with candy or sweet treats,
and send them home with lovely surprise.


See The Video On My Crochet Youtube 
Channel At This LINK


Christmas Mug Cozy Crochet Pattern

Please Add This Crochet Pattern To Your Ravelry Favorites
 
Skill: Easy
 
Materials:
Crochet Hook – H / 5 mm
Yarn- Medium (4) Acrylic – I Love This yarn Metallic 1 oz.–
                          C1- Red, C2- White, C3- Green
Yarn needle
Average size Coffee mug

Stitches:
Chain (ch)
Slip Stitch (slst)
Single Crochet (sc)
Back Loop Only (BLO)
Change to (chgto)
 
Size: 4 X 10 inches
 
Notes:
Ch1 Does not Count as a st
When Changing colors, keep yarn attach and carry your yarn
 
Pattern:
 
R: 1 – With C1, Ch 13, sc in the 2nd ch from the hook,
Sc in each ch across, turn, ch1 (12 sc)


Measure how tall your mug, you can add or subtract
 chs to adjust the height of your mug.
 
R: 2 – BLO, 1 sc in each sc across, turn (BLO 12 sc)


R: 3- Chgto to C2, ch1, BLO 1 sc in each sc across, turn, ch 1(BLO 12 sc)


R: 4 - BLO, 1 sc in each sc across, turn (BLO 12 sc)


R: 5 - Chgto to C1, ch1, BLO 1 sc in each sc across, turn, ch 1(BLO 12 sc)
 
R: 6 - BLO, 1 sc in each sc across, turn (BLO 12 sc)

 
R: 7 – R: 34 – Repeat R: 6
Alternating colors every 2 rows


Measure the cup and make sure the cozy fits.
You may need to add more rows or subtract some rows.


R: 35 – Tie off C2, 1 sc in each sc across, turn,
sc in the 1st sc, ch 12,
Join yarn to the other side of the cozy to form a loop,


sc evenly across the side of the cozy, 
turn to work across the other edge, sc in the 1st st, ch12,
Join to the other side of the cozy, tie off and weave in securely.


Little Christmas Wreath Applique –
 
With green yarn, ch 4, join in a circle,
8 sc in the circle, join to the 1st sc with a slst,
*Ch 3, slst in the next sc*
Repeat from * to * 7 more times, join to the 1st sc, tie off,
Leave a 10 in tail of yarn for sewing cozy.
 
Little Bow – Cut a 8 inch piece of yarn.
Wrap yarn around 2 finger about 6 times.
Tie the center of the loops with the tail of yarn.
Place on the wreath and tie in place.
 
Attach to the cozy with the tail of yarn and needle.
 
You can add Christmas Buttons and decorations if desired.


An Ad Free PDF file is Available
In My Ravelry Shop At This LINK
For $2.50


Wednesday, December 18, 2024

Christmas Country Stripe Hot Pad And Pot Holder Crochet Pattern By Sara Sach

 Christmas Country Stripe 
Hot Pad And Pot Holder 
Crochet Pattern 
By Sara Sach Of Posh Pooch Designs


The Christmas Country Stripe Hot Pad And Pot Holder
 is a quick and easy Crochet pattern. I really enjoyed
 stitching up this pattern and love the texture it has.
It is doubled for extra thickness, so you will not burn 
your hands or counter surface.
 

I designed it using the Sugar And Cream Medium (4) 
weight cotton yarn with the Holiday Stripes Color. 
It is a long striping yarn with muted colors of green,
 red and cream. I love how the muted colors give it a
 country feel. I have used it to design these other 
country style crochet patterns.

Country Star Ornament 
Country Tree ornament
Country Dress Pot Holder
 Country Heart Ornament
Country Bell Ornament 
Country Round Doily 

You can Find these Country Style 
Crochet Patterns At This LINK

I love these Christmas Country Style Crochet Patterns, 
but had not designed a basic pot holder/ hot pad.
I decided it was time to make one and I really love
 how it worked up.


It can be stitched up in any colors you like, it does not
 have to be Christmas or country. Make some to match
 your kitchen, or some one else's kitchen as a gift. 
They will love them.


See The Video On My Crochet Youutbe
 Channel At This LINK


Christmas Country Stripe Hot Pad And Pot Holder Crochet Pattern

Please Add This Crochet Pattern To Your Ravelry Favorites

Skill: Easy
 
Materials:
Crochet hook - H / 5 mm.
Yarn - Med (4) Cotton – 4 oz / Sugar And Cream/Holiday Stripe
Yarn Needle
Decorative Button
 
Stitches:
Chain (ch)
Single Crochet (sc)
Slip Stitch (slst)
Double Crochet (dc)
Triple Front Triple (FPTR)
 
Size: 9 X 9 Inches
 
Notes:
Ch1 Does not Count as a st
Ch3 Counts as a dc
 
Pattern:
Make 2 Squares For A Front And A Back
 
R: 1 – Ch 24, dc in the 4th ch from the hook,
Dc in each ch across, turn, ch 3 (22 dc)


R: 2 - 1 sc in each st across, turn, ch 3 (22sc)


R: 3 – 1 dc in the next sc,
*FPTR in the next 2 dc below the previous row, 1 dc in the next 2 sc*
Repeat from * to * 4 more times, turn, ch 1 (10 FRTR), 12 dc)


R: 4 – 1 sc in each st across, turn, ch 3 (22sc)


R: 5 – Dc in the next 3 sc,
*FPTR in the next 2 dc below the previous row, 1 dc in the next 2 sc*
Repeat from * to * across 3 more times,
1 dc in the last 2 dc, turn, ch 1 (8 FPTR, 14 dc)


R: 6 – 1 sc in each st across, turn, ch 2 (22 sc)


 R: 7 – R: 18 – Repeat R: 3 – R: 6
For 4 More Times
Tie off Weave in the Ends


Repeat R: 1 – R: 18, leave yarn attached on 2nd Square


R: 19 - Trim:
Place the 2 Squares together, right sides out.
Sc around all 4 sides of the squares, stitching them together,
Place a sc, ch1, sc in the 4 corners,
Join to the 1st sc with a slst,


R: 20 -Sc in the next 3 sc, *ch2, slst in the same sc, sc next 3 sc*
Repeat from * to * around the hot pad,
Join to the 1st slst with a  slst, 
ch12, 12 sc around the ch12 loop, join to the 1st sc,
tie off, weave in the ends.


Add a decorative button if desired.


AN AD Free PDF file is Available
In My Ravelry Shop At This LINK
For $3.50


Wednesday, December 11, 2024

Christmas Triangle Scarf Crochet Pattern By Sara Sach

Christmas Triangle Scarf 
Crochet Pattern
By Sara Sach Of Posh Pooch Designs


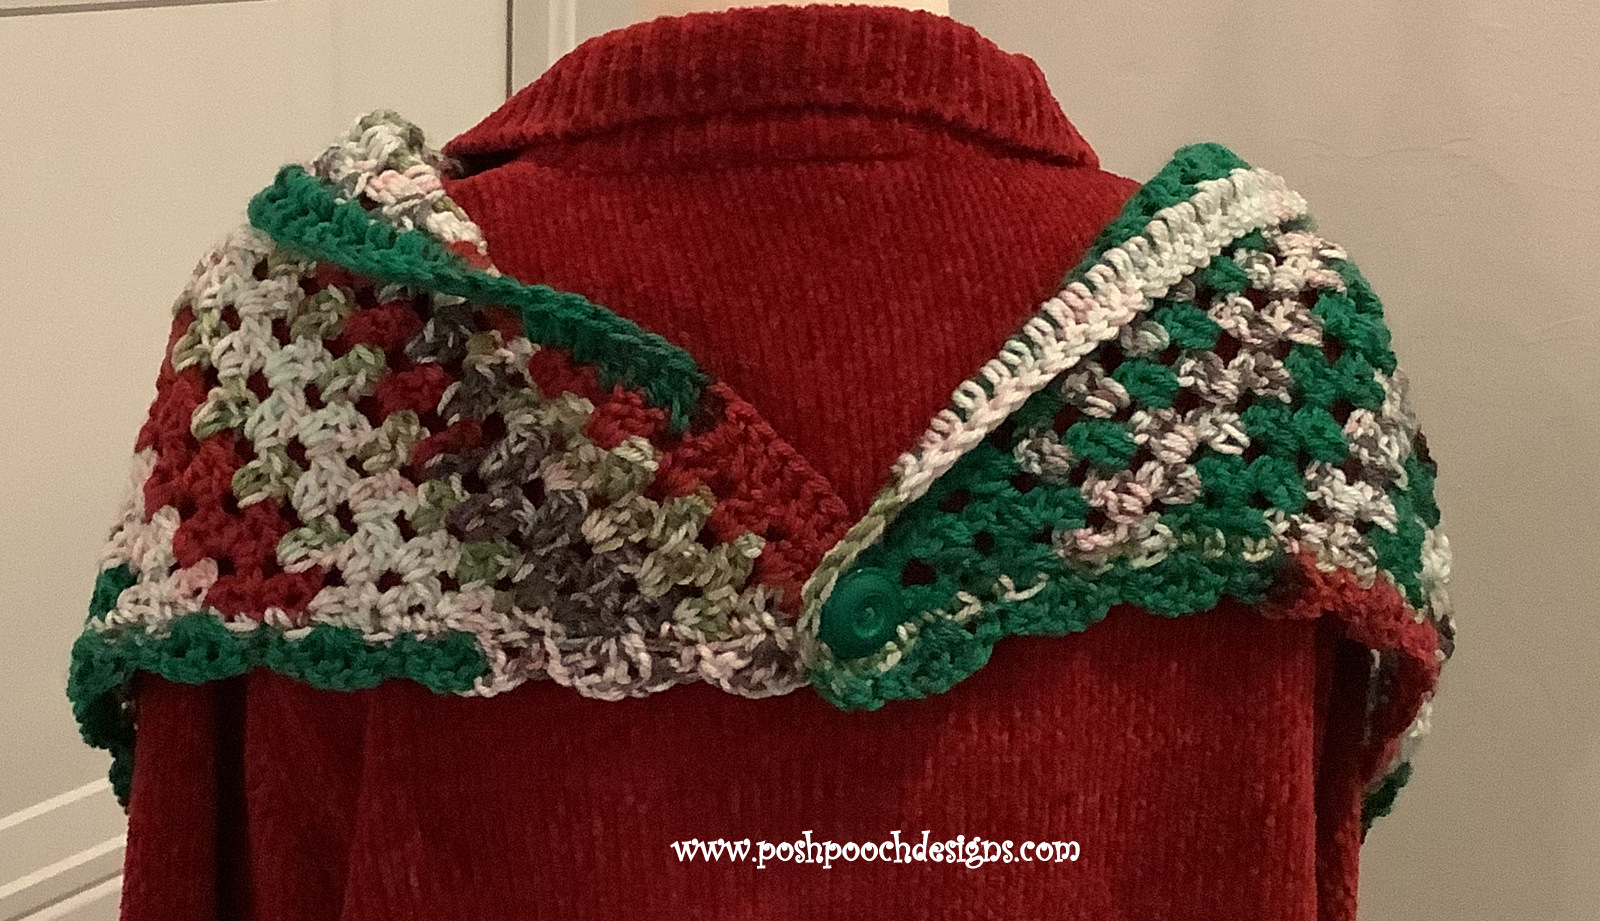
The Christmas Triangle Scarf is quick and easy
 Crochet Pattern, especially if you need a last minute gift.
 It is a bottom up pattern, which means it is stitched
 from the bottom point of the scarf and 
And worked up in simple granny style rows.

If you work the pattern as written is will measure
 about 56 inches wide and 32 inches in length.
If you would like a longer and wider scarf keep repeating
 the rows until it is the size you need.


I designed the Triangle Scarf using Michael's 
Craftsmart Yarn in the color of Ivy And Cranberries.
It is a medium (4) weight yarn and  has deeper
 and richer colors than the typical
 Christmas colors with brown shades mixed in. 
I think it is perfect for a winter scarf.


It can be stitched up in any colors of your
 choosing. It is beautiful and comfortable to ware
with any out fit, Sweaters, dresses and even spots wear.
Make one to match your favorite winter coast and you 
will be stylish and warm all winter long.


See The Video On My Crochet Youtube
 Channel At This LINK


Christmas Triangle Scarf Crochet Pattern

Please Add This Crochet Pattern To Your Ravelry Favorites
 
Skill: Easy
 
Materials:
Crochet hook – H / 5 mm.
Yarn – Med (4) Acrylic – 8 oz. / 400 yds.
            Craft Smart / Value Jacquard/ Ivy And Cranberries
1 Button – 1.5 inches
Yarn needle
 
Stitches:
Chain (ch)
Slip Stitch (slst)
Single Crochet (sc)
Double Crochet (dc)
Space (sp)
Skip (sk)
Open Shell Stitch (shst) dc, ch1, dc, ch1, dc in the same st
 
Size: 56 W. X 32 L.
 
Notes:
Ch1 Does Not Count as a st.
Ch 3 Counts as a dc
 
Pattern:
 
R: 1 – Ch 4, 4 dc in the 4th ch from the hook,
Turn, ch 3 (5 dc)


R: 2 – Dc in the same st as the ch3, ch1, sk the next dc,
2 dc in the next dc, ch1, sk the next dc,
2 dc in the last dc, turn, ch 3
(3 sets of 2 dc, 2 ch1 sp)


R: 3 - Dc in the same st as the ch3, ch1,
2 dc in the next ch1 sp, ch1,
2 dc in the last dc, turn, ch 3
(4 sets of 2 dc, 3 ch1 sp)


R: 4 - Dc in the same st as the ch3, ch1,
*2 dc in the next ch1 sp, ch1,*
Repeat from * to * 2 more times,
2 dc in the last dc, turn, ch 3
(5 sets of 2 dc, 4 ch1 sp)


R: 5 - Dc in the same st as the ch3, ch1,
*2 dc in the next ch1 sp, ch1,*
Repeat from * to * 3 more times,
2 dc in the last dc, turn, ch 3
(6 sets of 2 dc, 5 ch1 sp)
 
R: 6 - Dc in the same st as the ch3, ch1,
*2 dc in the next ch1 sp, ch1,*
Repeat from * to * 4 more times,
2 dc in the last dc, turn, ch 3
(7 sets of 2 dc, 6 ch1 sp)


R: 7 - Dc in the same st as the ch3, ch1,
*2 dc in the next ch1 sp, ch1,*
Repeat from * to * 5 more times,
2 dc in the last dc, turn, ch 3
(8 sets of 2 dc, 7 ch1 sp)
 
R: 8 - Dc in the same st as the ch3, ch1,
*2 dc in the next ch1 sp, ch1,*
Repeat from * to * 6 more times,
2 dc in the last dc, turn, ch 3
(9 sets of 2 dc, 8 ch1 sp)


R: 9 – R: 47 - Repeat R: 8, increasing every row.


R: 48 - Dc in each dc and ch1 sp across,
Do Not Increase On This Row


Turn working down the side of the scarf,
Evenly sc to the bottom point of the scarf,
Sc, ch1, sc in the point,
Evenly sc up the side of the scarf, join to the dc with a slst, ch1
 
R: 49 – Turn, working back down the side of the scarf,
*sc, ch1, sk 1 sc, shst in the next sc, ch1, sk 1 sc,*
Repeat from * to * down to the point, and back up the other side,
Join to the dc, tie off and weave in the ends.


Sew a Button On The top Corner of the Scarf


AN Ad Free PDF file Is Available
In My Ravelry Shop A This LINK
For $4.50


Friday, December 6, 2024

Fuzzy Peppermint Pillow Crochet Pattern By Sara Sach

FRIDAY FUN DAY!
 Fuzzy Peppermint Pillow 
Crochet Pattern 
By Sara Sach of Posh Pooch Designs

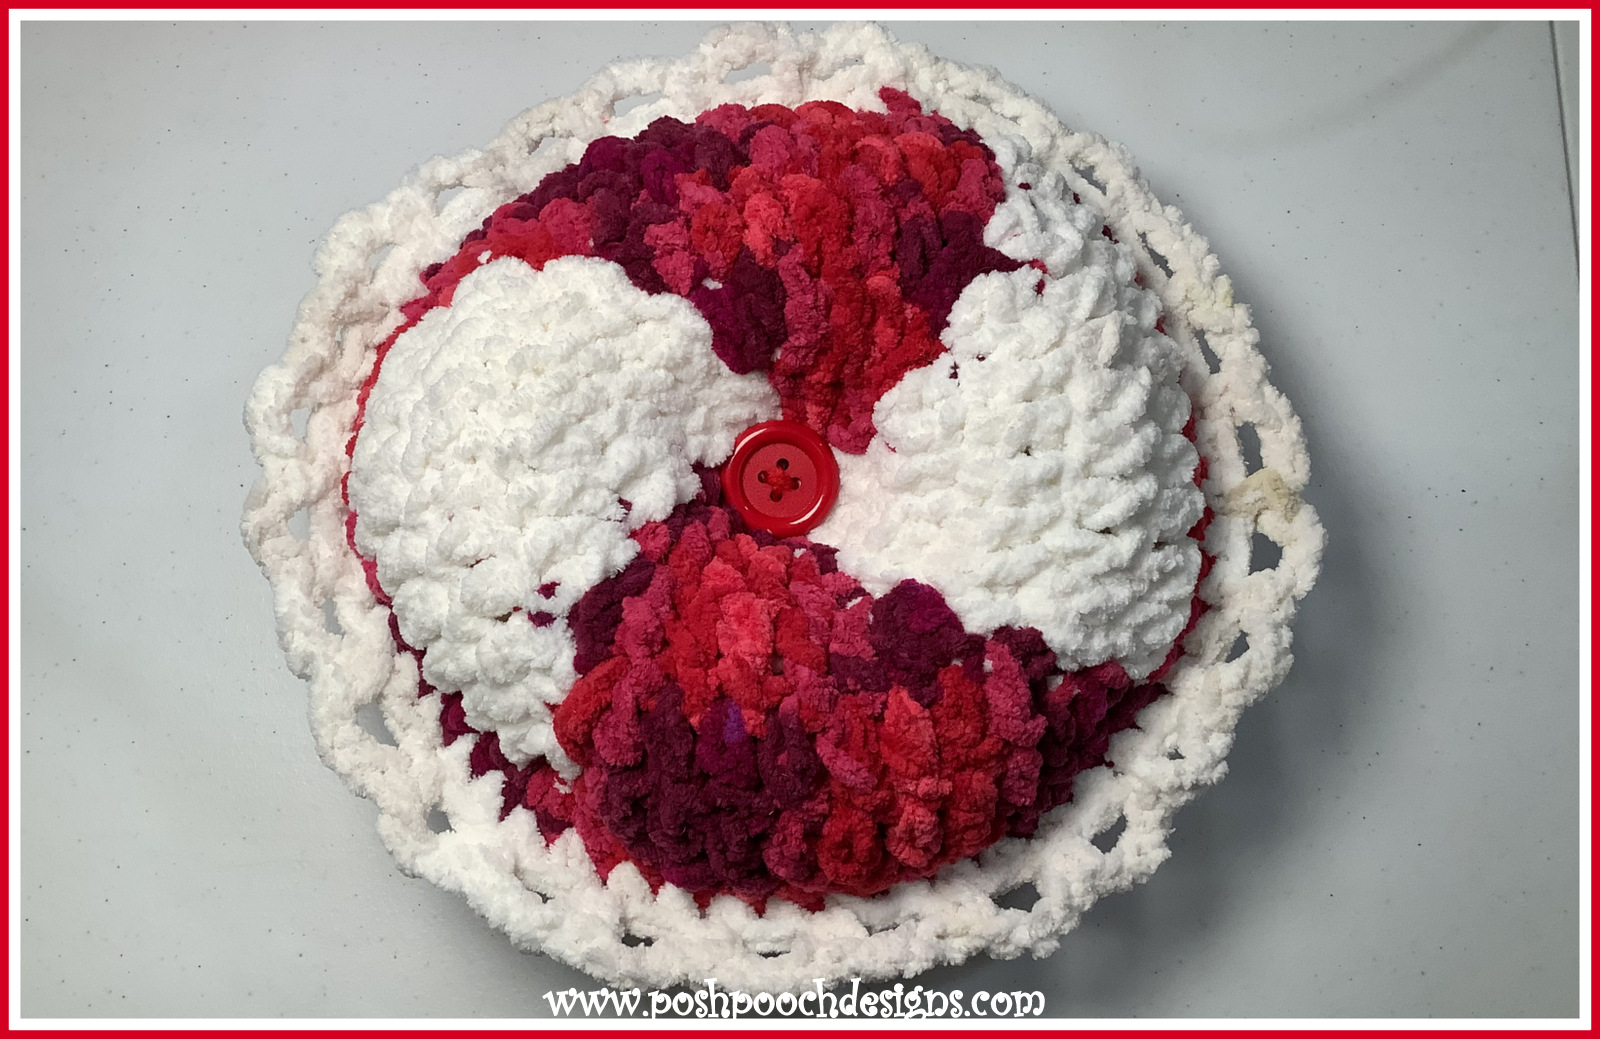
The Fuzzy Peppermint Pillow is the perfect
 Project for A Sweet And Festive
Friday Funday!

It is designed using Bernat super bulky (6) weight 
blanket yarn, so it stitches up super quick. And,
It only uses a few ounces of yarn
You can make it in just a couple of hours. 


It Measure 12 X 12 inches and it's a nice addition
 to your Christmas and Holiday decorations.
It is also so soft and squishy, that everyone will
 want one. 

You do not have to make it in traditional Christmas
 Colors, just use your imagination and look through
 your yarn stash and see what fun color combinations
 you can come up with.


I just know you will enjoy stitching up some of these.
I know I did. They are so fun to make, decorate with
 and give to others.


See The Video on My Crochet Youtube
Channel At This LINK


Fuzzy Peppermint Pillow Crochet Pattern

Please Add This Crochet Pattern To Your Ravelry Favorites
 
Skill: Easy
 
Materials:
Crochet Hook – N / 9 mm.
Yarn- Super Bulky (6) Bernat Blanket Yarn –
          C1- Red – Cranberry Variegated- 4 oz.
          C2- Wispy Whites – 4 oz.
Yarn Needle
Stuffing - Polyfiberfil- 10 -12 oz.
2 Buttons- 1 – 1.5 inches
 
Stitches:
Chain (ch)
Slip Stitches (slst)
Single Crochet (sc)
Double Crochet (dc)
Change to (chgto)
Shell Stitch (shst) 3 dc in the same sc
 
Size - 12 inches
 
Notes:
Ch3 Counts as a dc
When Changing colors do not cut your yarn,
           Carry it across the back of the circle.

How To Change Colors:


 A.-You will change Colors every 4th dc
yo, pull through the 1st 2 loops,

Yo with C2 and pull through the 2 loops 

This gives you a neat and tidy color change.


Pattern:

R: 1 - With C1, Ch 5, join in a circle, ch3, 3 dc in the circle,
Chgto C2, leave c1 attached, 4 dc,
Chgto C1, leave c1 attached, 4 dc,
Chgto C2, leave c2 attached, 4 dc,
Join to the ch3, slst in the next dc,
(8 C1 dc, 8 C2 dc = 16 dc)
 
When Changing colors leave yarn attached,
Carry across the back of the circle.

 
R: 2- Chgto to C1, slst in the next dc,
2 dc in this dc, 1 dc in the next 2 dc, 2 dc in the next dc,
Chgto C2, 2 dc in the next dc, 1 dc in the next 2 dc, 2 dc in the next dc,
Chgto C1, 2 dc in this dc, 1 dc in the next 2 dc, 2 dc in the next dc,
Chgto C2, 2 dc in this dc, 1 dc in the next 2 dc, 2 dc in the next dc,
Join to the ch3, slst in the next dc,
(12 C1, 12 C2 = 24 dc)


R: 3 - Chgto to C1, slst in the next dc,
2 dc in this dc, 1 dc in the next 4 dc, 2 dc in the next dc,
Chgto C2, 2 dc in the next dc, 1 dc in the next 4 dc, 2 dc in the next dc,
Chgto C1, 2 dc in this dc, 1 dc in the next 4 dc, 2 dc in the next dc,
Chgto C2, 2 dc in this dc, 1 dc in the next 4 dc, 2 dc in the next dc,
Join to the ch3, slst in the next dc,
(16 C1, 16 C2 = 32 dc)


R: 4 - Chgto to C1, slst in the next dc,
2 dc in this dc, 1 dc in the next 6 dc, 2 dc in the next dc,
Chgto C2, 2 dc in the next dc, 1 dc in the next 6 dc, 2 dc in the next dc,
Chgto C1, 2 dc in this dc, 1 dc in the next 6 dc, 2 dc in the next dc,
Chgto C2, 2 dc in this dc, 1 dc in the next 6 dc, 2 dc in the next dc,
Join to the ch3, slst in the next dc,
(20 C1, 20 C2 = 40 dc)


R: 5 - Chgto to C1, slst in the next dc,
2 dc in this dc, 1 dc in the next 8 dc, 2 dc in the next dc,
Chgto C2, 2 dc in the next dc, 1 dc in the next 8 dc, 2 dc in the next dc,
Chgto C1, 2 dc in this dc, 1 dc in the next 8 dc, 2 dc in the next dc,
Chgto C2, 2 dc in this dc, 1 dc in the next 8 dc, 2 dc in the next dc,
Join to the ch3, slst in the next dc,
(24 C1, 24 C2 = 48 dc)


R: 6 – Tie off C2, With C1,
*2 sc in the 1st dc, 1 sc in the next 10 sc, 2 sc in the next sc*
Repeat from * to * 3 more times,
Join to the sc with a slst, tie off weave in the ends.


Repeat R: 1- R: 6 For A Front and back


Place the 2 circles together, right sides out,
Chgto C2, Sc them together, leaving a opening for stuffing.
Stuff and sc closed the hole, join to the 1st sc


Trim - *ch3, sk 1 sc, sc in the next sc*
Repeat around pillow, join to the 1st sc, tie off, weave in the ends.

Buttons:
Attach a button  to center of the pillow, on both sides.


An Ad Free PDF file is Available
 In My Ravelry Shop A This LINK
 For $4.50