Showing posts with label peppermint. Show all posts

Friday, December 6, 2024

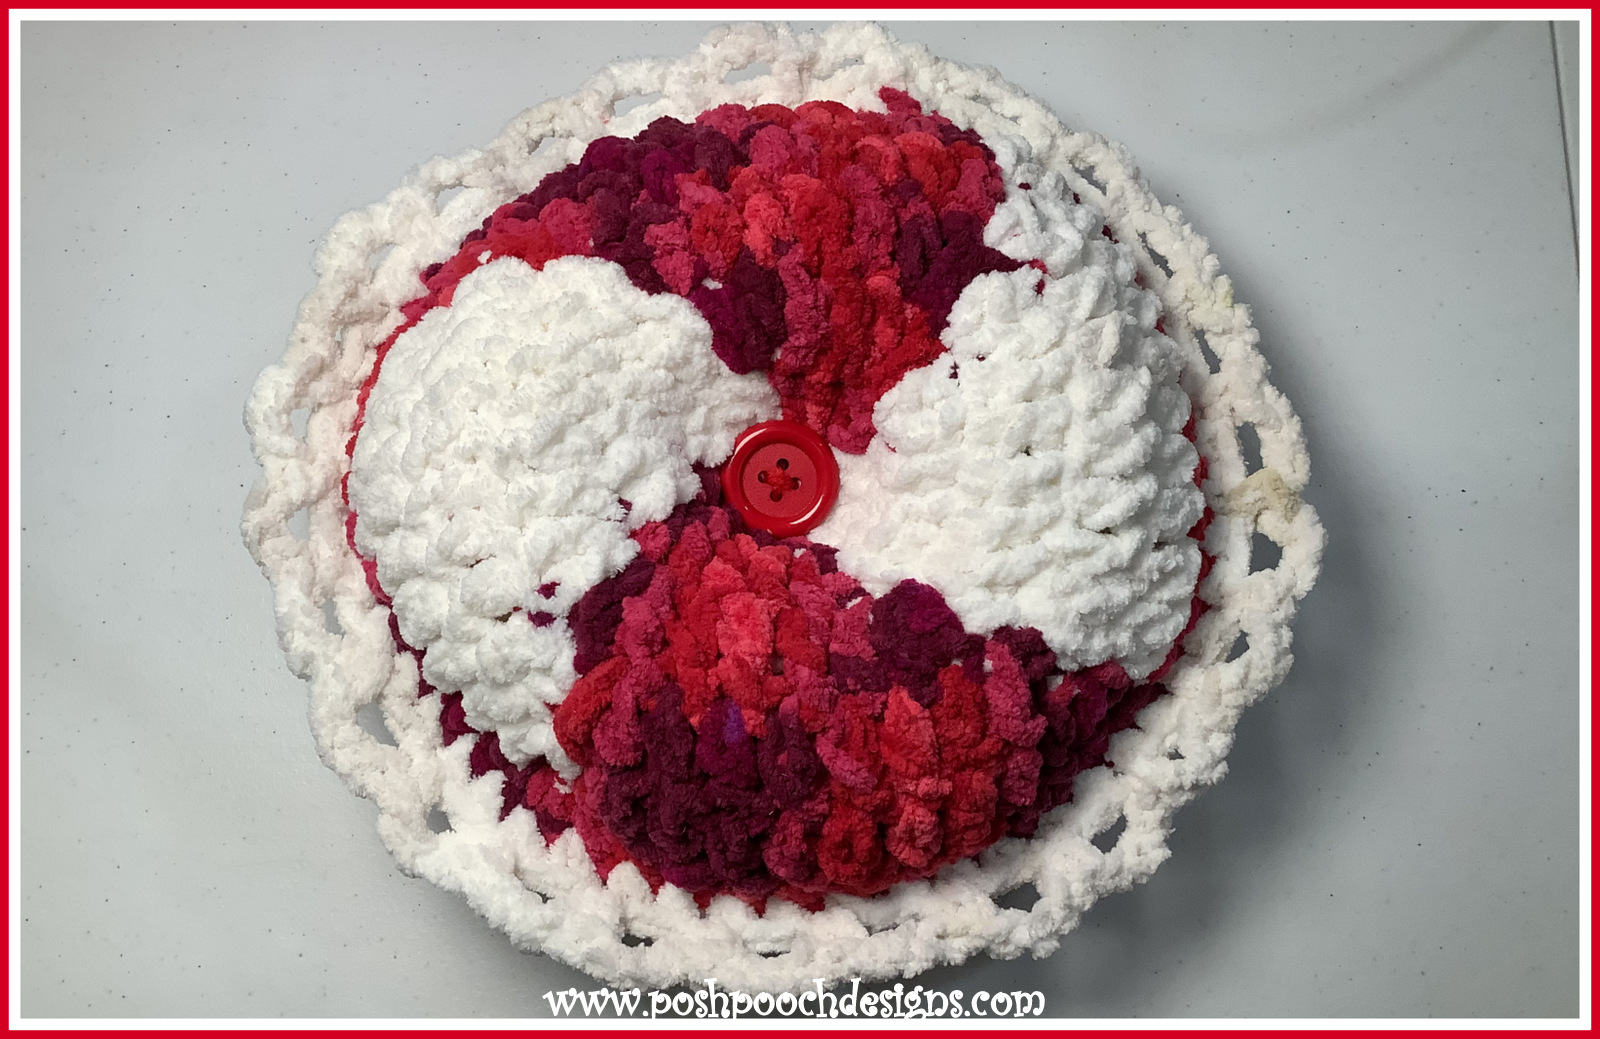
Fuzzy Peppermint Pillow Crochet Pattern By Sara Sach

FRIDAY FUN DAY!
 Fuzzy Peppermint Pillow 
Crochet Pattern 
By Sara Sach of Posh Pooch Designs

The Fuzzy Peppermint Pillow is the perfect
 Project for A Sweet And Festive
Friday Funday!

It is designed using Bernat super bulky (6) weight 
blanket yarn, so it stitches up super quick. And,
It only uses a few ounces of yarn
You can make it in just a couple of hours. 


It Measure 12 X 12 inches and it's a nice addition
 to your Christmas and Holiday decorations.
It is also so soft and squishy, that everyone will
 want one. 

You do not have to make it in traditional Christmas
 Colors, just use your imagination and look through
 your yarn stash and see what fun color combinations
 you can come up with.


I just know you will enjoy stitching up some of these.
I know I did. They are so fun to make, decorate with
 and give to others.


See The Video on My Crochet Youtube
Channel At This LINK


Fuzzy Peppermint Pillow Crochet Pattern

Please Add This Crochet Pattern To Your Ravelry Favorites
 
Skill: Easy
 
Materials:
Crochet Hook – N / 9 mm.
Yarn- Super Bulky (6) Bernat Blanket Yarn –
          C1- Red – Cranberry Variegated- 4 oz.
          C2- Wispy Whites – 4 oz.
Yarn Needle
Stuffing - Polyfiberfil- 10 -12 oz.
2 Buttons- 1 – 1.5 inches
 
Stitches:
Chain (ch)
Slip Stitches (slst)
Single Crochet (sc)
Double Crochet (dc)
Change to (chgto)
Shell Stitch (shst) 3 dc in the same sc
 
Size - 12 inches
 
Notes:
Ch3 Counts as a dc
When Changing colors do not cut your yarn,
           Carry it across the back of the circle.

How To Change Colors:


 A.-You will change Colors every 4th dc
yo, pull through the 1st 2 loops,

Yo with C2 and pull through the 2 loops 

This gives you a neat and tidy color change.


Pattern:

R: 1 - With C1, Ch 5, join in a circle, ch3, 3 dc in the circle,
Chgto C2, leave c1 attached, 4 dc,
Chgto C1, leave c1 attached, 4 dc,
Chgto C2, leave c2 attached, 4 dc,
Join to the ch3, slst in the next dc,
(8 C1 dc, 8 C2 dc = 16 dc)
 
When Changing colors leave yarn attached,
Carry across the back of the circle.

 
R: 2- Chgto to C1, slst in the next dc,
2 dc in this dc, 1 dc in the next 2 dc, 2 dc in the next dc,
Chgto C2, 2 dc in the next dc, 1 dc in the next 2 dc, 2 dc in the next dc,
Chgto C1, 2 dc in this dc, 1 dc in the next 2 dc, 2 dc in the next dc,
Chgto C2, 2 dc in this dc, 1 dc in the next 2 dc, 2 dc in the next dc,
Join to the ch3, slst in the next dc,
(12 C1, 12 C2 = 24 dc)


R: 3 - Chgto to C1, slst in the next dc,
2 dc in this dc, 1 dc in the next 4 dc, 2 dc in the next dc,
Chgto C2, 2 dc in the next dc, 1 dc in the next 4 dc, 2 dc in the next dc,
Chgto C1, 2 dc in this dc, 1 dc in the next 4 dc, 2 dc in the next dc,
Chgto C2, 2 dc in this dc, 1 dc in the next 4 dc, 2 dc in the next dc,
Join to the ch3, slst in the next dc,
(16 C1, 16 C2 = 32 dc)


R: 4 - Chgto to C1, slst in the next dc,
2 dc in this dc, 1 dc in the next 6 dc, 2 dc in the next dc,
Chgto C2, 2 dc in the next dc, 1 dc in the next 6 dc, 2 dc in the next dc,
Chgto C1, 2 dc in this dc, 1 dc in the next 6 dc, 2 dc in the next dc,
Chgto C2, 2 dc in this dc, 1 dc in the next 6 dc, 2 dc in the next dc,
Join to the ch3, slst in the next dc,
(20 C1, 20 C2 = 40 dc)


R: 5 - Chgto to C1, slst in the next dc,
2 dc in this dc, 1 dc in the next 8 dc, 2 dc in the next dc,
Chgto C2, 2 dc in the next dc, 1 dc in the next 8 dc, 2 dc in the next dc,
Chgto C1, 2 dc in this dc, 1 dc in the next 8 dc, 2 dc in the next dc,
Chgto C2, 2 dc in this dc, 1 dc in the next 8 dc, 2 dc in the next dc,
Join to the ch3, slst in the next dc,
(24 C1, 24 C2 = 48 dc)


R: 6 – Tie off C2, With C1,
*2 sc in the 1st dc, 1 sc in the next 10 sc, 2 sc in the next sc*
Repeat from * to * 3 more times,
Join to the sc with a slst, tie off weave in the ends.


Repeat R: 1- R: 6 For A Front and back


Place the 2 circles together, right sides out,
Chgto C2, Sc them together, leaving a opening for stuffing.
Stuff and sc closed the hole, join to the 1st sc


Trim - *ch3, sk 1 sc, sc in the next sc*
Repeat around pillow, join to the 1st sc, tie off, weave in the ends.

Buttons:
Attach a button  to center of the pillow, on both sides.


An Ad Free PDF file is Available
 In My Ravelry Shop A This LINK
 For $4.50


Monday, July 13, 2015

Candy Stripe Wash Cloth - Christmas In July #5 Free Crochet Pattern | Posh Pooch Designs

Christmas Candy Stripe Wash Cloth - 
By Sara Sach of Posh Pooch Designs
Christmas In July #5 
Free Crochet Pattern

This Washcloth is so Candy-lisious, you will want to make
 a bunch. Designed in a Candy Cane Stripe pattern,
 trimmed in Christmas Green.
You can use it in the bathroom or the kitchen,
 To add a touch of festive fun.
It has a loop hanger so you can hang it up.
It measure 8.5 X 8.5 so it is nice size.

We Just updated the Video, 
And you can find it on my Youtube Channel 
At This LINK


Christmas Candy Stripe Wash Cloth  Crochet Pattern 
by Sara Sach
Please add this Pattern to your Ravelry favorites.

Skill: Easy

Materials:
Crochet Hook – H
Yarn – Cotton yarn – Red C1, White C2, Green C3
           I used peaches and Cream Cotton Yarn
Yarn Needle to weave in ends.

Stitches:
Chain (ch)
Single Crochet (sc)
Double Crochet (dc)

Size : 8.5 X 8.5 inches

Note: Ch1 at ends of rows does not count s a st.
When doing color changes, Ch1 after the colors Change.

R : 1 – With C1, Ch 31, 1sc in the 2nd ch from the hook, 
1 sc in the next ch,
*1 dc in the next 2 chs, 1 sc in the next 2 chs*
 Repeat From * to * across, ch1, turn.
(30 sts)

ss dd ss  dd ss dd ss dd ss dd ss dd ss dd ss

R : 2 -*1 dc in the next 2 sts, 1 sc in the next 2 sts* 
Repeat Across row, turn
Making sure you are stitching your dc in a sc, 
and your sc in a dc.

dd ss dd ss dd ss dd ss dd ss dd ss dd ss dd

R : 3 – Change to C2, *1sc in the next 2 sts,
 1 dc in the next 2 sts*
Repeat From * to * across row, ch1, turn

ss dd ss  dd ss dd ss dd ss dd ss dd ss dd ss

R : 4 --*1 dc in the next 2 sts, 1 sc in the next 2 sts* 
Repeat Across row, turn
Making sure you are stitching your dc in a sc, 
and your sc in a dc.
dd ss dd ss dd ss dd ss dd ss dd ss dd ss dd

R : 5-6 – Change to C1, Repeat R : 3 and 4
R : 7-8 – Change to C2, Repeat R : 3 and 4
R : 9-10 – Change to C1, Repeat R : 3 and 4
R : 11-12 – Change to C2, Repeat R : 3 and 4
R : 13-14 – Change to C1, Repeat R : 3 and 4
R : 15-16 – Change to C2, Repeat R : 3 and 4
R : 17-18 – Change to C1, Repeat R : 3 and 4
R : 19-20 – Change to C2, Repeat R : 3 and 4,

R : 21- Change to C3,1 sc in each st across, 3 sc in the corner,
 *evenly crochet down the side of the of the washcloth, 
3 sc in the corner* 
Repeat From * to * on the other sides of the washcloth,
 join to 1st sc with a sl st, 
Loop hanger: Ch 12,
 join to the same st with a sl st, to form a loop.
You can make them in any colors you like!
An Ad Free PDF file is Now Available
For $3.50 in my Ravelry Shop
 At This LINK

For The Christmas In July Free Crochet Patterns
1- 4 Click this link:


You can also keep up 
By following our 
facebook page at:
or
Our Pinterest Board at:

Merry Christmas In July!
Sara

Friday, December 9, 2011

Chocolate Peppermint Popcorn YUMMY!!

I need to bring a Christmas treat or Cookie for an exchange tomorrow.
Since I moved to Colorado..I just can not bake.
So...............I am making
  Chocolate Peppermint Popcorn

Here is What I used:
1 Bag Microwave Popcorn (plain) popped
1 bag Peppermint Marshmellows
6 Blocks of Melting Chocolate
2 Blocks of white melting Chocolate
Red and White Sprinkles ( do not use the sugar kind, it's too grainy)
Several Candy canes Crushed
Wax paper
 2 cookie Sheets
25 Christmas Sandwich Bags.

1. Lay out the wax paper in the Cookie Sheets.
2. Melt 2 blocks of the Cho. and drizzle across the wax paper.
3. Spread the popped popcorn across the Drizzzled cookie Sheets.
4. Sprinkle the marshmellows across the pop corn.
5. Melt the rest of the Choc. and drizzile across them again.
6. Sprinklle with the Crushed peppermint and the sprinkles.
7. Melt the white Choc. and Drizzle that also Across them.
8. Flip the mixture around gently, lightly coating the popcorn and the marshmellows.

9. Leave them To Dry about a hour, then divide into individual portions
putting them in the ssandwich bags.

Makes 25 individual bags, plus some left over for you to try.

Merry Christmas!


Thursday, November 17, 2011

Peppermint Christmas Dog collar Crochet Pattern

Peppermint Dog or Pet Collar Crochet Pattern
 By Sara Sach of Posh Pooch Designs


Peppermint Dog Collar
Crochet Pattern
Add This Crochet Pattern to your Ravelry Favorites
Skill: Easy

Materials :
Hook - H / 5.00 MM
Yarn- Bulky (5 or 6) Bernat Denim- Lava Wash 
              (This is a chunky Yarn, you can also use strand
                 each of a Red and White Worsted weight yarn.)
Peppermint Button or PLASTIC decorations- 
                     I found these in the mini. Christmas Tree Section
                     at Hobby Lobby. Do Not Use real Peppermints!!!


Stitches:
Chain (ch)
Single Crochet (sc)
Double Crochet (dc)
Slip Stitch ( sl st)

First measure your dog, cat, bunny or pets neck.


Ch 27 for a 10 inch neck - 
(to make larger or smaller add chs in increments of 4.)


R: 1 Sc in the 2nd ch from the hook, *skip the next ch, 4 dc in the next ch, 
skip the next ch, 1 sc in the next ch, Repeat from * 5 more times for 6 shells,
 1 sc in the last ch, ch1


R: 2 - Working down the opposite side of the ch, 1 sc in the 1st sc,
 *skip the next ch, 4 dc in the next ch (should be in the center of the last shell) 
skip the next ch, sc in the next ch, repeat 5 more times for 6 shells, sc in the last ch.
 do not tie off.


1st Tie - Ch 25, 1 dc in the 2nd ch from the end, sl st back down the ch to the collar, 
join with a sl st and tie off.


2nd Tie - join yarn to the opposite end of the collar with a sl st, Ch 25, 
1 dc in the 2nd ch from the end, sl st back down the ch to the collar,
 join with a sl st and tie off.

I cut off the loops from the plastic peppermints. 
Then I Hot Glued one in each shell center. 
The package comes with 9 peppermints, 
so if you need to make the collar larger you have a few extra.

Keep the collar on securely so dogs are not tempted
 to bite or chew on the peppermint pieces.


Rosie is wearing the Reindeer hat. 
You can find the Pattern in my Ravelry shop

Happy Stitching!