Showing posts with label Elf. Show all posts

Friday, November 22, 2024

Gnome Christmas Ornaments Crochet Pattern By Sara Sach

 Gnome Christmas Ornaments 
Crochet Pattern 
By Sara Sach of Posh Pooch Designs


The Gnome Christmas Ornaments are
so silly and cute, they will make you giggle.
 I Just love them, and you will too.

I received so many requests for an easy Gnome
 Christmas Ornament, that I decided to design one.
 I got into my Christmas yarn and had fun. 
Although it is a super easy
 design, it is also super cute! They are sure to bring
 a smile and a giggle from all who see them.


Do They look familiar? 


Gnome For The Holidays Pillow
Crochet Pattern And Video -  LINK


I designed the Gnome Christmas Ornaments to look 
similar to the Gnome Christmas Pillows.
 I shrunk them down so we can hang them on
 our Christmas Trees.
They would also make great gift tags, or place markers. 
As well as, look adorable added to a Christmas Bunting.
There are just so many ways to decorate with The 
Christmas Gnome ornaments.


Get in your yarn stash and choose your favorite colors
 or make them for you friends and family, in their
 favorite colors. Add a button to fit there personalities.
I think this would be a fun friends and family project.


See The Video On My Crochet Youtube
 Channel At This LINK


Gnome Christmas Ornaments Crochet Pattern

Please Add This Crochet Pattern To Your Ravelry Favorites
 
Skill: Easy
 
Materials:
Crochet hook – H / 5 mm
Yarn – Med (4) Acrylic, 4 colors of Your choosing – 1 oz. of each)
                                        C1 - Body, C2 – Beard, pompom, C3 – Hat, C4 - nose)
Stuffing – Polyfiberfil- about a handful
Decorative button
Thin Ribbon – 16 inches
Optional Nose - Wooden Bead 
 
Stitches:
Chain (ch)
Slip Stitch (slst)
Single Crochet (sc)
Front Loop Only (FLO)
Change to (chgto)
Single Crochet Together (sctog) Decrease
 
Size: 7.5 X 4 Inches
 
Notes:
Ch1 Does Not Count as a st
 

How To Change Colors For The Beard


Pull up a loop,

yo with next color,
pull that loop through the 2 loop


st the next st with new color
 
Pattern:

Front Of The Gnome -
R: 1 – With C1, Ch 12, sc in the 2nd ch from the hook,
 1 sc in each ch across, turn, ch 1 (11 sc)


R: 2 - 1 sc in each ch across, turn, ch 1 (11 sc)
 
R: 3 – R: 4 – Repeat R: 2


R: 5 – Sc in the 1st 5 sc,
Chgto C2, 1 sc,
Chgto C1, 1 sc in the last 5 sc, turn, ch1 (11sc)


R: 6 - Sc in the 1st 4 sc,
Chgto C2, 3 sc,
Chgto C1, 1 sc in the last 4 sc, turn, ch1 (11sc)


R: 7 - Sc in the 1st 3 sc,
Chgto C2, 5 sc,
Chgto C1, 1 sc in the last 3 sc, turn, ch1 (11sc)
 
R: 8 - Sc in the 1st 2 sc,
Chgto C2, 7 sc,
Chgto C1, 1 sc in the last 2 sc, turn, ch1 (11sc)


R: 9  – R: 10 – Repeat R: 8
Tie off C1
 

R: 11 – With C2, FLO, slst in each sc, turn (11 slst)

 
R: 12 – Tie off C2, Chgto C3, FLO, sc in the unworked loops of R: 11 (11 sc)


R: 13 – With C3, 1 sc in each st across, turn, ch1 (11 sc)
 
R: 14 – R: 15 – Repeat R: 13


R: 16 – Sctog The 1st 2 sc, 1 sc in the next 7 sc, sctog the last 2 sc,
Turn, ch1 (9 sc)
 
R: 17 – 1 sc in each sc, turn, ch 1 (9 sc)


R: 18 - Sctog The 1st 2 sc, 1 sc in the next 5 sc, sctog the last 2 sc,
Turn, ch1 (7 sc)

R: 19- Repeat R: 16 (7 sc)
 
R: 20- Sctog The 1st 2 sc, 1 sc in the next 3 sc, sctog the last 2 sc,
Turn, ch1 (5 sc)
 
R: 21 - Repeat R: 16 (5 sc)


R: 22 - Sctog The 1st 2 sc, 1 sc in the next sc, sctog the last 2 sc,
Turn, ch1 (3 sc)
 
R: 23 - Sctog The 1st 2 sc, 1 sc in the next sc, turn, ch 1 (2sc)
 
R: 24 - Sctog The 1st 2 sc, tie off weave in the ends.
 

Back of The Gnome –

R: 1 – With C1, Ch 12, sc in the 2nd ch from the hook,
 1 sc in each ch across, turn, ch 1 (11 sc)
 
R: 2 - 1 sc in each ch across, turn, ch 1 (11 sc)
 
R: 3 – R: 10 – Repeat R: 2
 
Repeat R: 11 – 22 - Front The Front Of The Gnome.


Assembly –

Place the Front and Back Together, Right sides out.
Join matching yarn to the right side of the gnome where the
Body and hat meet.
Sc evenly up to the point of the hat, and down the other side of the hat.
 
Chgto yarn color to match the body of the Gnome,
Sc evenly down the side and across the bottom of the gnome,
Leave side open for stuffing.


Stuff the Gnome,
And sc up the opening. Weave in the ends.
 
Nose
Opt - 1 - Attach a Wooden bead to the center front of the Gnome.

 Opt 2  With C4, Ch 3, 2 hdc in the 3rd ch from the hook,
Ch 1, join to the ch, tie off. Attach to the front of the gnome
With needle and yarn ends.


Make a small pompom and attach to the top of the hat.
 
Add a Christmas Button of choice.
 
Add The Thin Ribbon to the top for a hanger.


An Ad Free PDF file Is Available
In My Ravelry Shop At This LINK
for $3.50


Friday, September 19, 2014

Freebie Friday - Posh Pete The Elf Doll Crochet Pattern

Posh Pete The Elf Doll Crochet Pattern
By Sara Sach
Posh Pooch Designs
I designed this pattern a few years ago,
 I like the Elf on shelf
 idea, but I found the Elf to be a little creepy. 

I wanted to make an elf, that was cute, 
Sweet, fun and big enough to play with.

This Doll is  soft and lovable.
If you start him now, 
he just might be ready for Christmas.
I have tried to show all the steps with good pictures, 
But you will need to have a good imagination 
and a little orneriness to make his 
Christmas Magic come to life!
We have decided to Do Crochet A Long using This
 Elf Doll Crochet Pattern
We have retested, and updated this Crochet pattern.
And have added A Video For Each step.


Video 1 - Intro and Supplies List - 
See the Video on my 
Youtube Crochet Channel At This LINK


Post Pete, The Elf Doll Crochet Pattern
Please, add this pattern to your Favorites on Ravelry

Skill Level : Easy to Moderate - Lots of pieces to sew together

Materials:
Hook : F / 3.75 MM
Yarn Needle
Yarn :Worsted Weight  - I Love This Yarn 
( Green Sparkle, Red Sparkle White Sparkle, beige, black, Brown)
Fun fur - White
2 small snap on eyes, or 2 small buttons
Tape measure
Stuffing
Stitch markers

Stitches :
Chain  - ch
Single Crochet -sc
Single Crochet Decrease  -sc dec
Double Crochet - dc
Half Double Crochet  - hdc

Size: 18 inches

This Pattern is Written 4 Steps because it has a lot of pieces.

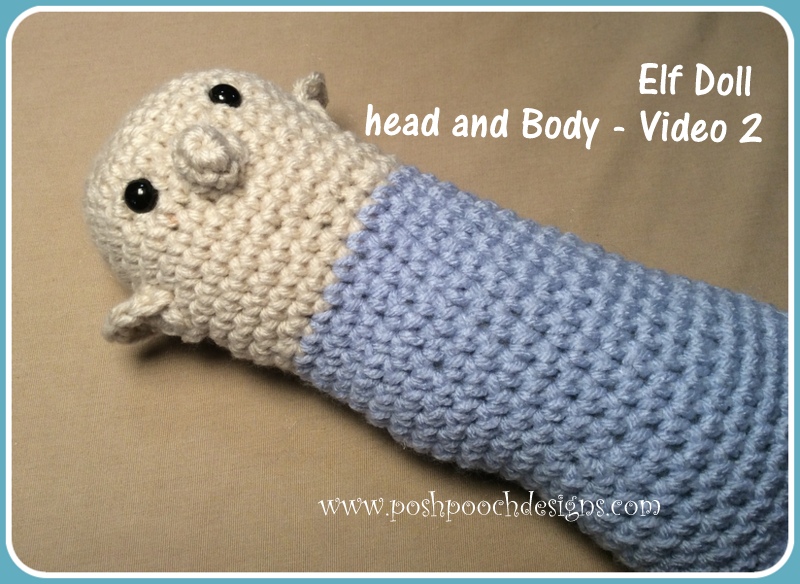
Step 1 : Head and Body -
We will be starting at the top of the head and work in rounds.
Video 2 - Click This LINK


R : 1 - With Beige yarn, ch 2, 6 sc in the 2nd ch from the hook, join.( 6 sc)
R : 2 - 2 sc in each sc, ( 12 sc)
R : 3 -  *1 sc in the 1st sc, 2 sc in the next sc, Repeat from * around, (18, sc)
R : 4 -  * 1 sc in the 1st 2 sc, 2 sc in the next sc, Repeat from * around, (24 sc)
R : 5 -  * 1 sc in the 1st 4 sc, 2 sc in the next sc, Repeat from * around, (28 sc)
R : 6 -  * 1 sc in the 1st 6sc, 2 sc in the next sc, Repeat from * around, (32 sc)
R : 7  - 1 sc in each sc, (32 sc)
R : 8-15  - Repeat R : 7 (32 sc)
R : 16 -  * 1 sc in the next 6 sc, 1 dc dec with the next 2 sts,
Repeat from around, (28 sc)
R : 17 - Repeat R: 16 , (25 sc)


R : 18 - Change to Green Sparkle yarn, 1 sc in each sc, (25 sc)
R : 19-40  - 1 sc in each sc, (25 sc )

The body needs to measure about 6 inches.


Tie off after R : 40, leaving a 25 inch tail,  Place the eyes in the head
if using the snap eyes, then stuff the head and body of the elf,
then fold flat and sew closed with the tail.

Ears: make 2
R : 1 - With beige yarn, ch 2, 6 sc in the 2nd ch from the hook.
join. ( 6 sc)
R : 2 - 1 sc in the 1st 3 sc,
1 hdc, 1dc, 1 hdc in the next sc,
1 sc in the last 2 sc, join and tie off,
leave a 10 inch tail for sewing on to the head.

Place each ear on the sides of the elf head and sew in place.

Nose:
R : 1 - With beige yarn, ch 2, 6 sc in the 2nd ch from the hook.
 join. ( 6 sc)
R :  1 sc in each sc, tie off, leaving a 10 in tail to sew on to head. 
Place nose in the center of the face and sew in place.


Step 2 : Legs and Arms
Video 3 - Click This LINK


Stuff lightly.
 For the bends in the knees and elbows you sew across with matching yarn.

Work legs and Arms in rounds


Legs: make 2, each leg should measure about 8 inches


R : 1 - With Black yarn, ch3, 6 sc in the 2nd ch from the hook, join, ( 6 sc)
R : 2 - 2 sc in each sc, (12 sc)
R : 3 - 1 sc in each sc, 12 sc
R : 4-8 -Repeat R : 3 (12 sc)
R : 9 - Change to Green Sparkle Yarn, 1 sc in each sc, ( 12 sc)
R : 10 - *1 sc in the 1st sc, 2 sc in the next sc, Repeat around, ( 18 sc)
R : 11 - 1 sc in each sc, ( 18 sc)
R : 12-24 - Repeat R : 11 ( 18 sc)

 Tie off after R: 22, leave a 12 inch tail for sewing leg closed.


Arm - Make 2, Each Arm should measure about 6 inches

 R : 1 - With Red Sparkle yarn, ch3, 6 sc in the 2nd ch from the hook, join, ( 6 sc)
R : 2 – 2 sc in each sc, (12 sc)
R : 3 – R: 4 - 1 sc in each sc, (12 sc)
R : 5 -1 sc in 1st 4 sc, ch 3, slst in the same sc, 1 sc in the next 8 sc,
          (ch 3 makes the thumb, 12 sc)
R:-8 - 1 sc in each sc, (12 sc)
R : 9 - Change to Green Sparkle Yarn, 1 sc in each sc, ( 12 sc)
R : 10 - 1 sc in each sc ( 12 sc)
R : 11- 19- Repeat R : 10 ( 12 sc)


Tie off after R: 19, leave a 12 inch tail for sewing arm closed.

Assembly
Line the arms up with the edge of the neck and sew them on each side.
Line the legs up at the bottom of the body of the Elf and sew them on.


Step 3 : Collar, Shirt Trim, Hat
Video 4 - Click This LINK

Collar -
R : 1 - With 1 strand of fun fur and 1 strand of White sparkle yarn, ch 32,
1 dc in the 2nd ch from the hook and in each ch across. ch 1 turn. ( 31 dc)
R : 2 - 1 dc in each dc ( 41 dc) tie off. Wrap collar around the neck of the elf,
sew the top corner together to look like a collar, tack collar to Elf, to keep it in place.

Shirt Trim -
R : 1 - With 1 strand of fun fur and 1 strand of White sparkle yarn, ch 32,
 1 dc in the 2nd ch from the hook and in each ch across. ch 1 turn. ( 31 dc)
R : 2 - 1 dc in each dc ( 41 dc) tie off. Wrap band  around the bottom edge
 of the shirt, where the legs are sewed on. Sew the back closed, then tack in place.


Step 4: Hat: will be stitched in rounds.

Video 5 - Click This LINK


R : 1 - ch 2, 5 sc in the 2nd ch from the hook, join in a circle w a sl st.( 5sc)
R : 2 - 2 sc in each sc, (10 sc)
R : 3 - 1 sc in each sc, ( 10 sc)
R : 4 - * 1 sc in the 1st sc, 2 sc in the next, Repeat From * around, ( 15 sc)
R : 5 - 1 sc in each sc, ( 15 sc)
R : 6 - * 1 sc in the 1st 2 sts, 2 sc in the next, Repeat From * around, ( 20 sc)
R : 7- 1 sc in each sc, ( 20 sc)
R : 8 - * 1 sc in the 1st 3 sc, 2 sc in the next, Repeat From * around (25 sc)
R : 9 - 1 sc in each sc, ( 25 sc)
R : 10 -  * 1 sc in the 1st 4 sc, 2 sc in the next, Repeat From * around (30 sc)
R : 11 - 1 sc in each sc, ( 30 sc)
R : 12 - * 1 sc in the 1st 5 sc, 2 sc in the next, Repeat From * around (35 sc)
R : 13 - 1 sc in each sc, ( 35 sc)
R : 14 -  * 1 sc in the 1st 6 sc, 2 sc in the next, Repeat From * around (40 sc)
R : 15 - 1 sc in each sc, ( 40 sc)
R : 16 -  * 1 sc in the 1st 7 sc, 2 sc in the next, Repeat From * around (45 sc)
R : 17 - 1 sc in each sc, ( 45 sc)
R : 18- Trim, Change to 1 strand of White and 1 strand of Fun fur,
 1dc in each sc around, join and tie off.

Pom pom: With only the fun fur, wrap the yarn around your 3 middle fingers,
 about 15 times. Cut a piece of white yarn about 10 inches long,
then slip it through the loops and tie securely.
Do not cut loops, fluff it out and attach to the top of the hat.

Gently stuff the hat, if you want it to stand up.


Hair: With Brown yarn, Wrap yarn around your 3 middle fingers 10 times, 
Cut a 12 in piece of yarn and slip through the loops and tie securely. 
Will look like a loose pompom, do not cut the loops. 
Attach the loops to the top of the Elf head with the ties,  
Them put them to the front like bangs.
Place the hat on top of the elf head and sew it on using white yarn.
Lastly with a piece of red yarn, embroider a smile on the face of the Elf.

Last year I made the Green Elf, and
 this year I made the Elf Red.
They are so fun to make. 
I am thinking of maybe one in Ice Blue  
would look cute.

An Ad Free PDF File is
 Now Availble in my
Ravelry For $3.50 At This LINK


To See How I made the Big Elf Behind 
the regular elfs,
Click This LINK
He is huge - 3 Feet Tall!

Thursday, August 28, 2014

Mini Elf Hat Crochet Pattern

Mini Elf  And Santa Hats
Crochet Pattern By
Sara Sach of Posh Pooch Designs

Are you ready for Christmas?
And Christmas Pictures?

Here is a little Elf Hat to get you started.
The Pattern can be An Elf or a Santa hat.
 They are the perfect size for ornaments,  
decorations or even silly photo props!

See The Video Tutorial on my Youtube Crochet
 Channel at this LINK


Mini Elf And Santa Hats Crochet Pattern
By Sara Sach
Please, hop over to Ravelry and add this pattern to your favorites.

Skill: Easy

Materials :
Crochet Hook - H / 5. MM
Yarn - Worsted Weight (4)  - Red Heart - Super saver (4)
            Spring green C1, Golden rod C2,  Red C3 - Elf
Stitch Marker
Yarn Needle

Stitches:
Chain ( ch)
Single crochet (sc)
Double Crochet (dc)
half Double crochet ( hdc)

Size: 5 X 4 inches

Note : The Top of the hat is worked in rounds.

R: 1 - With C1, Ch 2, 4 sc in the 2nd ch from the hook. 
Mark your rounds with a stitch marker. (4sc)

R: 2 - *1 sc in the next st, 2 sc in the next st*, repeat 1 time,
(6sc)
 .
R: 3 - 1 sc in the next st, *2 sc in the next, 1 sc in the next 2 sts*
Repeat * to *1 time, 1 sc in the last sc. (8sc)

R: 4 - *1 sc in the next 3 sts, 2 sc in the st*, repeat from * to * around (10sc)

R: 5 - *1 sc in the next 2 sts, 2 sc in the next st*, repeat from * to * around, 1 sc in the last sc,
(13sc)

R: 6 - *1 sc in next 3 sts, 2 sc in next st*, repeat from * to * around, 1 sc in the last sc, (16sc)

R: 7 - *1 sc in next 3 sts, 2 sc in next st*, repeat from * to * around (20sc)

R : 8 - *1 sc in the next 4 sts, 2 sc in the next st*, repeat from * to * around
(24sc)

R: 9 - *1 sc in the next 5 sts, 2 sc in the next st*, repeat from * to * around
(28)

R: 10 - R 13 -1 sc in each sc around, slst in the next sc,  (28sc)
For Santa Hat - Repeat For 3 more Rounds

R: 14  - change to C2, ch 2, leave C1 attached,
1 hdc in each sc around, join to 1st hdc with a sl st, ch 2 (28hdc)

R: 15 - 1 hdc in each hdc around, join to 1st hdc with a sl st, ch 1 (28hdc)
For Santa Hat tie off, Weave your ends.

R: 16 - Change  to C1, tie off C2, 1 sc in each hdc, join, ch 1(28sc)

R: 17- 1 sc in each sc, join, ch 1(28sc)

R: 18 - 1 sc in each sc, join, tie off, weave in ends.(28sc)

Leaf - With C4. ch 7, 1 sc in the 2nd and 3rd ch, 1 hdc in the next 2 chs, 
1 sc in the next 2 chs, 
WORKING DOWN THE OPPOSITE SIDE OF THE CH, 
1 sc in the 1st 2 chs, 1 hdc in the next 2 chs, 1 sc in the next 2 chs,
 join to the 1st sc, tie off leaving a 10 inch yarn tail.

Place Leaf on the hat at the band line, and sew in place.
Santa Hat - 

Little loopy Pompom -
Cut a 12 in piece of yarn, lay it out. Wrap yarn around your 2 fingers about 18 to 10 times, cut and lay on the yarn laid out. Tie securely, no not cut loops. Attach to the top of the hat.

An Ad Free PDF File is Available
 in my Ravelry shop At This LINK
 For $2.50


I think this hat would 
look great in Purple and silver, 
with a pink leaf!

What color combination do you like?


They are perfect for gift tags, place markers,

Gift card holders, doll hats,
 Stuffie hats or  even for our pets!

Maximo is ready for 
his Christmas Pictures.


Make an Elf Hat for you to match your pooch!
Elf Hat Crochet Pattern
Early Merry Christmas!